×
- Hello
- Login or Register
- Quick Links
- Live Chat
- Track Order
- Parts Availability
- RMA
- Help Center
- Contact Us
- Shop for
- Mazda Parts
My Garage
My Account
Cart
Genuine Mazda 323 Engine Mount
Engine Motor Mount- Select Vehicle by Model
- Select Vehicle by VIN
Select Vehicle by Model
orMake
Model
Year
Select Vehicle by VIN
For the most accurate results, select vehicle by your VIN (Vehicle Identification Number).
16 Engine Mounts found

Mazda 323 Mount Part Number: B455-39-050B
$64.00 MSRP: $85.36You Save: $21.36 (26%)Ships in 1-2 Business Days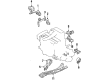
Mazda 323 Mount Part Number: B092-39-050
$67.04 MSRP: $89.40You Save: $22.36 (26%)Ships in 1-2 Business Days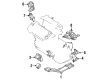
Mazda 323 Mount Part Number: BR70-39-060B
$74.44 MSRP: $99.27You Save: $24.83 (26%)Ships in 1-2 Business DaysMazda 323 Mount Part Number: BR74-39-040
$78.50 MSRP: $104.68You Save: $26.18 (26%)Ships in 1-2 Business DaysMazda 323 Mount Part Number: B210-39-050
$81.61 MSRP: $108.83You Save: $27.22 (26%)Ships in 1-2 Business Days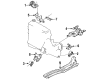
Mazda 323 Mount Part Number: B456-39-040C
$84.78 MSRP: $113.06You Save: $28.28 (26%)Ships in 1-2 Business DaysMazda 323 Front Mount Bracket Part Number: BR75-39-020A
Mazda 323 Mount Insulator Part Number: BK49-39-060A
Mazda 323 Mount Part Number: B599-39-100A
Mazda 323 Bracket Part Number: B596-39-100B
Mazda 323 Front Mount Bracket Part Number: B456-39-020A
Mazda 323 Mount Part Number: B252-39-060B
Mazda 323 Mount Part Number: B210-39-070C
Mazda 323 Mount Part Number: B182-39-060A
Mazda 323 Mount Part Number: B180-39-050
Mazda 323 Mount Part Number: B092-39-040A
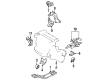
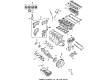
Mazda 323 Engine Mount
The fundamental role of the Mazda 323 Engine Mount is to secure the engine tightly attached to it and absorb shocks, making the small car ride better and more securely. An Engine Mount has two metal brackets with a rubber insulator between them, and the engine and transaxle are attached to the subframe, isolating buzz that would otherwise travel to the cabin. The older models applied a plain rubber block, but in later 323 models the designs were fluid-filled hydraulic units referred to as hydromounts that absorb smaller vibrations whilst the drivetrain is not rocked by load. The highly advanced units installed on some Mazda models also included electronically managed active chambers that remain soft at idle but tighten as the revs increase, combining comfort and accurate component alignment. However, all versions have the same mission; no matter which one is applied, the engine must not drift off its design centerline, which would put stress on the hoses, axles or exhaust components. Old age, heat and oil exposure may result in rubber sagging or splitting, and the loss of damping fluid in a leaking hydromount becomes evident on bumps during acceleration or braking. If odd sounds occur, owners can observe cracks visually and then pull the powertrain upward gently to identify the presence of unwanted gaps, but in the active ones a scan tool or a simple handheld vacuum pump may be required to confirm functionality. Maintaining every Mazda Engine Mount in great health ensures throttle response and cabin quietness, which is why it fits every Mazda with an Engine Mount that is specifically designed to suit its lightweight chassis.
Looking for Engine Mount with proven quality? Choose OEM Engine Mount. Mazda designs and builds them to strict factory specs. Every piece goes through rigorous quality checks. You'll get parts that fit right and work like new. Shop our huge inventory of OEM Mazda 323 parts. Enjoy the highly competitive prices online. Our site is your one-stop shop. Each genuine 323 part includes a manufacturer's warranty. Buy with confidence. Our return policy is simple and hassle-free. In a rush? Choose expedited delivery at checkout. You'll love the streamlined experience from search to checkout to receiving your order.
Mazda 323 Engine Mount Parts and Q&A
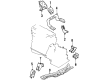
- Q: How should engine mounts be checked and replaced to prevent damage to the drive line components on Mazda 323?A:Engine mounts rarely need attention, although damaged or worn mounts must be used and replaced as soon as possible to ensure that the drive line parts are not damaged or worn. In order to verify the mounts, one needs to lift the engine a little bit to take the weight off the mounts. First of all, lift the vehicle and place it firmly on jackstands, after which place a jack under the engine Oil Pan with a block of wood or an engine support fixture on top. Gradually lift the engine to deform the weight off the mounts, and examine them, as well, at the same time, to discover any cracks, hardened rubber or separation between the rubber and the metal part, and that the rubber will sometimes tear along the center. Test the relative movement between the mounts and the frame with a large screwdriver or prybar; in case relative movement is found, then lower the engine and tighten the mount fasteners. In order to keep the mounts in good condition, rub the mounts with rubber preservative liquid which is found in the automotive parts shops. To replace, disconnect the negative battery connector, lift the car and place it safely on jackstands and have the engine supported. Install new transaxle/engine mounts by loosening the engine mount nuts at the bottom of the engine mount cross member, unscrewing the through bolts / nuts to break the rubber mount to the mount bracket, and loosening the cross member mounting bolts. Install the transaxle/ engine mounts by fitting the mount brackets to the transaxle and fitting the mount through-bolts, washers and nuts and then reinstalling the cross member with all the bolts and nuts tightened to the required torque. In the case of engine mount No. 3, which is on the right hand side, adjacent to the engine timing belt cover, remove the through-bolt nut and washer, detach the dynamic damper block, and remove engine mount bracket nuts. Install the right side engine mount using the frame mount bracket, through-bolt, and new washer and nut, and then install the dynamic damper, and tighten all the bolts and nuts accordingly. In the case of engine mount No. 4, which is on the left side of the engine compartment, almost in the area of the battery tray, loosen the battery and battery tray, and loosen the engine mount bracket bolts/nuts, engine mount bolts/nuts at the vehicle body bracket then loosen the engine mount. Install the left side engine mount by ensuring that the mount bracket is clamped to the vehicle frame, new washers are replaced and tightening the left side engine mount bracket-to-vehicle body bolts in a few steps with a criss-cross pattern to even the torque.
Related Mazda 323 Parts
 Mazda 323 Timing Belt
 Mazda 323 Oil Pump
 Mazda 323 Belt Tensioner
 Mazda 323 Cam Gear
 Mazda 323 Camshaft
 Mazda 323 Crankshaft Gear
 Mazda 323 Crankshaft Pulley
 Mazda 323 Crankshaft Seal
 Mazda 323 Crankshaft Timing Gear
 Mazda 323 Oil Pan
 Mazda 323 Rod Bearing
 Mazda 323 Timing Belt Tensioner
Browse by Year
1994 Engine Mount
1993 Engine Mount
1992 Engine Mount
1991 Engine Mount
1990 Engine Mount
1989 Engine Mount 1988 Engine Mount 1987 Engine Mount 1986 Engine Mount