×
- Hello
- Login or Register
- Quick Links
- Live Chat
- Track Order
- Parts Availability
- RMA
- Help Center
- Contact Us
- Shop for
- Mazda Parts
My Garage
My Account
Cart
Genuine Mazda 6 Crankshaft Position Sensor
Engine Crankshaft Position Sensor- Select Vehicle by Model
- Select Vehicle by VIN
Select Vehicle by Model
orMake
Model
Year
Select Vehicle by VIN
For the most accurate results, select vehicle by your VIN (Vehicle Identification Number).
6 Crankshaft Position Sensors found


Mazda 6 Crankshaft Position Sensor Part Number: PE01-18-221
$66.09 MSRP: $88.13You Save: $22.04 (26%)Ships in 1-2 Business Days
Mazda 6 Crankshaft Position Sensor Part Number: L3G2-18-221
$66.98 MSRP: $89.32You Save: $22.34 (26%)Ships in 1-2 Business Days
Mazda 6 Crankshaft Position Sensor Part Number: ZZC0-18-230
$45.28 MSRP: $60.38You Save: $15.10 (26%)

Mazda 6 Crankshaft Position Sensor Part Number: CAY1-18-221
$52.15 MSRP: $69.56You Save: $17.41 (26%)Ships in 1-2 Business Days
Mazda 6 Crankshaft Position Sensor Part Number: L3K9-18-221A
$82.56 MSRP: $110.10You Save: $27.54 (26%)Ships in 1-2 Business Days
Mazda 6 Crankshaft Position Sensor Part Number: GY07-18-221A
$27.64 MSRP: $36.85You Save: $9.21 (25%)Ships in 1-2 Business Days
Mazda 6 Crankshaft Position Sensor
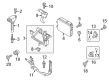
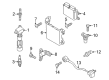
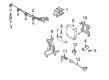
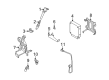
The Mazda 6 Crankshaft Position Sensor is the timekeeper of the engine that continuously reports the crankshaft angle and speed to ensure that the control computer triggers the spark to the engine and releases the appropriate amount of fuel at the right time. The sensor is mounted by the crank pulley or flywheel, or even the crankshaft itself, and measures a toothed wheel and translates each passing edge into an electrical pulse that is sent to the powertrain control module, which refines ignition advance, fuel injection timing and start-up synchronization. The pulses may cease due to heat, vibration or corrosion, which results in the loss of rhythm by the module, so the motor becomes difficult to start, misfires, stumbles on acceleration or stops suddenly when hot. There are three main sensing styles that have been manifested across Mazda production years. Inductive sensors create their signal each time a metallic tooth passes over them and therefore are a simple yet rugged choice, but they cannot sense any stationary crank. Primarily found in Hall effect and magnetoresistive sensors are additional built-in electronics that respond to magnetic fields even when stationary, providing smoother idle operation and consistent hot starts on new Mazda models. Optical units, which are not frequently applied but are highly accurate, pass light through a slotted disc to identify sharp edges, but dirt contamination may distort their readings. Later 6 sedan drivers usually enjoy the faster Hall technology, whereas older Mazda editions usually bear inductive units. Whether it is healthy or not, Crankshaft Position Sensor ensures that the four-cylinder or V6 engine continues to run smoothly, and the replacement of an unhealthy Crankshaft Position Sensor will put the engine back to running smoothly within seconds.
Looking for Crankshaft Position Sensor with proven quality? Choose OEM Crankshaft Position Sensor. Mazda designs and builds them to strict factory specs. Every piece goes through rigorous quality checks. You'll get parts that fit right and work like new. Shop our huge inventory of OEM Mazda 6 parts. Enjoy the highly competitive prices online. Our site is your one-stop shop. Each genuine 6 part includes a manufacturer's warranty. Buy with confidence. Our return policy is simple and hassle-free. In a rush? Choose expedited delivery at checkout. You'll love the streamlined experience from search to checkout to receiving your order.
Mazda 6 Crankshaft Position Sensor Parts and Q&A
- Q: What actions should you take if replacing the Crankshaft Position Sensor triggers a Diagnostic Trouble Code (DTC) on Mazda 6?A:Some models may program a Diagnostic Trouble Code (DTC) on changing the CKP sensor. In case it does, and you have a generic scan tool that is able to clear codes, erase the code and run a check to see whether it has vanished or is still present. In case it does, one should use a dealer service department to carry out a Misfire Monitor Neutral Profile Correction on the factory scan tool. Start with the disconnection of the cable to the negative battery terminal. On models other than 3.7L V6, loosen the front right lug nuts and then jack up the front of the car and secure it on jackstands. Take off the right front wheel and the access panel on the lower part of the fender beneath the bigger splash cover. In case of 3.7L V6, raise front of the car and place it safely at jackstands and remove engine under cover. The CKP sensor is fitted on the back of the timing chain cover at the lower rear part just behind the crankshaft pulley. Install the No.1 cylinder in Top Dead Center (TDC). Unscrew the CKP sensor mounting bolts, disconnect the electrical connector, to the CKP sensor and remove the sensor. When fitting a new CKP sensor, then it includes an alignment jig that is unique to the sensor but an aftermarket one may be sufficient. In case the CKP sensor had to be removed to get to another component, apply the other method of aligning the CKP sensor. Attach a 6 mm 18 mm bolt in the threaded hole that is in the crankshaft pulley and screw into the timing chain cover. Install CKP sensor and leave the sensor mounting bolts loose. In case of new installation of a CKP sensor, follow as follows: place it with the special alignment jig as per the instructions provided by the manufacturer, screw the CKP sensor bolts firmly and then take away the alignment jig. When replacing the old CKP sensor, note the sensor trigger wheel or timing plate attached on the back of the crankshaft pulley with the blank spot on that side of the timing plate. Then number five teeth in an anti-clockwise direction of this blanked area followed by a straight line, passing through the middle of the crankshaft pulley. Install CKP sensor: Line made, center of the CKP sensor is then mounted in position by tightening of sensor bolts. Unscrew the Crankshaft pulley bolt which was previously fixed, take off the special timing tool and fit in the cylinder block plug. Removal is otherwise the opposite of the installation. In V6 models that have a 3.0L engine, unscrew the CKP sensor mounting bolt, and detach the electrical connector of the CKP sensor. Check sensor O-ring and change it in case it is cut, torn, or worn. Wipe sensor O-ring with clean engine oil. On the engine block, the CKP sensor is positioned on the left front side of the engine block just next to the transaxle; in the case of the 3.7L engine. Take out the upstream and downstream Oxygen Sensor of the catalyst converter of the front head, then take out the catalyst of the front head. Take out the mounting nut and the heat shield of CKP sensor. Take off the rubber grommet cover, fully loosen the CKP sensor mounting bolt, and take off the sensor and bolt as one, bearing in mind that the sensor mounting bolt and sensor are a single piece. Unplug electrical connector of CKP sensor on sensor, and plug electrical connector of CKP sensor on sensor, and fit sensor. Removal is otherwise the opposite of the installation.

Related Mazda 6 Parts
 Mazda 6 Oxygen Sensor
 Mazda 6 Camshaft Position Sensor
 Mazda 6 Coolant Temperature Sensor
 Mazda 6 Mass Air Flow Sensor
 Mazda 6 Speedometer
 Mazda 6 Throttle Position Sensor
 Mazda 6 Spark Plug
 Mazda 6 Engine Control Module
 Mazda 6 Fuel Pump Strainer
 Mazda 6 Fuel Sending Unit
 Mazda 6 MAP Sensor
 Mazda 6 Vehicle Speed Sensor
Browse by Year
2021 Crankshaft Position Sensor 2020 Crankshaft Position Sensor 2019 Crankshaft Position Sensor 2018 Crankshaft Position Sensor 2017 Crankshaft Position Sensor 2016 Crankshaft Position Sensor 2015 Crankshaft Position Sensor 2014 Crankshaft Position Sensor 2013 Crankshaft Position Sensor 2012 Crankshaft Position Sensor 2011 Crankshaft Position Sensor 2010 Crankshaft Position Sensor 2009 Crankshaft Position Sensor 2008 Crankshaft Position Sensor 2007 Crankshaft Position Sensor 2006 Crankshaft Position Sensor 2005 Crankshaft Position Sensor 2004 Crankshaft Position Sensor 2003 Crankshaft Position Sensor