×
- Hello
- Login or Register
- Quick Links
- Live Chat
- Track Order
- Parts Availability
- RMA
- Help Center
- Contact Us
- Shop for
- Mazda Parts
My Garage
My Account
Cart
Genuine Mazda 6 Liftgates
- Select Vehicle by Model
- Select Vehicle by VIN
Select Vehicle by Model
orMake
Model
Year
Select Vehicle by VIN
For the most accurate results, select vehicle by your VIN (Vehicle Identification Number).
3 Liftgates found

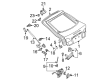
Mazda 6 Lift Gate Part Number: GM9B-62-020A
$935.23 MSRP: $1277.89You Save: $342.66 (27%)Ships in 1-2 Business Days
Mazda 6 Lift Gate Part Number: GM9F-62-020D
Mazda 6 Lift Gate Part Number: GM9E-62-020D
Mazda 6 Liftgates
Looking for Liftgates with proven quality? Choose OEM Liftgates. Mazda designs and builds them to strict factory specs. Every piece goes through rigorous quality checks. You'll get parts that fit right and work like new. Shop our huge inventory of OEM Mazda 6 parts. Enjoy the highly competitive prices online. Our site is your one-stop shop. Each genuine 6 part includes a manufacturer's warranty. Buy with confidence. Our return policy is simple and hassle-free. In a rush? Choose expedited delivery at checkout. You'll love the streamlined experience from search to checkout to receiving your order.
Mazda 6 Liftgates Parts and Q&A
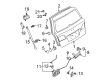
- Q: How can liftgates be removed and installed safely and effectively on Mazda 6?A:The liftgate is heavy and somewhat awkward to remove and install, so at least two people should perform this procedure. Begin by disconnecting the cable from the negative battery terminal. Open the liftgate fully and support it. Carefully pry out the liftgate trim panels using a trim tool. Press the harness connector for the liftgate in and down to free it, then disconnect the harness connector, ground wire, and rear window defogger connector, removing the rubber grommet from the liftgate. Mark around the door hinges with a pen or scribe to facilitate realignment during reassembly. With an assistant holding the door, pry off the support struts stay bands and pull the support strut(s) from the ball stud at each end. Remove the hinge-to-liftgate bolts and lift off the door, drawing a reference line around the hinges before removing the bolts. Installation is the reverse of removal. Proper liftgate-to-body alignment is critical for a well-functioning door assembly; check the liftgate hinge pins for excessive play. Fully open the liftgate and lift up and down on the door without lifting the body. If there is 1/16-inch or more excessive play, the hinges should be replaced. Adjustments for liftgate-to-body alignment are made by loosening the hinge-to-body or hinge-to-door bolts and moving the door until the top is parallel with the roof section, the sides are flush with the rear quarter panels, and the bottom aligns with the lower door sill. If these goals can't be reached through adjustments, body alignment shims may need to be purchased and inserted behind the hinges. To adjust the door-closed position, mark around the striker plate for reference and check that the door latch contacts the center of the latch striker; adjust the up and down position first if necessary. Finally, adjust the latch striker sideways to ensure the door panel is flush with the rear quarter panel and provides positive engagement with the latch mechanism.

Related Mazda 6 Parts
 Mazda 6 Door Latch Assembly
 Mazda 6 Door Lock
 Mazda 6 Door Hinge
 Mazda 6 Door Screws
 Mazda 6 Lift Support
 Mazda 6 Liftgate Hinge
 Mazda 6 Liftgate Lift Support
 Mazda 6 Liftgate Lock Actuator
 Mazda 6 Tailgate Handle
 Mazda 6 Tailgate Lock
 Mazda 6 Trunk Lid Latch
 Mazda 6 Weather Strip