×
- Hello
- Login or Register
- Quick Links
- Live Chat
- Track Order
- Parts Availability
- RMA
- Help Center
- Contact Us
- Shop for
- Mazda Parts
My Garage
My Account
Cart
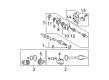
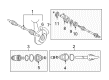
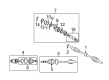
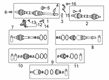
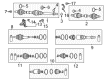
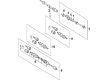
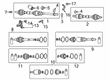
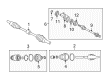
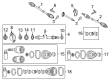
Genuine Mazda 6 CV Joint Boot
Constant-Velocity Joint Boot- Select Vehicle by Model
- Select Vehicle by VIN
Select Vehicle by Model
orMake
Model
Year
Select Vehicle by VIN
For the most accurate results, select vehicle by your VIN (Vehicle Identification Number).
23 CV Joint Boots found

Mazda 6 Inner Boot Part Number: GD42-22-540
$31.99 MSRP: $42.65You Save: $10.66 (25%)Ships in 1-2 Business Days
Mazda 6 Outer Boot Part Number: GP04-22-530A
$34.54 MSRP: $46.06You Save: $11.52 (26%)Ships in 1-2 Business DaysMazda 6 Outer Boot Part Number: GD42-22-530A
$34.78 MSRP: $46.38You Save: $11.60 (26%)Ships in 1-2 Business Days
Mazda 6 Outer Boot Part Number: GP02-22-530A
$36.54 MSRP: $48.72You Save: $12.18 (25%)Ships in 1-2 Business Days
Mazda 6 Inner Boot Part Number: GP02-22-540
$36.56 MSRP: $48.76You Save: $12.20 (26%)Ships in 1-2 Business Days
Mazda 6 Outer Boot Part Number: GP40-22-530
$137.33 MSRP: $183.13You Save: $45.80 (26%)Ships in 1-2 Business Days
Mazda 6 Inner Boot Part Number: GTC1-22-540
$59.78 MSRP: $79.72You Save: $19.94 (26%)Ships in 1-2 Business DaysMazda 6 Inner CV Joint Boot Part Number: FTC8-22-540
$62.58 MSRP: $83.45You Save: $20.87 (26%)Ships in 1-2 Business Days
Mazda 6 Outer Boot Part Number: GDB6-22-530
$69.83 MSRP: $93.11You Save: $23.28 (25%)Ships in 1-2 Business Days
Mazda 6 Inner Boot Part Number: GP40-22-540
$73.64 MSRP: $98.20You Save: $24.56 (26%)Ships in 1-2 Business Days
Mazda 6 Inner Boot Part Number: GDB6-22-540
$77.09 MSRP: $102.81You Save: $25.72 (26%)Ships in 1-2 Business Days
Mazda 6 Outer CV Joint Boot Part Number: FTC8-22-530
$77.71 MSRP: $103.63You Save: $25.92 (26%)Ships in 1-2 Business Days
Mazda 6 Outer Boot Part Number: GD55-22-530A
$74.89 MSRP: $99.87You Save: $24.98 (26%)Ships in 1-2 Business Days
Mazda 6 Inner CV Joint Boot Part Number: FTH3-22-540
$98.89 MSRP: $131.87You Save: $32.98 (26%)Ships in 1-2 Business Days
Mazda 6 Outer Boot Part Number: GD81-22-530
$103.64 MSRP: $138.21You Save: $34.57 (26%)Ships in 1-2 Business DaysMazda 6 Outer Boot Part Number: GP37-22-530
$110.79 MSRP: $147.74You Save: $36.95 (26%)Ships in 1-2 Business Days
Mazda 6 Outer CV Joint Boot Part Number: FTH3-22-530
$125.55 MSRP: $167.43You Save: $41.88 (26%)Ships in 1-2 Business Days
Mazda 6 Outer Boot Part Number: GG62-22-530
$129.50 MSRP: $172.70You Save: $43.20 (26%)Ships in 1-2 Business Days
Mazda 6 Inner Boot Part Number: GG62-22-540
$152.00 MSRP: $202.71You Save: $50.71 (26%)Ships in 1-2 Business Days
Mazda 6 Inner Boot Part Number: GD55-22-540
| Page 1 of 2 |Next >
1-20 of 23 Results
Mazda 6 CV Joint Boot
Looking for CV Joint Boot with proven quality? Choose OEM CV Joint Boot. Mazda designs and builds them to strict factory specs. Every piece goes through rigorous quality checks. You'll get parts that fit right and work like new. Shop our huge inventory of OEM Mazda 6 parts. Enjoy the highly competitive prices online. Our site is your one-stop shop. Each genuine 6 part includes a manufacturer's warranty. Buy with confidence. Our return policy is simple and hassle-free. In a rush? Choose expedited delivery at checkout. You'll love the streamlined experience from search to checkout to receiving your order.
Mazda 6 CV Joint Boot Parts and Q&A
- Q: What factors should you consider when the CV Joint Boot is worn and needs replacement on Mazda 6?A:If the CV joints are worn, indicating the need for an overhaul, explore all options before beginning the job, as complete rebuilt CV joints are available on an exchange basis, which eliminates much time and work. Some auto parts stores carry split type replacement boots that can be installed without removing the CV joint from the vehicle, providing a convenient alternative; however, the CV joint should be removed, and the joint disassembled and cleaned to ensure it is free from contaminants such as moisture and dirt that can accelerate wear. Models equipped with ABS have sensor rings on the outer CV joints, which should be inspected for chipped or missing teeth, replacing the sensor ring if necessary. Begin by removing the CV joint and mounting it in a vise lined with wood or rags to prevent damage. Remove the boot clamps, pull the boot back from the inner CV joint, and slide the joint housing off, marking the relationship of the tripod to the outer race. Mark the tripod and axleshaft for proper reassembly, then spread the ends of the stop-ring apart, slide it towards the center of the shaft, and remove the retainer clip from the end of the axleshaft. Use a hammer and brass punch to drive the tripod joint from the CV joint, then remove and discard the stop-ring from the axleshaft. Clean the old grease from the outer race and tripod bearing assembly, carefully disassembling each section of the tripod assembly to avoid mixing up parts, and clean the needle bearings with solvent. Inspect the rollers, tripod, bearings, and outer race for scoring, pitting, or other signs of abnormal wear that warrant replacement of the inner CV joint. For reassembly, slide the clamps and boot onto the axleshaft, wrapping the splines with tape to prevent boot damage. Install a new stop-ring on the axleshaft without seating it in its groove, position the tripod on the shaft aligning the marks, and install a new bearing retainer clip. Slide the tripod against the retainer clip and seat the stop-ring in its groove, then apply CV joint grease to the tripod assembly, inside of the joint housing, and inside of the boot before sliding the boot into place. Position the CV joint mid-way through its travel, equalize the pressure in the boot, and tighten the boot clamps before installing the CV joint assembly. For the outer CV joint, remove the boot clamps, strike the edge of the CV joint housing with a soft-face hammer to dislodge the outer CV joint from the axleshaft, and remove and discard the bearing retainer clip. Slide the outer CV joint boot off the axleshaft, thoroughly clean all components with solvent until the old CV grease is removed, and inspect the bearing surfaces for cracks, pitting, scoring, and other signs of wear, replacing the entire CV joint assembly if any part of the outer CV joint is worn. For reassembly, slide a new sealing boot clamp and sealing boot onto the axleshaft, place a new bearing retainer clip onto the axleshaft, and place half the grease from the sealing boot kit into the outer CV joint assembly housing, putting the remaining grease into the sealing boot. Align the splines on the axleshaft with those on the outer CV joint assembly and gently drive the CV joint onto the axleshaft until seated, position the CV joint boot over the joint housing, equalize the pressure in the boot, tighten the boot clamps, and install the CV joint.
- Q: How to inspect the CV Joint Boot and check the steering and suspension components on Mazda 6?A:To test the shock absorbers, one should park the car on flat surfaces, shut down the engine and place a parking reserve, and tyre pressures should be checked. Stomp on one end in the vehicle and loosen it and watch what happens with the body; it should halt in one or two bounces. In case it is still in motion or fails to resume its initial position, then there could be a worn or poor shock absorber. Check at these other corners again. Lift the car and place it on jackstands and check the shock absorbers to ensure there is no leakage of fluid, but a light coating is not a problem and an excessive amount of fluid must also make the shocks have to be replaced as a set. Make sure the shocks have been completely mounted and are not damaged, inspecting them in all places, and also inspecting the upper mounts, which also require replacement as a set in the event of damage and wear. With regards to the steering and suspension, inspect the tires on irregular wear and proper air inflation, look at the universal joint and steering gear housing as to leakage of lubricants and make sure that dust boots are present. Check tie-rod ends of excessive play and examine loose bolts or damaged parts. As an assistant turns the steering wheel, check on the steering parts to ensure that they move freely. To test balljoints, pry the control arms in an up and down motion to determine whether there is any play and in that case, the balljoints should be replaced. Check balljoint boots to be of good shape and look at the back of the boots to ensure the bushings of the suspension arms are not worn out. Finally, examine the CV Joint Boots for tears, cracks, and loose clamps, bending them with the hand to determine the existence of the cracks or grease leaks, since the signs of any damages prove that they need to be replaced to ensure that the constant velocity joints will not be exposed to dirt and moisture.


Related Mazda 6 Parts
 Mazda 6 Control Arm Bushing
 Mazda 6 Crankshaft Seal
 Mazda 6 Harmonic Balancer
 Mazda 6 Battery Trays
 Mazda 6 Camber and Alignment Kit
 Mazda 6 Differential Bearing
 Mazda 6 Door Check
 Mazda 6 Door Lock Cylinder
 Mazda 6 Engine Control Module
 Mazda 6 Light Control Module
 Mazda 6 Piston
 Mazda 6 Trunk Lid Latch
Browse by Year
2021 CV Joint Boot 2020 CV Joint Boot 2019 CV Joint Boot 2018 CV Joint Boot 2017 CV Joint Boot 2016 CV Joint Boot 2015 CV Joint Boot 2014 CV Joint Boot 2013 CV Joint Boot 2012 CV Joint Boot 2011 CV Joint Boot 2010 CV Joint Boot 2009 CV Joint Boot 2008 CV Joint Boot 2007 CV Joint Boot 2006 CV Joint Boot 2005 CV Joint Boot 2004 CV Joint Boot 2003 CV Joint Boot