×
- Hello
- Login or Register
- Quick Links
- Live Chat
- Track Order
- Parts Availability
- RMA
- Help Center
- Contact Us
- Shop for
- Mazda Parts
My Garage
My Account
Cart
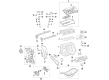
Genuine Mazda 6 Piston
Engine Pistons- Select Vehicle by Model
- Select Vehicle by VIN
Select Vehicle by Model
orMake
Model
Year
Select Vehicle by VIN
For the most accurate results, select vehicle by your VIN (Vehicle Identification Number).
7 Pistons found

Mazda 6 Piston Part Number: PYY3-11-SA0
$69.44 MSRP: $92.60You Save: $23.16 (26%)Ships in 1-2 Business Days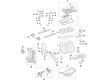
Mazda 6 Piston Part Number: PYY5-11-SA0
$84.85 MSRP: $113.16You Save: $28.31 (26%)Ships in 1-2 Business Days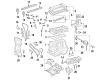
Mazda 6 Piston Part Number: L3Y0-11-SA0
$111.89 MSRP: $149.21You Save: $37.32 (26%)Ships in 1-2 Business Days
Mazda 6 Piston Part Number: L5Y3-11-SA0
$146.20 MSRP: $194.97You Save: $48.77 (26%)Ships in 1-2 Business Days
Mazda 6 Piston Part Number: L33L-11-210A
$152.51 MSRP: $203.40You Save: $50.89 (26%)Ships in 1-2 Business Days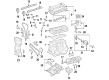
Mazda 6 Piston Part Number: L3Y9-11-010
$184.91 MSRP: $246.60You Save: $61.69 (26%)Ships in 1-2 Business Days
Mazda 6 Piston Part Number: PYY1-11-SA0
Mazda 6 Piston
Looking for Piston with proven quality? Choose OEM Piston. Mazda designs and builds them to strict factory specs. Every piece goes through rigorous quality checks. You'll get parts that fit right and work like new. Shop our huge inventory of OEM Mazda 6 parts. Enjoy the highly competitive prices online. Our site is your one-stop shop. Each genuine 6 part includes a manufacturer's warranty. Buy with confidence. Our return policy is simple and hassle-free. In a rush? Choose expedited delivery at checkout. You'll love the streamlined experience from search to checkout to receiving your order.
Mazda 6 Piston Parts and Q&A
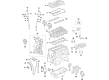
- Q: What steps must be taken before removing the piston and connecting rod assemblies on Mazda 6?A:Before the removal of the piston and connecting rod assemblies the cylinder head and oil pan are to be removed. Unscrew the connecting rod cap bolts 1/2 turn at a time until they can easily be removed, but the old ones must be retained in order to measure the connecting rod bearing clearance with oil, as new ones must be bought in case of assembly failure. Take off the number one bearing insert and cap on the connecting rod without dropping the bearing insert. Insert the connecting rod/piston assembly out through the top of the engine with the help of a wooden or plastic hammer handle, being careful not to encounter any form of resistance and being assured that all the ridges are cleared out of the cylinder. When the other cylinders are repeated, must repair the connecting rod caps and bearing inserts in their respective rods, and refit the cap bolts with a finger tight screw to stop any accidental injury. The connecting rods and pistons are now ready to be inspected and overhauled. Check the end gaps before the installation of the new piston rings to ensure that the clearance on the piston ring side is precise. Assemble all the piston/ connecting rod assemblies and new ring sets to match during assembly. Fit the top ring into the first cylinder and square it against the cylinder walls and gauge the end gap with feeler gauges and make sure the gap does not exceed the stipulated limits. When the gap is very small, the ring ends may be carefully filed to make it larger and more than 0.040 inch is only critical. Do the same to the rings, making sure that rings, pistons and cylinders are matched. After verifying and rectifying the end gaps, fit the rings on the pistons, the oil control ring followed by the middle and the top rings with ensure that it is put in correct position and also taking care to prevent damages. It is important to clean the sides of the cylinder wall, chamfer the upper end of each cylinder bore, and make sure that the Crankshaft is attached before fitting the piston/connecting rod assemblies. Take off the cap of the number one connecting rod, clean the bearing surfaces and fit the new upper bearing insert taking care to fit in place without lubrication. Clean and install the other bearing insert in the rod cap keeping clean. Make the gaps in the piston rings at 90-degree intervals, lubricate the piston and rings and fit a piston ring compressor which directs the piston into the cylinder. oil clearance Check the connecting rod bearing, use Plastigage, and specifically have the rod cap and old rod bolts installed and tightened accordingly. Divide width of the crushed Plastigage by width of oil to tell how much oil is cleared off, and see an automotive machine shop to see what the specification is. When the clearance is wrong, make sure that there is no interference of dirt or oil and ensure that the journal diameter is checked again. Once clean, a coating of grease should be spread evenly over the bearing faces, the connecting rod should then be returned into position, the cap and end of the rod fitted with new bolts, and tightened to the recommended torque. Proceed likewise with the rest of the assemblies keeping the inserts of the bearings and connecting rods clean, and making sure that each cylinder is properly assembled, and the sides of the cylinders and faces of the bearings are lubricated. Once the crankshaft is installed, turn it over to ensure it does not bind and the connecting rod endplay, correcting a resizing problem where needed in an automotive machine shop.


