×
- Hello
- Login or Register
- Quick Links
- Live Chat
- Track Order
- Parts Availability
- RMA
- Help Center
- Contact Us
- Shop for
- Mazda Parts

My Garage
My Account
Cart
Genuine Mazda 6 Crankshaft
Crank Shaft- Select Vehicle by Model
- Select Vehicle by VIN
Select Vehicle by Model
orMake
Model
Year
Select Vehicle by VIN
For the most accurate results, select vehicle by your VIN (Vehicle Identification Number).
7 Crankshafts found
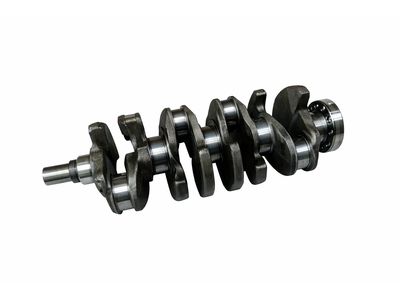
Mazda 6 Crankshaft Part Number: PY8W-11-300
$1174.97 MSRP: $1605.47You Save: $430.50 (27%)Ships in 1-2 Business Days
Mazda 6 Crankshaft Part Number: L3K9-11-300A
$1175.24 MSRP: $1605.84You Save: $430.60 (27%)Ships in 1-2 Business Days
Mazda 6 Crankshaft Part Number: L591-11-300
$652.37 MSRP: $891.39You Save: $239.02 (27%)Ships in 1-2 Business Days
Mazda 6 Crankshaft Part Number: L320-11-300
$213.92 MSRP: $280.79You Save: $66.87 (24%)Ships in 1-2 Business Days
Mazda 6 Crankshaft Part Number: L505-11-300
Mazda 6 Crankshaft Part Number: AJ03-11-301A
Mazda 6 Crankshaft Part Number: AJ03-11-301
Mazda 6 Crankshaft
The Mazda 6 Crankshaft provides the much-needed advantage of substituting the straight up and down push of the pistons with easy-spinning energy that turns the transmission and propels the wheels, such that no kilometer becomes hard. The Crankshaft is positioned deep in the engine block and turns on its axis, with the offset throws connected by rods, which is ingenious and converts reciprocating energy into rotational energy, with precision comparable to a clock. In all generations of the midsize Mazda sedan, there are two principal material designs, tough cast iron units with low horsepower engines, and more robust forged steel designs with higher horsepower engines, the forged components able to resist flexing and fatigue when the drivers reach the sporty aspect of the car. In any style, every Mazda shaft is well balanced and will last the complete life of the vehicle as long as owners follow frequent oil changes that keep dirt off the journals and ensure a constant flow of lubricant. The absence of care may allow the passage of grit onto the bearing surfaces resulting in scoring, increasing clearances, metal-to-metal contact and the characteristic knock or vibration that is an indication of trouble. In case damage does occur, it is a complicated matter to replace the engine since it will have to be removed, the main bearing caps removed sequentially and clearances reinspected before the refreshed Crankshaft assembly can be reinstated, though many 6 owners are glad that Mazda engineering has not complicated the overall design by complicating the Crankshaft.
Looking for Crankshaft with proven quality? Choose OEM Crankshaft. Mazda designs and builds them to strict factory specs. Every piece goes through rigorous quality checks. You'll get parts that fit right and work like new. Shop our huge inventory of OEM Mazda 6 parts. Enjoy the highly competitive prices online. Our site is your one-stop shop. Each genuine 6 part includes a manufacturer's warranty. Buy with confidence. Our return policy is simple and hassle-free. In a rush? Choose expedited delivery at checkout. You'll love the streamlined experience from search to checkout to receiving your order.
Mazda 6 Crankshaft Parts and Q&A
- Q: How can the crankshaft be removed and reinstalled on Mazda 6?A:Revising the crankshaft is only possible once the engine has been removed out of the vehicle, provided that other components like the flywheel, crankshaft pulley, timing chain, oil pan, oil pump body, oil filter and piston/connecting rod assemblies have been removed. Measure the crankshaft endplay, with a dial indicator, at the crankshaft prior to capillary removal. Crankshaft The crankshaft should be pried to the rear and zero the indicator then pried to the front to verify the reading, a normal endplay should be between 0.003 and 0.010 inch. In the event that a dial indicator is not available, a clearance can be established using feeler gauges. Unscrew the main bearing cap bolts one by one and then remove main bearing cap support beam or lower cylinder block accordingly. Lift the crankshaft (preferably with some help) out very cautiously and re-fit the main bearing caps or lower cylinder block finger-tight. To install it, the engine block and crankshaft should be clean and checked. Place the engine block on its back, take off all support beams or caps and oil the surfaces of the bearings. Install new upper main bearing inserts in the engine block making sure that oil holes correspond and lay the inserts in the lower inserts in the caps or lower block. Clearance check Check clearance with Plastigage, but do not disturb it during installation. When all the bolts have been tightened in the appropriate order, compare the Plastigage width to clearance. Insert bearing inserts of the right size where needed. Clean any Plastigage coating on the journals and fit faces; finally lay on a thin coat of grease or assembly lube to the bearing surfaces. Install the crankshaft making sure it is clean and apply RTV sealant where needed prior to fitting the lower block. Install all bolts to the required level, re-examine crankshaft endplay, and turn the crankshaft over to ensure no binding. Lastly, a new rear main oil seal should be installed.


