×
- Hello
- Login or Register
- Quick Links
- Live Chat
- Track Order
- Parts Availability
- RMA
- Help Center
- Contact Us
- Shop for
- Mazda Parts
My Garage
My Account
Cart
Genuine Mazda 929 Control Arm
Suspension Arm- Select Vehicle by Model
- Select Vehicle by VIN
Select Vehicle by Model
orMake
Model
Year
Select Vehicle by VIN
For the most accurate results, select vehicle by your VIN (Vehicle Identification Number).
4 Control Arms found

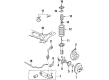
Mazda 929 Control Arm Part Number: H2Y0-34-300
$256.15 MSRP: $341.61You Save: $85.46 (26%)Ships in 1-2 Business Days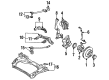
Mazda 929 Upper Control Arm Part Number: H430-34-C50
Mazda 929 Upper Control Arm Part Number: H430-34-C00
Mazda 929 Control Arm Part Number: H2Y0-34-350
Mazda 929 Control Arm
Looking for Control Arm with proven quality? Choose OEM Control Arm. Mazda designs and builds them to strict factory specs. Every piece goes through rigorous quality checks. You'll get parts that fit right and work like new. Shop our huge inventory of OEM Mazda 929 parts. Enjoy the highly competitive prices online. Our site is your one-stop shop. Each genuine 929 part includes a manufacturer's warranty. Buy with confidence. Our return policy is simple and hassle-free. In a rush? Choose expedited delivery at checkout. You'll love the streamlined experience from search to checkout to receiving your order.
Mazda 929 Control Arm Parts and Q&A
- Q: How to remove and install components using a Control Arm on Mazda 929?A:To take parts in and out of different types of vehicles, you will be required to loosen the front lug nuts and either securely lift the car to take the front wheels off. In the case of the rear-wheel drive GLC, disconnect the brake line to the strut tower, disconnect the tie-rod to the knuckle arm and loosen the Shock Absorber bolts. The third step is to remove the rubber bushing and washer in the stabilizer bar, then the last step is to unfit the control arm to the frame. Push on the strut assembly to unattach the control arm and steering knuckle assembly. In the case of the 1981-82 front-wheel drive GLC, place the support, de-attach the through-bolt that joins the lower arm and steering knuckle, and disconnect the control arm with the body. This installation is in a reverse order to provide appropriate torque specifications. In the case of the 1983-85 front-wheel drive GLC, hold the vehicle, loosen the bolts in the ball joint, and sever the lower arm of the vehicle. The process of reinstallation involves reversal of the steps in a particular torque value. The front end of the 626 and MX-6 (1983-89) (626) 824-824-PG-B was equipped to support the front end, eliminate the components of the stabilizer bar and disconnect the ball joint to the strut. The installation is similar to the removal and last tightening of all the parts is done upon assembling. With the 1986-89 323, jack the vehicle, remove the required parts and reverse the process to install that part making sure that there is proper torque. The 929 model, loosen the lug nuts, take out the control arm parts and service the ball joint. The installation implies the reconnecting of all parts of a certain torque value. In the case of the RX-7 models, it is important to support the vehicle and remove the control arm and ball joint assembly and inspect to see whether there is any type of damage and only then reassemble the vehicle and make sure that all bolts are connected to the right specification.
Related Mazda 929 Parts
 Mazda 929 Axle Beam Mount
 Mazda 929 Axle Bearing Lock Rings
 Mazda 929 Bump Stop
 Mazda 929 Coil Springs
 Mazda 929 Control Arm Bolt
 Mazda 929 Strut Housing
 Mazda 929 Suspension Strut Rod
 Mazda 929 Sway Bar Link
 Mazda 929 Sway Bar Link Bushing
 Mazda 929 Trailing Arm
 Mazda 929 Wheel Bearing
 Mazda 929 Wheel Seal
Browse by Year
1995 Control Arm 1994 Control Arm 1993 Control Arm 1992 Control Arm 1991 Control Arm
1990 Control Arm
1989 Control Arm
1988 Control Arm