×
- Hello
- Login or Register
- Quick Links
- Live Chat
- Track Order
- Parts Availability
- RMA
- Help Center
- Contact Us
- Shop for
- Mazda Parts
My Garage
My Account
Cart
Genuine Mazda B2200 Camshaft
Cam- Select Vehicle by Model
- Select Vehicle by VIN
Select Vehicle by Model
orMake
Model
Year
Select Vehicle by VIN
For the most accurate results, select vehicle by your VIN (Vehicle Identification Number).
1 Camshaft found

Mazda B2200 Camshaft Part Number: F240-12-420
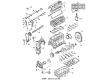
Mazda B2200 Camshaft
The Mazda B2200 Camshaft coordinates the opening and closing of the valves to ensure that the 2.2 liter engine can breathe at the right time to provide smooth engine power and stable torque to the truck. Within this narrow steel rod there are offset lobes, which are carried on bearings that rotate on journals, forcing the followers or pushrods to open each of the valves as springs clap them back together while the crankshaft revolves at twice the rate of the Camshaft. The crank moves the Camshaft with a belt or a chain, and the correct timing ensures the four strokes intake, compression, power, and exhaust are in perfect flow with the movement of the piston. In its earlier Mazda B-series pickups an overhead valve design was applied where the cam is mounted on the block, and pushrods and rocker arms lifted the valves, but the newer B2200 applied a single overhead design with the cam in the head, which saved much weight and reduced moving parts. The SOHC design responds faster to changes in engine speed than the old pushrod design and allows Mazda to optimize valve lift and duration to achieve improved fuel economy without reducing midrange pull. Whichever version is applied, correct lubrication and timing are extremely important since worn lobes or missed teeth will leave the valves out of sync, depriving any Mazda driver of power and can easily damage pistons and valves.
Looking for Camshaft with proven quality? Choose OEM Camshaft. Mazda designs and builds them to strict factory specs. Every piece goes through rigorous quality checks. You'll get parts that fit right and work like new. Shop our huge inventory of OEM Mazda B2200 parts. Enjoy the highly competitive prices online. Our site is your one-stop shop. Each genuine B2200 part includes a manufacturer's warranty. Buy with confidence. Our return policy is simple and hassle-free. In a rush? Choose expedited delivery at checkout. You'll love the streamlined experience from search to checkout to receiving your order.
Mazda B2200 Camshaft Parts and Q&A
- Q: How to remove and install a camshaft on Mazda B2200?A:To take off and install the 2.2L engine, begin by disconnecting the negative battery cable, the air cleaner assembly, and emptying the cooling system, being careful to use a sealable container to store the coolant in so that it is not spilt and injures pets. Then take off the front cover assembly, the cam gear, the thermostat housing, the distributor assembly, the rocker cover, the rear housing, the Rocker Arm assembly, the thrust plate should it be provided and finally the camshaft inside the cylinder head. To install, apply clean engine oil to the camshaft, place it on the cylinder head and fit the thrust plate with a new gasket, then the rocker arm assembly, rear housing with a new gasket, rocker cover with a new gasket, distributor assembly, thermostat housing with a new gasket, cam gear, front cover assembly and fill the cooling system, refit the air cleaner assembly, and connect the negative battery cable again. In the case of the 2.6L motor, 1987-88, the procedure will start as the negative battery cable and air cleaner assembly are disconnected and the rocker arm/valve cover, water pump belt and pulley and rotation of the crankshaft until the number 1 piston is positioned at the top of its compression stroke. Note mating mark on the camshaft sprocket and the timing chain and then loosen the camshaft sprocket bolt, washer and distributor drive gear, timing chain and camshaft sprocket assembly, rocker arms/shafts assembly and the camshaft, one by one. The process of installation is lubricated camshaft, fitting, installing the rocker arms/shafts assembly, adjusting the dowel hole and re-fitting the timing chain and camshaft sprocket assembly, making sure the mating marks are aligned. In the case of the 2.6L engine of 1989-93, the process remains the same, only that there are some extra steps that involve fixing the timing chain adjuster, as well as making sure that the timing chain is in proper alignment during installation. The 3.0L engine involves the removal of the cylinder heads, loosening the camshaft retaining bolt, prying out the camshaft oil seal and removing the rocker arm and shaft assemblies and should be careful with hydraulic lash adjusters. The camshaft is checked and then installed under proper lubrication, then the rocker arm/shaft assembly is installed after which the cylinder head is mounted. The process of 4.0L engine starts by disconnection of the negative battery cable which is followed by draining engine oil and coolant and multidisassembly of different parts, such as the Radiator, condenser, and intake manifold assembly. Once camshaft endplay is checked and the camshaft removed, it can be installed in reverse order i.e. a camshaft journals is oiled, the timing marks are aligned and all the components are put back in order. To check the camshaft lobe lift to inspect, the valve cover is removed and a Vernier caliper is used to measure the lift in each of the lobes, changing the camshaft where necessary. In the case of camshaft end play, install a dial indicator to measure end play and it is necessary to install spacer and thrust plate in case excessive end play is identified.
Related Mazda B2200 Parts
 Mazda B2200 Valve Cover
 Mazda B2200 Valve Cover Gasket
 Mazda B2200 Belt Tensioner
 Mazda B2200 Cam Gear
 Mazda B2200 Engine Mount
 Mazda B2200 Exhaust Valve
 Mazda B2200 Oil Pan Baffle
 Mazda B2200 Oil Pan Gasket
 Mazda B2200 Piston
 Mazda B2200 Timing Belt Tensioner
 Mazda B2200 Timing Cover
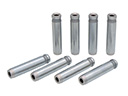 Mazda B2200 Valve Guide