×
- Hello
- Login or Register
- Quick Links
- Live Chat
- Track Order
- Parts Availability
- RMA
- Help Center
- Contact Us
- Shop for
- Mazda Parts
My Garage
My Account
Cart
Genuine Mazda B2200 Sway Bar
Sway Bar Kit- Select Vehicle by Model
- Select Vehicle by VIN
Select Vehicle by Model
orMake
Model
Year
Select Vehicle by VIN
For the most accurate results, select vehicle by your VIN (Vehicle Identification Number).
1 Sway Bar found

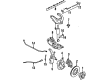
Mazda B2200 Stabilizer Bar Part Number: UB39-34-151
$172.51 MSRP: $230.07You Save: $57.56 (26%)Ships in 1-2 Business Days
Mazda B2200 Sway Bar
Looking for Sway Bar with proven quality? Choose OEM Sway Bar. Mazda designs and builds them to strict factory specs. Every piece goes through rigorous quality checks. You'll get parts that fit right and work like new. Shop our huge inventory of OEM Mazda B2200 parts. Enjoy the highly competitive prices online. Our site is your one-stop shop. Each genuine B2200 part includes a manufacturer's warranty. Buy with confidence. Our return policy is simple and hassle-free. In a rush? Choose expedited delivery at checkout. You'll love the streamlined experience from search to checkout to receiving your order.
Mazda B2200 Sway Bar Parts and Q&A
- Q: How to remove and install the front sway bar on Mazda B2200?A:In order to install and remove the stabilizer bar of various types of vehicles, it is necessary to commence by lifting and maintaining the front side by means of jackstands. In the pickup, loosen the stabilizer bar-to-frame clamps and the lower Control Arms and keep all the bushings, washers, and spacers in order. Check on any wear or damage on the parts and replace any suspicious parts. Install the stabilizer bar to the lower control arms and frame brackets and lightly loosen the fasteners and then torque them to specifications 34 ft. lbs. for the stabilizer bar-to-control arm nut and 19 ft. lbs. for the stabilizer-to-frame clamp bolts. In the case of the MPV, once the front end has been lifted, pull out the splash shield, pull off the end links at the compression rods and take out the stabilizer bar by pulling off the clamp bolts. Check parts and reinsert as they are removed, laying end link bushings to correspond with marks on the bar, tightening clamp bolts to 45 ft. lbs., and end link bolts to tighten until 13mm +1mm of thread shows above the nut. In the case of the Navajos, lift and support the automobile, unhook the stabilizer link assembly to the front I-beam axle and remove the stabilizer bar holders and the bar itself. Installation To install, the stabilizer bar should be installed on the frame mounting brackets, the retainer bolt should be tightened to 30-50 ft. lbs., and the stabilizer link assembly should be tightened with a nut and washer tightened to 30-40 ft. lbs. Lastly, with the 4-wheel drive, lift and hold the vehicle, loosen the bolts and other holders of the stabilizer bar, and loosen the stabilizer bar and bushings. The procedure of re-installation is in reverse order and the retainer bolts are tightened to 35-50 ft. lbs. and the stabilizer bar-to-link nut to 30-44 ft. lbs.


