×
- Hello
- Login or Register
- Quick Links
- Live Chat
- Track Order
- Parts Availability
- RMA
- Help Center
- Contact Us
- Shop for
- Mazda Parts
My Garage
My Account
Cart
Genuine Mazda Millenia Distributor Cap
Ignition Distributor Cap- Select Vehicle by Model
- Select Vehicle by VIN
Select Vehicle by Model
orMake
Model
Year
Select Vehicle by VIN
For the most accurate results, select vehicle by your VIN (Vehicle Identification Number).
1 Distributor Cap found

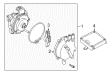
Mazda Millenia Cap Part Number: KF34-18-V00-9U
Mazda Millenia Distributor Cap
Looking for Distributor Cap with proven quality? Choose OEM Distributor Cap. Mazda designs and builds them to strict factory specs. Every piece goes through rigorous quality checks. You'll get parts that fit right and work like new. Shop our huge inventory of OEM Mazda Millenia parts. Enjoy the highly competitive prices online. Our site is your one-stop shop. Each genuine Millenia part includes a manufacturer's warranty. Buy with confidence. Our return policy is simple and hassle-free. In a rush? Choose expedited delivery at checkout. You'll love the streamlined experience from search to checkout to receiving your order.
Mazda Millenia Distributor Cap Parts and Q&A
- Q: How to remove and inspect the distributor cap and distributor rotor on Mazda Millenia?A:Removing the distributor cap To eliminate the distributor cap, label sparkplug wires by their cylinder numbers and loosen connecting bolts, taking care not to drop them. Take off the cap that has wires in it. Label all Spark Plug Wires and match mark the dispensatory to the distributor body (as a precaution). Any shrouds or air intake piping that can prevent removal of the cap should be removed and then the cap hold-down screws are loosened. Fully lift the cap so as not to break the rotor blade and spring. In case of lack of slack in the plug wires, then label them and detach them off the cap. Installation is the opposite process, which requires the location of the square alignment locator to be noted and the hold-down screws tightened with 18-23 inch pounds (2.0-2.6Nm). In the case of the distributor rotor, the cap is removed followed by the pulling off of the rotor off the shaft. Once the cap has been removed, pull out straight on the rotor, until it comes out of the shaft and armature. Installation is the opposite and the locating boss on the rotor is inserted with the hole on the armature and it must be fully seated on the shaft. To inspect, carefully examine the distributor cap of the engine to confirm that there are no damages, wear or corrosions, and in particular at the electrical terminals. Wipe the cap using soap and water, dry using compressed air and examine it in regards to cracks, broken or worn-out carbon button, or tracks of the carbon and replace the compressed air dryer in the event of any problem. Likewise, examine the rotor to see whether it is damaged, worn out, or corroded, especially at the electrical connections. Clean the rotor using soap and water and dry using compressed air and ensure it is free of cracks, traces of carbon, and burns or broken blade or spring, and replace them in case of any of these.

Related Mazda Millenia Parts
 Mazda Millenia ABS Relay
 Mazda Millenia Antenna
 Mazda Millenia Crankshaft Position Sensor
 Mazda Millenia Cruise Control Module
 Mazda Millenia Dimmer Switch
 Mazda Millenia Distributor
 Mazda Millenia Distributor Rotor
 Mazda Millenia Engine Control Module
 Mazda Millenia Horn Relay
 Mazda Millenia Ignition Coil
 Mazda Millenia Neutral Safety Switch
 Mazda Millenia Spark Plug Wire