×
- Hello
- Login or Register
- Quick Links
- Live Chat
- Track Order
- Parts Availability
- RMA
- Help Center
- Contact Us
- Shop for
- Mazda Parts
My Garage
My Account
Cart
Genuine Mazda Millenia Radiator
Cooling Radiator- Select Vehicle by Model
- Select Vehicle by VIN
Select Vehicle by Model
orMake
Model
Year
Select Vehicle by VIN
For the most accurate results, select vehicle by your VIN (Vehicle Identification Number).
1 Radiator found

Mazda Millenia Radiator Part Number: KL47-15-200A
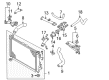
Mazda Millenia Radiator
The Mazda Millenia Radiator cools the engine by pumping hot coolant into a fin-and-tube core through which the hot fluid is poured, in which moving air pulls out the heat before the coolant is pumped back into the block. The majority of Millenia automobiles have an aluminum core with plastic or aluminum Radiator side tanks attached, which is a lighter design with quicker heat transfer compared to the heavier copper or brass design of some earlier Mazda models. No matter what the material, all Mazda Radiator units have the same structure with an inlet tank on one side, an outlet tank on the other side, and an ideal location behind the grille so that natural airflow and the engine fan can enhance cooling. The tubes are embraced by dozens of slim fins which increase the area of contact and allow heat to be rapidly conducted into the air; the more efficient the fins in conducting heat, the more constant the temperature remains. The primary issue that these components experience is leakage as the seams, tubes, or tanks wear out. Temporary corrections can be made using solder or welding to close small holes; however, to be certain the optimal solution is to replace the assembly altogether, particularly when the tiny holes have been clogged with scale or sediment. Regular coolant flushes are useful in preventing those deposits and maintaining circulation. An effective Mazda Radiator is a shield of health, power, efficiency, and engine life, and its silent value is felt in every mile.
Looking for Radiator with proven quality? Choose OEM Radiator. Mazda designs and builds them to strict factory specs. Every piece goes through rigorous quality checks. You'll get parts that fit right and work like new. Shop our huge inventory of OEM Mazda Millenia parts. Enjoy the highly competitive prices online. Our site is your one-stop shop. Each genuine Millenia part includes a manufacturer's warranty. Buy with confidence. Our return policy is simple and hassle-free. In a rush? Choose expedited delivery at checkout. You'll love the streamlined experience from search to checkout to receiving your order.
Mazda Millenia Radiator Parts and Q&A
- Q: How to remove and install the radiator on Mazda Millenia?A:To take out the radiator of 1.5L and 1.8L engines used in 1995-98 to empty the cooling system, first of all, disconnect the negative battery cable and empty the cooling system. Take off the upper seal board and radiator grille to remove then the hood safety lever. Remove coolant reservoir and top and bottom radiators hose, and in the case of an automatic transaxle, remove the oil cooler lines and plug the hoses. Unplug the electric cooling fan connector and unattach the cooling fan/shroud assembly off the radiator and put it aside. Send the radiator brackets back and push the radiator out of the car. Installation Installing the radiator back in; make sure that the lower tank contacts the insulators, and then install and tighten radiator brackets. Replace the cooling fan/shroud assembly and loosen its mounting bolts. Should the need arise reconnect the cooler lines, fit the upper radiator hose, lower radiator hose, then the overflow tube and cooling fan wiring. Install the bolts of the radiator grille and upper seal board, then the hood safety lever. Close radiator drain valve, pour the system with coolant and fit in the pressure cap up to the first stop. Reconnect the negative battery cable, turn the engine on and run it at fast idle till the upper radiator hose heats up and the coolant is flowing. Turn off the engine, inspect radiator, and add more coolant as necessary, and screw the radiator cap on and fill the coolant reservoir to the FULL line with fresh coolant and then start the engine to determine any leakage. In the case of the 2.3L engine, the procedure starts only by disconnecting the negative battery cable and depleting the cooling system as well as removing the right hand splash shield in case it is installed, and the charge air cooler and radiator grill. Once the hose to the coolant reservoir has been disconnected and the reservoir taken out, the electrical connector of the cooling fan should be disconnected and the shroud should be taken off the fan assembly. Unscrew radiator hoses and oil cooler lines, and disconnect the mounting brackets on the top of the radiator and pick up the radiator. To install, make sure that the lower tank fits in place and the insulators and upper brackets are installed, and the bolts tightened. Reconnect the cooler line, fit-in the radiator hose, and also fit back the fan assembly and electrical connector. Install back the coolant reservoir and any components removed, fill up the cooling system and reconnect the negative battery cable. In other engines, the operation begins by disconnection of the negative battery cable, removal of the engine under cover (where it exists), and emptying the cooling system. Take out the air ducts that are needed, unscrew the electric cooling fan connector, the coolant hoses, and any lines that are connected to the radiator or the fan assembly. Detach the upper radiator mounting brackets/shroud panel when necessary, then hoist out the radiator/Cooling Fan Assembly out of the vehicle. Take off the cooling fan/shroud assembly off the radiator, where required. Installation, in case of removal, install the fan and shroud assembly and screw the bolts. Install the radiator again, making sure that the bottom tank fits in the insulators, and the upper radiator insulators, tightening the bolts. Rewind the cooler lines, wiring harness, and hoses and attach the overflow tube and cooling fan wiring. Turn on the radiator drain valve, pour the system with the coolant, and place the pressure cap. Reconnect the negative battery cable and turn the engine on and run at fast idle until the upper radiator hose becomes hot. Turn off the engine, inspect radiator, and add more coolant as necessary, and screw the radiator cap on and fill the coolant reservoir to the FULL line with fresh coolant and then start the engine to determine any leakage.

Related Mazda Millenia Parts
 Mazda Millenia Coolant Pipe
 Mazda Millenia Coolant Reservoir
 Mazda Millenia Coolant Reservoir Cap
 Mazda Millenia Cooling Hose
 Mazda Millenia Fan Shroud
 Mazda Millenia Oil Cooler Hose
 Mazda Millenia Radiator fan
 Mazda Millenia Radiator Hose
 Mazda Millenia Thermostat
 Mazda Millenia Thermostat Gasket
 Mazda Millenia Water Pump Gasket
 Mazda Millenia Water Pump Pulley