×
- Hello
- Login or Register
- Quick Links
- Live Chat
- Track Order
- Parts Availability
- RMA
- Help Center
- Contact Us
- Shop for
- Mazda Parts
My Garage
My Account
Cart
Genuine Mazda MPV Mass Air Flow Sensor
MAF Sensor Meter- Select Vehicle by Model
- Select Vehicle by VIN
Select Vehicle by Model
orMake
Model
Year
Select Vehicle by VIN
For the most accurate results, select vehicle by your VIN (Vehicle Identification Number).
3 Mass Air Flow Sensors found


Mazda MPV Mass Air Flow Sensor Part Number: GY01-13-215R-00
$215.26 MSRP: $287.07You Save: $71.81 (26%)Ships in 1-2 Business Days

Mazda MPV Mass Air Flow Sensor Part Number: B6BF-13-215
$771.59 MSRP: $1054.30You Save: $282.71 (27%)Ships in 1-2 Business Days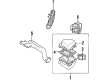
Mazda MPV Mass Air Flow Sensor Part Number: JE06-13-210R-0A
$43.75 MSRP: $57.43You Save: $13.68 (24%)Ships in 1-2 Business Days
Mazda MPV Mass Air Flow Sensor
The Mazda MPV Mass Air Flow Sensor constantly monitors air flowing through the intake, permitting the powertrain computer to combine fuel with precision accuracy, which results in easy starting, constant cruising and hard acceleration. The Mass Air Flow Sensor compensates by monitoring the density changes in air mass caused by weather or altitude instead of just the simple volume, preventing rich or lean mixtures that may trigger the check engine lamp, cause sputters, or even shut down the engine. There have been two types witnessed throughout the life of the minivan. Past Mazda MPVs had a VAF meter, which is a spring-loaded flap that travels with the incoming air and a connected potentiometer translates this action into an electrical signal. This mechanical design is subject to wear, limits airflow, and becomes stuck when dirt coats the door, and therefore the fuel delivery may not be targeted. Subsequent Mazda MPV models applied the hot wire Mass Air Flow Sensor that uses a small piece of wire in the airstream and measures the amount of current required to sustain its temperature. Since airflow chills the wire, the necessary electrical draw indicates the actual mass of air with much less restriction and faster reaction; however, contamination by oil or dust may insulate the wire and bias results. No matter the design, all Mazda Mass Air Flow Sensors will be required to be located in a leak-free intake path, as any unmeasured air that enters the intake downstream will lean out the mixture and reduce performance.
Looking for Mass Air Flow Sensor with proven quality? Choose OEM Mass Air Flow Sensor. Mazda designs and builds them to strict factory specs. Every piece goes through rigorous quality checks. You'll get parts that fit right and work like new. Shop our huge inventory of OEM Mazda MPV parts. Enjoy the highly competitive prices online. Our site is your one-stop shop. Each genuine MPV part includes a manufacturer's warranty. Buy with confidence. Our return policy is simple and hassle-free. In a rush? Choose expedited delivery at checkout. You'll love the streamlined experience from search to checkout to receiving your order.
Mazda MPV Mass Air Flow Sensor Parts and Q&A
- Q: How to check the voltage of a Mass Air Flow Sensor on Mazda MPV?A:To measure the voltage of the four-cylinder engine, the voltage check of the airflow meter electrical connector should be checked by withdrawing the rubber boot, which exposes the terminals. Test the assigned terminals, beginning with the power supply on the Black/white stripe wire and maintain appropriate voltage connection on the airflow meter terminal connector, some of the tests will need ignition key to be in the ON position. In case the voltages are not correct, check the wiring harness. In the case of the burnoff control system, which is used to heat the hot wire inside the airflow meter to burn him off, disconnect the negative battery terminal not less than 20 seconds with the airflow meter output voltage out of range, then reconnect the cable. Turn on the engine until it reaches normal operation temperature, unplug the rubber boot of the airflow meter electrical connector and continue the engine running over 5 seconds at about 2,000 rpm in Neutral. Once the ignition key is turned to the OFF position, measure the voltage at a terminal G/O and make sure that it is 0 volts when the switch is off, followed by 8 to 12 volts at 1 to 5 seconds. In case of faulty readings, diagnostic the ECU in a dealer or repair shop; in case of correct reading, change the airflow meter. In V6 engines (1989-1995), be it that the airflow meter be removed, inspecting the area of the airflow meter on a crack or other forms of damage is also advisable; the measuring plate should move freely and completely open. Test the terminals with the measuring plate completely closed to ensure that there is the right amount of resistance; in case the readings are wrong change the airflow meter. In order to remove and install the airflow meter of all the engines, one will have to remove the air cleaner assembly, disconnect the electrical connector, loosen the hose clamps, and loosen the bolts in order to elevate the airflow meter out of the engine compartment or air cleaner assembly and then install the airflow meter back in its place.
Related Mazda MPV Parts
 Mazda MPV Fuel Pump Relay
 Mazda MPV Oxygen Sensor
 Mazda MPV Camshaft Position Sensor
 Mazda MPV Coolant Temperature Sensor
 Mazda MPV Crankshaft Position Sensor
 Mazda MPV Engine Control Module
 Mazda MPV Fuel Sending Unit
 Mazda MPV Fuse
 Mazda MPV Knock Sensor
 Mazda MPV Relay
 Mazda MPV Starter Relay
 Mazda MPV Throttle Position Sensor
Browse by Year
2006 Mass Air Flow Sensor 2005 Mass Air Flow Sensor 2004 Mass Air Flow Sensor 2003 Mass Air Flow Sensor 2002 Mass Air Flow Sensor 2001 Mass Air Flow Sensor 2000 Mass Air Flow Sensor 1998 Mass Air Flow Sensor 1997 Mass Air Flow Sensor 1996 Mass Air Flow Sensor 1995 Mass Air Flow Sensor 1994 Mass Air Flow Sensor 1993 Mass Air Flow Sensor 1992 Mass Air Flow Sensor 1991 Mass Air Flow Sensor 1990 Mass Air Flow Sensor 1989 Mass Air Flow Sensor