×
- Hello
- Login or Register
- Quick Links
- Live Chat
- Track Order
- Parts Availability
- RMA
- Help Center
- Contact Us
- Shop for
- Mazda Parts
My Garage
My Account
Cart
Genuine Mazda Protege Piston
Engine Pistons- Select Vehicle by Model
- Select Vehicle by VIN
Select Vehicle by Model
orMake
Model
Year
Select Vehicle by VIN
For the most accurate results, select vehicle by your VIN (Vehicle Identification Number).
4 Pistons found


Mazda Protege Piston Part Number: FPY1-11-SA0E
$85.35 MSRP: $113.83You Save: $28.48 (26%)Ships in 1-2 Business Days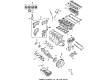
Mazda Protege Piston Part Number: BPY1-11-SA0A
$91.40 MSRP: $121.89You Save: $30.49 (26%)Ships in 1-2 Business DaysMazda Protege Piston Part Number: ZMY0-11-SA0
$11.32 MSRP: $14.85You Save: $3.53 (24%)Ships in 1-2 Business DaysMazda Protege Piston Part Number: FSY3-11-SA0
Mazda Protege Piston
Looking for Piston with proven quality? Choose OEM Piston. Mazda designs and builds them to strict factory specs. Every piece goes through rigorous quality checks. You'll get parts that fit right and work like new. Shop our huge inventory of OEM Mazda Protege parts. Enjoy the highly competitive prices online. Our site is your one-stop shop. Each genuine Protege part includes a manufacturer's warranty. Buy with confidence. Our return policy is simple and hassle-free. In a rush? Choose expedited delivery at checkout. You'll love the streamlined experience from search to checkout to receiving your order.
Mazda Protege Piston Parts and Q&A
- Q: What steps should be taken before carrying out the inspection process on piston/connecting rod assemblies on Mazda Protege?A:The piston/connecting rod assemblies need to be cleaned before the inspection process can be performed whereby the original piston rings need to be removed off the pistons with always new piston rings being used whenever reassembling. Installation of piston rings: With the tool of securing a piston ring, remove rings in the pistons without pinching or scribbling on the surface. Cleanse all the carbon off the top of the piston with a handheld wire brush or fine emery cloth, but not by a wire brush attached to a drill motor, because the wire brush may erode the soft piston material. The carbon deposits in the ring grooves must be cleaned off with a piston ring groove-cleaning tool, or the remnant of an old ring that has been broken off can suffice, but it must not be scraped off or the grooves destroyed. Once the deposits are removed, clean the piston/rod assemblies with solvent and dry them with compressed air and note that the oil holes, the oil hole in each rod, and the oil return holes are free. In case the pistons and the cylinder walls have not been severely damaged or worn out, and the engine block has not been rebored, then new pistons are not always required, but new piston rings should always be fitted during a rebuild. Check every piston to verify the presence of cracks, scoring, scuffing, holes and burned parts, which might be as a result of overheating, abnormal combustion or spark knock and hence a comprehensive examination of the cooling and lubrication system is necessary. Small pitting corrosion can indicate that there is a leakage of coolant into the combustion chamber or crankcase, and thus this needs to be remedied to avoid future occurrence. Check the piston ring groove clearance with a new piston ring and feeler gauge at several positions on each groove, and the appropriate ring must be used on that groove, and in case the clearance is more than specification then new pistons will be needed. Have the piston-to-bore clearance checked by measuring both the bore and piston diameter and comparing them, making sure that they fit together, then determining the difference between the bore and piston diameter; do not allow clearance to be more than specified, in which case rebore the block and replace the pistons and rings. Determine the clearance between piston and rod by rotating the piston and rod in opposite directions and a clearance that is easily felt indicates excessive wear that is to be corrected. In case of removal of pistons on the connecting rods, then bring the rods to an auto machine shop and check to see whether they are bent and twisted. Then, lastly, check connecting rod cracks and damages, momentarily wipe the bearing surfaces of nicks, gouges and scratches and replace old bearings and screw the caps finger-tight, but remember to install new rods in case the engine is being rebuilt because of a connecting rod knock.
- Q: What steps should be taken before installing the piston and connecting rod assemblies on Mazda Protege?A:Prior to fitting in the piston and connecting rod assemblies, make sure that the walls of the cylinder are clean, the uppermost edge of each cylinder is chamfered and the Crankshaft is fitted inside. Take off the cap of the number one connecting rod, being careful to record the marks produced in doing so, and wiping the bearing surfaces with a lint-free cloth. Wipe the rear surface of the new upper bearing insert and insert it into the connecting rod making sure that the tab fits into the recess and that the holes in the oil holes are aligned without hammering or lubricating the bearing. The same with the other bearing insert in the rod cap, keeping it clean. Install the gaps in the piston rings at staggered intervals, place a hose on each of the connecting rod cap bolts, smear the piston and rings with clean engine oil, and install a piston ring compressor, with the skirt still sticking out to show the direction to insert the piston to the cylinder. Turn the crankshaft until the number one connecting rod journal is in bottom dead center and place engine oil on the cylinder wall. Insert the piston/connecting rod assembly into the cylinder bore with the dimple on the piston oriented to the front of the engine making sure the ring compressor is touching the block. Tap the piston lightly with a wooden hammer handle and push the connecting rod onto the crankshaft journal, but do not use lots of force that may damage the piston or rings. Following installation, verify the connecting rod bearing oil clearance with Plastigage with the mating marks on the cap and the rod matching appropriately. Fit the rod cap nuts in three stages and then install the rod cap tightening then remove the cap with care to ensure that the Plastigage width does not exceed the scale. In case clearance is wrong then cleanliness and journal diameter should be checked and then other bearing inserts should be taken into consideration. Wipe off all Plastigage off the rod journal and bearing face, coat with a even layer of moly-base grease or engine assembly lube, fit the connecting rod and cap, and screw the nuts on to the required torque. Proceed with the rest of the assemblies, cleaning the bearing inserts and connecting rods, keeping the right piston/rod combination in place, and lubricating the bearer face and walls of the cylinder. Install all the assemblies, then turn the crankshaft to confirm that there is no binding then lastly check the end play of the connecting rod and make sure that it is within specification and resizing of the connecting rod end play should there be a problem with resizing.
Related Mazda Protege Parts
 Mazda Protege Cylinder Head
 Mazda Protege Oil Pump
 Mazda Protege Timing Belt
 Mazda Protege Camshaft Seal
 Mazda Protege Crankshaft Pulley
 Mazda Protege Crankshaft Seal
 Mazda Protege Crankshaft Timing Gear
 Mazda Protege Cylinder Head Gasket
 Mazda Protege Exhaust Valve
 Mazda Protege Oil Pump Gasket
 Mazda Protege Timing Belt Idler Pulley
 Mazda Protege Timing Cover Gasket