×
- Hello
- Login or Register
- Quick Links
- Live Chat
- Track Order
- Parts Availability
- RMA
- Help Center
- Contact Us
- Shop for
- Mazda Parts
My Garage
My Account
Cart
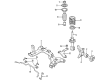
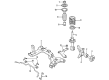
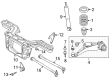
Genuine Mazda Tribute Coil Springs
Strut Spring- Select Vehicle by Model
- Select Vehicle by VIN
Select Vehicle by Model
orMake
Model
Year
Select Vehicle by VIN
For the most accurate results, select vehicle by your VIN (Vehicle Identification Number).
28 Coil Springs found

Mazda Tribute Coil Spring Part Number: EC07-34-011A
$99.90 MSRP: $133.23You Save: $33.33 (26%)Ships in 1-2 Business DaysMazda Tribute Coil Spring Part Number: EC03-34-011A
$18.48 MSRP: $107.99You Save: $89.51 (83%)Ships in 1-2 Business Days
Mazda Tribute Coil Spring Part Number: ZZC3-34-011
$65.35 MSRP: $87.14You Save: $21.79 (26%)Mazda Tribute Spring Part Number: ZZC0-34-011
$65.63 MSRP: $87.51You Save: $21.88 (25%)Mazda Tribute Coil Spring Part Number: ZZC1-34-011
$70.49 MSRP: $94.00You Save: $23.51 (26%)Mazda Tribute Spring Part Number: ZZD0-34-011
$74.36 MSRP: $99.17You Save: $24.81 (26%)

Mazda Tribute Spring Part Number: ZZCA-34-011
$87.25 MSRP: $116.35You Save: $29.10 (26%)
Mazda Tribute Spring Part Number: ZZDC-28-011
$92.49 MSRP: $123.34You Save: $30.85 (26%)

Mazda Tribute Spring Part Number: ZZCD-28-011
$140.65 MSRP: $187.57You Save: $46.92 (26%)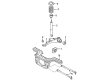
Mazda Tribute Coil Spring Part Number: ZZCB-28-011
$172.21 MSRP: $229.67You Save: $57.46 (26%)Mazda Tribute Coil Spring Part Number: ZZC2-34-011
$16.22 MSRP: $21.29You Save: $5.07 (24%)Ships in 1-2 Business DaysMazda Tribute Coil Spring Part Number: ZZC4-34-011
$16.24 MSRP: $21.32You Save: $5.08 (24%)Ships in 1-2 Business DaysMazda Tribute Spring Part Number: ZZDB-28-011
$25.53 MSRP: $33.51You Save: $7.98 (24%)Ships in 1-2 Business Days
Mazda Tribute Coil Spring Part Number: ZZDE-28-011A
Mazda Tribute Spring Part Number: ZZDD-28-011A
Mazda Tribute Spring Part Number: ZZDA-34-011
Mazda Tribute Coil Spring Part Number: ZZD4-34-011
Mazda Tribute Coil Spring Part Number: ZZD3-34-011
Mazda Tribute Coil Spring Part Number: ZZD2-34-011
Mazda Tribute Coil Spring Part Number: ZZD1-34-011
| Page 1 of 2 |Next >
1-20 of 28 Results
Mazda Tribute Coil Springs
Looking for Coil Springs with proven quality? Choose OEM Coil Springs. Mazda designs and builds them to strict factory specs. Every piece goes through rigorous quality checks. You'll get parts that fit right and work like new. Shop our huge inventory of OEM Mazda Tribute parts. Enjoy the highly competitive prices online. Our site is your one-stop shop. Each genuine Tribute part includes a manufacturer's warranty. Buy with confidence. Our return policy is simple and hassle-free. In a rush? Choose expedited delivery at checkout. You'll love the streamlined experience from search to checkout to receiving your order.
Mazda Tribute Coil Springs Parts and Q&A
- Q: What actions are necessary when Coil Springs and Shock Absorber show signs of wear on Mazda Tribute?A:When the front suspension struts display any wear conditions (such as leaking fluid, damping loss, or sagging and cracked coil springs) then they can be disassembled and overhauled accordingly and faulty struts need replacement whereas springs and other components can be replaced individually. Both sides have to be replaced to ensure that the balance between the properties is maintained. After the strut is out of the car, clear off all the foreign matter and you should fit it in the vise. Install the coil spring compressor tools in place and push the spring up until all the tension is out of the upper mount. Using an Allen key, loose the strut piston rod and using a box-end wrench, loosen the retaining nut of the thrust bearing then withdraw the top mounting, thrust bearing, upper spring seat and spring and the boot and bump stop. In case a new spring is to be inserted, the old spring must be removed carefully out of the compressor; in case of a reuse, the spring may be left under compression. Once the strut assembly is disassembled, inspect every part of the assembly in terms of wear and damage, and also ensure the bearing is running smoothly and that the parts are in place accordingly. Look at the strut to see whether it is leaking fluid, examine the piston rod to see whether it is pitted and examine the strut body whether it has been damaged. Check the functioning of the strut by operating the piston in both full and short strokes and make sure the resistance is smooth and continuous; rough or irregular resistance denotes that it requires replacement. Reassembly consists of repeating the dismantling process, making sure the coil springs are fitted with the paint mark at the bottom, that the coil spring ends are carefully placed in the upper and lower seats, before the release of the compressor, and to confirm that the bearing is properly fitted to the piston rod seat, and the thrust bearing retaining nut is tightened to the required torque.
- Q: How to remove and install coil springs on Mazda Tribute?A:Weaken the wheel lug nuts, lift the vehicle and rest it firmly on jackstands and block the front wheels to ensure that it does not roll over and then loosen the wheel. In models available as early as 2012, in the event it has rear disc brakes, remove the caliper and store it. Unscrew the brake line on the body and on the trailing arm mounting bracket with the help of a floor jack. The rear drum brakes in the models will not have a connector to the wheel cylinder; this is because the brake line is connected to the wheel cylinder. In some cases, separate the brake line and the bracket. Provided, unbolt the harness bracket of the trailing arm and take off the ABS wheel speed sensor. Take off the upper arm of suspension, and loosen the inner bolt of the lower arm, and take off the lower end of the Shock Absorber of the trailing arm. Indicate the location of the spring to the spring insulator, gradually lower the floor jack, draw down the trailing arm and take out the coil spring. Inspect the springs and spring ends by looking for cracks and chips, replacing the springs as a unit in case of any damage and wearing, and also inspect the upper insulator by looking at its condition and wear and tear. Installation is the opposite process of removal to make sure that the lower end of the coil spring is installed in the space depression of the trailing arm and all the fasteners are installed into the correct torque settings. In those models, which were built in 2013 and above, the rear lower arm should be supported with the use of a floor jack, which should be placed under the coil spring pocket and elevated slightly. Provided the same coil spring should be used, label it to the subframe in order to be in position. Unscrew the rear lower pivot bolt of the arm, unscrew the rear lower arm-to-knuckle bolt and lower the jack very, very slowly to take away the spring. Inspect the springs and spring ends by looking for cracks and chips, replacing the springs as a unit in case of any damage and wearing, and also inspect the upper insulator by looking at its condition and wear and tear. Installation includes the opposite of this by screwing the lower arm bolts to the required torque and lifting the suspension with the floor jack to approximate normal ride height and then tightening the fasteners.


Related Mazda Tribute Parts
 Mazda Tribute Wheel Bearing
 Mazda Tribute Axle Beam
 Mazda Tribute Axle Beam Mount
 Mazda Tribute Axle Pivot Bushing
 Mazda Tribute Camber and Alignment Kit
 Mazda Tribute Front Cross-Member
 Mazda Tribute Lateral Link
 Mazda Tribute Shock and Strut Boot
 Mazda Tribute Strut Housing
 Mazda Tribute Sway Bar Link
 Mazda Tribute Sway Bar Link Bushing
 Mazda Tribute Sway Bars