×
- Hello
- Login or Register
- Quick Links
- Live Chat
- Track Order
- Parts Availability
- RMA
- Help Center
- Contact Us
- Shop for
- Mazda Parts
My Garage
My Account
Cart
Genuine Mazda Tribute Side View Mirrors
Door Mirror- Select Vehicle by Model
- Select Vehicle by VIN
Select Vehicle by Model
orMake
Model
Year
Select Vehicle by VIN
For the most accurate results, select vehicle by your VIN (Vehicle Identification Number).
12 Side View Mirrors found

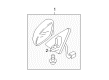
Mazda Tribute Mirror Assembly Part Number: EC01-69-120K
$159.40 MSRP: $212.58You Save: $53.18 (26%)Ships in 1-2 Business Days
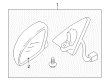
Mazda Tribute Mirror Assembly Part Number: ZZDM-69-120
$194.43 MSRP: $259.28You Save: $64.85 (26%)


Mazda Tribute Mirror Assembly Part Number: ZZC2-69-120B


Mazda Tribute Mirror Assembly Part Number: ZZC1-69-180B


Mazda Tribute Mirror Assembly Part Number: ZZC1-69-120B


Mazda Tribute Mirror Assembly Part Number: ZZC0-69-120-70
Mazda Tribute Mirror Assembly Part Number: ZZDM-69-180
Mazda Tribute Mirror Assembly Part Number: ZZDL-69-180
Mazda Tribute Mirror Assembly Part Number: ZZDL-69-120
Mazda Tribute Mirror Assembly Part Number: ZZDB-69-180A
Mazda Tribute Mirror Assembly Part Number: ZZC2-69-180B
Mazda Tribute Mirror Assembly Part Number: EC01-69-180L
Mazda Tribute Side View Mirrors
Looking for Side View Mirrors with proven quality? Choose OEM Side View Mirrors. Mazda designs and builds them to strict factory specs. Every piece goes through rigorous quality checks. You'll get parts that fit right and work like new. Shop our huge inventory of OEM Mazda Tribute parts. Enjoy the highly competitive prices online. Our site is your one-stop shop. Each genuine Tribute part includes a manufacturer's warranty. Buy with confidence. Our return policy is simple and hassle-free. In a rush? Choose expedited delivery at checkout. You'll love the streamlined experience from search to checkout to receiving your order.
Mazda Tribute Side View Mirrors Parts and Q&A
- Q: How do Side View Mirrors operate and what steps should be taken if they malfunction on Mazda Tribute?A:The majority of electric rear view mirrors provide two (motor) adjustments, one of the motors is vertical and another one is horizontal. The control switch has a selection which directs the voltage to the left or right side mirror. With the ignition switched on and the engine switched off, roll down the windows and use the mirror control switch with all the functions of each of the two mirrors listening to the sound of the electric motors. In case the motors are heard but the mirror glass is not moving, then it is possible that something is wrong with the drive mechanism. When the mirrors fail and no sound is produced then fuse has to be checked. In case the fuse is there, the mirror control switch ought to be taken out to be continuously tested at a reputable repair shop. In case the mirror is not functioning, then the mirror needs to be removed to conduct a check on whether there is any voltage at the wires. When the voltage at either or both positions of the switch is zero, one should make sure that there are no faults in the circuit between the mirror and the control switch. The voltage should be tested by jumper wires off the vehicle and the mirror should also be replaced in case of failure.
- Q: How to remove and install side view mirrors on Mazda Tribute?A:The first step in the procedure is to take off the front door trim panel to remove the external mirror assemblies. Take a plastic trim tool and de-attach the front door interior sail panel, then unconnection of the electrical connector of the mirror. In 2013 models and subsequent ones, remove the mounting bolts prior to removing the mirror assembly, whereas in 2012 models and older models, remove the retaining bolts to remove the mirror off the vehicle. The opposite of removal is installation. In the case of the mirror glass, it should be placed all the way down with a rag between the glass and housing to avoid damages. Unscrewdriver Raise the mirror glass with a screwdriver, without letting it fall off the tabs that hold it in place in the motor. Where present, remove the electrical connectors and take out the glass, and install it, always reversing, being careful that all the clips are in place and that the controls are working correctly. In the case of the inside mirror, it can be mounted differently depending on the model, and the choice of standard options can include retaining bolts or trim covers. Take out the electric connector of the auto-dimmer, when it is very likely to be found, and the compass module, when it does exist. Use a screwdriver to pry the tension clip at the bottom of the mirror stalk and remove the mirror out of the bracket and then place the new mirror into the bracket and press it down. In the event of the mount plate falling off the windshield, there are adhesive kits that are used to fix it and the instructions are given with the kits.


Related Mazda Tribute Parts
 Mazda Tribute Bumper
 Mazda Tribute Hood
 Mazda Tribute Sunroof
 Mazda Tribute Hood Latch
 Mazda Tribute Car Mirror
 Mazda Tribute Door Hinge
 Mazda Tribute Door Screws
 Mazda Tribute Glove Box
 Mazda Tribute Rear Crossmember
 Mazda Tribute Shift Knob
 Mazda Tribute Trunk Lock Cylinder
 Mazda Tribute Windshield Washer Nozzle