×
- Hello
- Login or Register
- Quick Links
- Live Chat
- Track Order
- Parts Availability
- RMA
- Help Center
- Contact Us
- Shop for
- Mazda Parts
My Garage
My Account
Cart
Genuine Mazda 6 Coil Springs
Strut Spring- Select Vehicle by Model
- Select Vehicle by VIN
Select Vehicle by Model
orMake
Model
Year
Select Vehicle by VIN
For the most accurate results, select vehicle by your VIN (Vehicle Identification Number).
27 Coil Springs found


Mazda 6 Spring Part Number: GHP9-28-011
$85.59 MSRP: $114.15You Save: $28.56 (26%)Ships in 1-2 Business Days


Mazda 6 Spring Part Number: GP9A-28-011A
$98.78 MSRP: $131.72You Save: $32.94 (26%)Ships in 1-2 Business Days


Mazda 6 Spring Part Number: GP9B-34-011A
$131.88 MSRP: $175.86You Save: $43.98 (26%)Ships in 1-2 Business Days


Mazda 6 Spring Part Number: GJS2-34-011F
$136.16 MSRP: $181.58You Save: $45.42 (26%)Ships in 1-2 Business Days
Mazda 6 Spring Part Number: GBFN-28-011
$101.59 MSRP: $135.48You Save: $33.89 (26%)Ships in 1-2 Business Days
Mazda 6 Spring Part Number: GS3L-28-011
$32.41 MSRP: $43.22You Save: $10.81 (26%)Ships in 1-2 Business Days
Mazda 6 Spring Part Number: GS3L-34-011A
$40.03 MSRP: $53.37You Save: $13.34 (25%)Ships in 1-2 Business DaysMazda 6 Spring Part Number: GS4K-34-011A
$40.85 MSRP: $54.47You Save: $13.62 (25%)Ships in 1-2 Business DaysMazda 6 Spring Part Number: GS4H-34-011A
$41.04 MSRP: $54.72You Save: $13.68 (25%)Ships in 1-2 Business DaysMazda 6 Spring Part Number: GS3N-34-011A
$41.41 MSRP: $55.23You Save: $13.82 (26%)Ships in 1-2 Business Days
Mazda 6 Spring Part Number: GK2G-34-011F
$50.21 MSRP: $66.96You Save: $16.75 (26%)Ships in 1-2 Business Days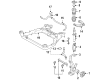
Mazda 6 Spring Part Number: GK2C-34-011F
$60.00 MSRP: $80.02You Save: $20.02 (26%)Ships in 1-2 Business DaysMazda 6 Spring Part Number: GK2E-34-011D
$60.63 MSRP: $80.84You Save: $20.21 (25%)Ships in 1-2 Business Days
Mazda 6 Spring Part Number: GSL3-34-011
$63.49 MSRP: $84.67You Save: $21.18 (26%)Ships in 1-2 Business DaysMazda 6 Spring Part Number: GBFN-34-011
$63.49 MSRP: $84.67You Save: $21.18 (26%)Ships in 1-2 Business DaysMazda 6 Spring Part Number: GBEF-34-011
$63.49 MSRP: $84.67You Save: $21.18 (26%)Ships in 1-2 Business Days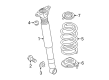
Mazda 6 Spring Part Number: GJP2-28-011
$85.81 MSRP: $114.43You Save: $28.62 (26%)Ships in 1-2 Business DaysMazda 6 Spring Part Number: GHR4-34-011F
$124.08 MSRP: $165.46You Save: $41.38 (26%)Ships in 1-2 Business DaysMazda 6 Spring Part Number: GHT2-34-011F
$133.08 MSRP: $177.47You Save: $44.39 (26%)Ships in 1-2 Business Days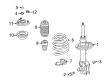
Mazda 6 Spring Part Number: GHM3-34-011F
$135.48 MSRP: $180.68You Save: $45.20 (26%)Ships in 1-2 Business Days
| Page 1 of 2 |Next >
1-20 of 27 Results
Mazda 6 Coil Springs
Looking for Coil Springs with proven quality? Choose OEM Coil Springs. Mazda designs and builds them to strict factory specs. Every piece goes through rigorous quality checks. You'll get parts that fit right and work like new. Shop our huge inventory of OEM Mazda 6 parts. Enjoy the highly competitive prices online. Our site is your one-stop shop. Each genuine 6 part includes a manufacturer's warranty. Buy with confidence. Our return policy is simple and hassle-free. In a rush? Choose expedited delivery at checkout. You'll love the streamlined experience from search to checkout to receiving your order.
Mazda 6 Coil Springs Parts and Q&A
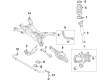
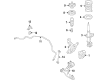
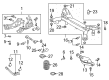
- Q: What steps should be followed to safely remove and inspect rear coil springs and the lower control arm on Mazda 6?A:The next task is to loosen the wheel lug nuts, lift the car and place it safely on jack stands and block the front wheels to ensure that the car does not roll over then remove the wheel. Make sure that you keep the lower Control Arm raised with a floor jack located under the coil spring pocket and place another floor jack on the trailing arm. In the event that there is no other floor jack, take the caliper out and suspend it using a piece of wire. Unscrew the stabilizer bar connection and take out the lower control arm outboard bolt. Fully extend the coil spring by positioning the lower arm downwards with the floor jack and label the position of the coil spring with the spring insulators. Look at the springs to see whether there are any cracks and chips and also check the upper insulator to see whether it is broken and worn out and replace the insulators when required. Installation is the opposite of removal as the lower end of coil spring is secured in the depressed section of the trailing arm and all the fasteners secured to the correct torque level.
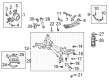
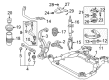
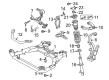
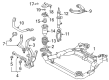
- Q: What precautions should be taken during the installation and removal of front coil springs and shock absorbers on Mazda 6?A:The manufacturer advises that all the fasteners need to be changed with new ones when installing them. Starting removal, it is important to loosen the wheel lug nuts, lift the vehicle and put it safely on jack stands before taking the wheel off. Unbolt brake hose bracket of the shock absorber, then disassemble the ABS speed sensor and also disassemble the wiring harness by removing the clamp bracket bolt. Disconnect the stabilizer bar link to the damper fork, however, should the ball stud rotate, clamp it with an Allen wrench and loosen the nut. Use a floor jack to support the Steering Knuckle and then loosen the bolt as well as flag nut that holds the damper fork to the lower Control Arm. Unscrew the pinch bolt holding the damper fork to the bottom of the shock absorber, loosening the fork with a hammer as needed so as to unscrew. Indicate the position of the outer mounting stud relative to the body in the engine compartment, hold the shock absorber/coil spring assembly, and take out the three upper mounting nuts. Fold the knuckle down to fit the shock absorber/coil spring assembly out, being careful not to overstretch the inner CV joint. To be checked, the shock body should also be inspected to check the presence of fluid leakage, dents, cracks and other apparent damages that would lead to replacement. Check the coil spring in the presence of chips or cracks with the spring coating as it will lead to early spring failure with corrosion and look upon the spring seat to the presence of the cuts, hardness, and overall wear. In case of any unwanted circumstances, go through the shock absorber/ coil spring disassembling process. To fit in place, insert upper mounting studs through body holes, fit the assembly up to the fender well and align the match marks that had been made earlier. After the studs stick out, fit the new nuts to ensure that the shock does not fall back through which is more simple with some help as the strut is heavy and cumbersome. Fit the damper fork to the bottom of the shock body, fit a new pinch bolt, not tight at this stage, so that it fits into the notch of the shock. Position the damper fork bottom in line with the insertion of a new bolt that would hold it in place on the bottom of the lower control arm. Install the steering knuckle by jacking the steering component to a target normal ride height and torque the damper fork-to-shock pinch bolt and the damper fork-to-lower control arm bolt to the correct specified torque. Use the stabilizer bar link to the damper fork and tighten the nut to the required torque. The rest of the installation is done in the opposite sequence of de-installation. Lastly, fit power, lug nuts and lug wrench, drop the car and secure the lug nuts to the required torque after which you are to tighten the upper mounting nuts to the required torque. Take the car to an alignment shop where the front end alignment would be inspected and adjusted when needed.


Related Mazda 6 Parts
 Mazda 6 Control Arm Bushing
 Mazda 6 Shock Absorber
 Mazda 6 Sway Bar Bushing
 Mazda 6 Sway Bar Link
 Mazda 6 Axle Support Bushings
 Mazda 6 Bump Stop
 Mazda 6 Control Arm Bolt
 Mazda 6 Control Arm Nut
 Mazda 6 Lateral Link
 Mazda 6 Radius Arm
 Mazda 6 Sway Bar Bracket
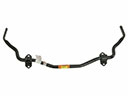 Mazda 6 Sway Bars
Browse by Year
2021 Coil Springs
2020 Coil Springs
2019 Coil Springs
2018 Coil Springs
2017 Coil Springs
2016 Coil Springs
2015 Coil Springs
2014 Coil Springs
2013 Coil Springs 2012 Coil Springs 2011 Coil Springs 2010 Coil Springs 2009 Coil Springs 2008 Coil Springs 2007 Coil Springs 2006 Coil Springs 2005 Coil Springs 2004 Coil Springs 2003 Coil Springs