×
- Hello
- Login or Register
- Quick Links
- Live Chat
- Track Order
- Parts Availability
- RMA
- Help Center
- Contact Us
- Shop for
- Mazda Parts
My Garage
My Account
Cart
Genuine Mazda 6 Radiator
Cooling Radiator- Select Vehicle by Model
- Select Vehicle by VIN
Select Vehicle by Model
orMake
Model
Year
Select Vehicle by VIN
For the most accurate results, select vehicle by your VIN (Vehicle Identification Number).
16 Radiators found


Mazda 6 Radiator Part Number: L5A3-15-200A
$329.96 MSRP: $440.04You Save: $110.08 (26%)Ships in 1-2 Business Days

Mazda 6 Radiator Part Number: PYML-15-200
$485.75 MSRP: $653.02You Save: $167.27 (26%)Ships in 1-2 Business Days
Mazda 6 Radiator Part Number: PE11-15-200B
$343.95 MSRP: $458.70You Save: $114.75 (26%)Ships in 1-2 Business Days
Mazda 6 Radiator Part Number: PE16-15-200
$381.93 MSRP: $513.45You Save: $131.52 (26%)Ships in 1-2 Business Days
Mazda 6 Radiator Part Number: L519-15-200B
$413.60 MSRP: $556.02You Save: $142.42 (26%)Ships in 1-2 Business DaysMazda 6 Radiator Part Number: L518-15-200B
$413.60 MSRP: $556.02You Save: $142.42 (26%)Ships in 1-2 Business Days
Mazda 6 Radiator Part Number: CA07-15-200A
$437.70 MSRP: $588.41You Save: $150.71 (26%)Ships in 1-2 Business Days

Mazda 6 Radiator Part Number: AJ57-15-200E
$25.98 MSRP: $34.11You Save: $8.13 (24%)Ships in 1-2 Business Days

Mazda 6 Radiator Part Number: L5A4-15-200A


Mazda 6 Radiator Part Number: L322-15-200E
Mazda 6 Radiator Part Number: L3R1-15-200A

Mazda 6 Radiator Part Number: L3K9-15-200D
Mazda 6 Radiator Part Number: L321-15-200E

Mazda 6 Radiator Part Number: CA38-15-200A
Mazda 6 Radiator Part Number: AJB5-15-200A
Mazda 6 Radiator Part Number: AJ58-15-200G
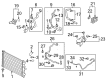
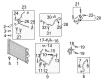
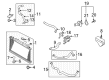
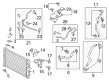
Mazda 6 Radiator
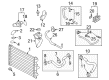
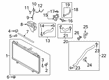
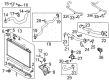
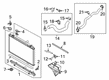
The Mazda 6 Radiator controls the temperature of the engine by being the primary heat exchanger for the coolant exiting the four-cylinder or six-cylinder powerplants. It is located in the front of the vehicle in front of the grille, which directs the outside air to pass through a dense core of thin-cut tubes and fins where the hot coolant is able to release heat rapidly, after which it is directed back to the engine. The majority of more recent Mazda models feature an aluminum core paired with lightweight plastic side tanks, which replace the older automobile style of copper or brass with lighter and more easily heat-transferring materials. The fins provide the coolant with a larger surface area and, as a result, the extent of heat that could be swept away by even the airflow at city speed could be carried away by the fan. The layout of the same basic crossflow has been in use by the 6 across two generations, but has been updated primarily in terms of materials. Construction materials can vary, but all Mazda Radiator units are based on the same concept, where the coolant is pumped in and out of the block through an inlet tank and an outlet tank respectively. In case of the development of a leak, replacement is the highly effective; however, small pinholes can occasionally be fixed by soldering or welding. Periodic flushing of coolant is also applied to avoid mineral deposition that seals the small tubes and reduces efficiency. The Radiator keeps engine performance, fuel economy and long-term engine life intact by ensuring a consistent operating temperature for any Mazda driver.
Looking for Radiator with proven quality? Choose OEM Radiator. Mazda designs and builds them to strict factory specs. Every piece goes through rigorous quality checks. You'll get parts that fit right and work like new. Shop our huge inventory of OEM Mazda 6 parts. Enjoy the highly competitive prices online. Our site is your one-stop shop. Each genuine 6 part includes a manufacturer's warranty. Buy with confidence. Our return policy is simple and hassle-free. In a rush? Choose expedited delivery at checkout. You'll love the streamlined experience from search to checkout to receiving your order.
Mazda 6 Radiator Parts and Q&A
- Q: How to disconnect and remove the radiator on Mazda 6?A:Disconnect the cable from the negative battery terminal, raise the vehicle and place it securely on jackstands. Remove the lower splash shield. Drain the cooling system; if the coolant is relatively new and in good condition, save it and reuse it. Detach the radiator hose from the bottom of the radiator. If you're working on a vehicle equipped with an automatic transaxle, disconnect the transaxle cooler lines from the radiator, use a drip pan to catch spilled fluid, and plug the lines and fittings. For 2008 and earlier models, remove the radiator support and cooling fan/shroud assembly. On four-cylinder models, remove the upper radiator hose. On V models, remove the power steering reservoir mounting nuts and set the reservoir to the side. Remove the coolant reservoir hose (if equipped). Remove the radiator mounting bolts and carefully lift out the radiator, ensuring not to spill coolant on the vehicle or scratch the paint. Make sure the rubber radiator insulators that fit on the bottom of the radiator and into the sockets in the body remain in place for proper reinstallation of the radiator. For 2009 and later models, remove the air filter housing and inlet air assembly, then disconnect the fan motor electrical connector(s). Remove the cooling fan/shroud assembly from the radiator. On 2010 and earlier models, remove the front bumper cover. Remove the radiator hoses. Remove the coolant reservoir hose. Press each of the upper radiator mount covers down and towards the front of the vehicle to remove the covers. Once the covers are out, remove the upper rubber mounts. On 2010 and earlier models, working from the front side of the radiator, squeeze the radiator-to-radiator support locking tabs together and pull the radiator and condenser forward. Lift the condenser up a few inches and out to separate it from the radiator brackets, then set the condenser back into the opening. On 2011 and later models, pull the radiator and condenser forward slightly, then remove the condenser-to-radiator mounting bolts. Carefully lift out the radiator, ensuring not to spill coolant on the vehicle or scratch the paint. Remove bugs and dirt from the radiator with compressed air and a soft brush, being careful not to bend the cooling fins. Inspect the radiator for leaks and damage. If it needs repair, have a radiator shop or a dealer service department do the work. Inspect the rubber insulators in the lower crossmember for cracks and deterioration, ensuring that they're free of dirt and gravel. When installing the radiator, make sure that it's correctly seated on the insulators before fastening the top brackets. Installation is otherwise the reverse of removal. After installation, fill the cooling system with the correct mixture of antifreeze and water, then bleed the air from the system. Start the engine and check for leaks. Allow the engine to reach normal operating temperature, indicated by the upper radiator hose becoming hot. Recheck the coolant level and add more if required. On automatic transaxle-equipped vehicles, check and add transaxle fluid as needed.


