×
- Hello
- Login or Register
- Quick Links
- Live Chat
- Track Order
- Parts Availability
- RMA
- Help Center
- Contact Us
- Shop for
- Mazda Parts
My Garage
My Account
Cart
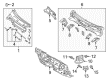
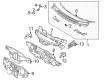
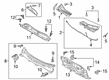
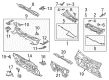
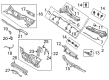
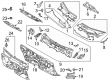
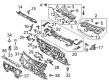
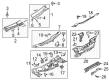
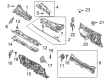
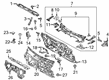
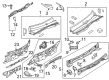
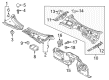
Genuine Mazda Dash Panels
Dashboard- Select Vehicle by Model
- Select Vehicle by VIN
Select Vehicle by Model
orMake
Model
Year
Select Vehicle by VIN
For the most accurate results, select vehicle by your VIN (Vehicle Identification Number).
41 Dash Panels found

Mazda Lower Dash Panel Part Number: TN39-53-400A
$629.07 MSRP: $859.56You Save: $230.49 (27%)Ships in 1-2 Business DaysProduct Specifications- Other Name: Panel, Dash-Lower
- Position: Lower
Mazda Lower Dash Panel Part Number: TK48-53-400
$641.66 MSRP: $876.76You Save: $235.10 (27%)Ships in 1-2 Business DaysProduct Specifications- Other Name: Panel, Dash-Lower
- Position: Lower
- Replaced by: TK48-53-400A

Mazda Dash Panel Part Number: LD47-53-400C
$741.93 MSRP: $1013.77You Save: $271.84 (27%)Ships in 1-2 Business DaysProduct Specifications- Other Name: Panel, Dash-Lower

Mazda Upper Dash Panel Part Number: BDTS-53-500B
$142.38 MSRP: $189.87You Save: $47.49 (26%)Ships in 1-2 Business DaysProduct Specifications- Other Name: Panel, Dash & Cowl Front
- Position: Upper
- Replaces: BCJH-53-500A, BDTS-53-500A, BCJH-53-500, BDTS-53-500


Mazda Upper Dash Panel Part Number: FF14-53-510A
$268.04 MSRP: $357.46You Save: $89.42 (26%)Ships in 1-2 Business DaysProduct Specifications- Other Name: Panel, Dash-Upper
- Position: Upper

Mazda Lower Dash Panel Part Number: GMD9-53-400
$275.34 MSRP: $367.19You Save: $91.85 (26%)Ships in 1-2 Business DaysProduct Specifications- Other Name: Panel, Dash-Lower
- Position: Lower

Mazda Upper Dash Panel Part Number: BJS7-53-500D
$299.75 MSRP: $399.74You Save: $99.99 (26%)Ships in 1-2 Business DaysProduct Specifications- Other Name: Panel, Dash & Cowl Front
- Position: Upper
Mazda Lower Dash Panel Part Number: GME1-53-400
$284.15 MSRP: $378.94You Save: $94.79 (26%)Ships in 1-2 Business DaysProduct Specifications- Other Name: Panel, Dash-Lower
- Position: Lower

Mazda Lower Dash Panel Part Number: BBM4-53-400C
$308.39 MSRP: $411.26You Save: $102.87 (26%)Ships in 1-2 Business DaysProduct Specifications- Other Name: Panel, Dash-Lower
- Position: Lower
- Replaces: BBM4-53-400A, BBM4-53-400B

Mazda Lower Dash Panel Part Number: KB8A-53-400
$314.60 MSRP: $419.56You Save: $104.96 (26%)Ships in 1-2 Business DaysProduct Specifications- Other Name: Panel, Dash-Lower
- Position: Lower
- Replaced by: KB8A-53-400A

Mazda Dash Panel Part Number: GHR4-53-400F
$361.01 MSRP: $481.45You Save: $120.44 (26%)Ships in 1-2 Business DaysProduct Specifications- Other Name: Panel, Dash-Lower; Lower Dash Panel
- Replaces: BJS9-53-400B

Mazda Lower Dash Panel Part Number: CE13-53-400B
$375.20 MSRP: $504.39You Save: $129.19 (26%)Ships in 1-2 Business DaysProduct Specifications- Other Name: Panel, Dash-Lower
- Position: Lower

Mazda Dash Panel Part Number: DN4E-53-400B
$393.40 MSRP: $528.87You Save: $135.47 (26%)Ships in 1-2 Business DaysProduct Specifications- Other Name: Panel, Dash-Lower
- Replaces: DN4E-53-400, DN4E-53-400A

Mazda Dash Panel Part Number: GRF9-53-400A
$397.23 MSRP: $534.02You Save: $136.79 (26%)Ships in 1-2 Business DaysProduct Specifications- Other Name: Panel, Dash-Lower
Mazda Lower Dash Panel Part Number: CC29-53-400C
$405.52 MSRP: $545.16You Save: $139.64 (26%)Ships in 1-2 Business DaysProduct Specifications- Other Name: Panel, Dash-Lower
- Position: Lower
- Replaces: CC29-53-400B
Mazda Dash Panel Part Number: GRF6-53-400B
$406.68 MSRP: $546.73You Save: $140.05 (26%)Ships in 1-2 Business DaysProduct Specifications- Other Name: Panel, Dash-Lower
- Replaces: GRF6-53-400A

Mazda Dash Panel Part Number: DF71-53-400E
$421.49 MSRP: $566.62You Save: $145.13 (26%)Ships in 1-2 Business DaysProduct Specifications- Other Name: Panel, Dash-Lower
Mazda Dash Panel Part Number: GRF9-53-400B
$434.57 MSRP: $584.21You Save: $149.64 (26%)Ships in 1-2 Business DaysProduct Specifications- Other Name: Panel, Dash-Lower

Mazda Lower Dash Panel Part Number: NA1J-53-400D
$471.10 MSRP: $633.32You Save: $162.22 (26%)Ships in 1-2 Business DaysProduct Specifications- Other Name: Panel, Dash-Lower
- Position: Lower
Mazda Lower Dash Panel Part Number: NA1L-53-400D
$436.52 MSRP: $586.84You Save: $150.32 (26%)Ships in 1-2 Business DaysProduct Specifications- Other Name: Panel, Dash-Lower
- Position: Lower
| Page 1 of 3 |Next >
1-20 of 41 Results
Mazda Dash Panels
Mazda Dash Panels deliver a clear command hub that places gauges, switches, and entertainment where the driver can reach them quickly, keeping eyes on the road and hands relaxed. Mazda began building cars in 1931 and earned fame through its rotary engine before moving to efficient Skyactiv powertrains that save fuel without killing excitement. The brand also blends Kodo design, i-Activsense safety aids, and available i-Activ AWD to create vehicles that look sleek, feel agile, and protect families in changing weather. These strengths give Mazda a reputation for spirited driving wrapped in smart technology. Inside every model, the Mazda Dash Panels support that reputation by uniting visibility, comfort, and durability. A consistent cockpit layout stretches across the lineup, so whether the vehicle is small or large the driver instantly feels at home with identical control positions and clear analog or digital readouts. High grade plastics resist fading from sunlight, and subtle textures cut glare while adding style. Simple cleaning keeps fingerprints away, and owners can refresh minor scuffs with light sanding and matching paint, restoring the factory look without expensive parts. Integrated air vents, audio controls, and storage cut clutter while maintaining solid structure, proving Mazda thought about long term use when crafting Dash Panels that match the brand's fun to drive spirit with lasting practicality.
You'll get great performance and real durability when you pick genuine OEM Dash Panels. Mazda builds these using high-quality materials and official factory methods to ensure they hold up mile after mile. You deserve that Mazda reliability without the headache of cheap knockoffs. It is easy to find exactly what you need in our huge inventory of genuine parts. Plus, every OEM part carries a real manufacturer's warranty for your peace of mind. You will love our low prices too. Order today and we will ship your brand-new parts fast. They often reach your door in just a few days.
Mazda Dash Panels Parts and Q&A
- Q: What steps are involved in removing dash panels to access electrical and electronic components on Mazda 3?A:Removal of different dash panels also allows access to electrical and electronic parts including the instrument cluster, audio unit, heater and air conditioning control unit and a range of switches mounted on instrument panels. In order to remove the complete instrument panel, all the dash panels have to be removed to reach the mounting bolts. Start by removing the cable between the negative battery terminal. The scuff plate is easy to remove, and it can be replaced in the reverse order. With the kick panel, take out the plastic pin-type fastener, push the top forward to remove the clip and install in the reverse. On driver side lower trim panel, take off the hood release handle and screw, tear away the panel, take off electrical connectors and put back in the order. On the passenger side of 2010 and subsequent models, the scuff plate and kick panel are to be removed, then the undercover mounting fasteners, the glove box door, and the trim panel are to be removed by unscrewing clips and guides and replacement. Beginning at the left end of the ornamental decorative trim panel, pry it carefully up and in the case of 2010 and later models, take a screw out of the background of the end panel on the passenger side. Installation The glove box has a panel, the trim panel, which is removed in a reverse order. In the case of the center trim panel, loosen screws and the decorative trim panel and remove the center trim panel, undo the electrical connector of the hazard switch and re-install in the same order. On the side center trim panel of the 2010 and later models, the instrument cluster and center trim panel are removed, then the center trim can be pried out of the bottom to the top, and then installed back in the same manner. In case of top dash pieces of 2009 models and above, take off the A-pillar trim piece, instrument cluster trim piece, and upper piece trim piece assembly screws, and disconnect the clips to remove and reattach. On 2010 models, detach the instrument cluster, center trim panel, and side center trim panel and lift the main trim panel using the corners and un-hook electrical connectors on Bose-equipped models and then reinstall. To remove the knee bolster of the 2010 and the subsequent models, simply take out the lower panel of the trim of the driver side, the center console and knee bolster mounting bolts, and reassemble in the same order. Lastly, in 2010 and later models with left or right dash end trim panels, the left or right dash end trim panel needs to be carefully removed and installed in the reverse order.
- Q: How to remove the dash panels and disconnect the cable from the negative battery terminal to access electrical components on Mazda 6?A:Disconnect the cable from the negative battery terminal. Removing various dash panels provides access to electrical and electronic components such as the instrument cluster, audio unit, heater and air conditioning control unit, and various instrument panel-mounted switches. To remove the entire instrument panel, all of the dash panels must be removed to access the instrument panel mounting bolts. Carefully pry off the left or right dash end trim panel, and installation is the reverse of removal. For the instrument cluster trim panel, remove the steering column covers, and on later models, remove the knee bolster trim panel. On earlier models, remove the instrument cluster trim panel mounting screws, then pull the cluster trim panel to the rear to disengage the two retaining clips located at the lower corners. Ensure that the two lower retaining clips snap into place before installing the two upper screws during reinstallation. To detach the instrument cluster hood panel from its mounting clips, work your way around the outside of the hood panel, carefully prying loose the clips with a suitable trim removal tool, then pull the panel forward to disconnect the rubber strip to the upper steering column cover. For the center trim panel on earlier models, remove the glove box, center console, and center trim panel mounting screws, then remove the A/C and heater unit dials and the mounting screws, followed by the retaining bolt from each side of the unit. Carefully pry around the edges of the center panel and pull it out, disconnecting the electrical connectors from the radio and the heater and air conditioning control unit. For later models, note that the center trim panel and center console outer panel are one piece, and be sure to pry all the clips up around the perimeter before attempting removal. For the upper trim panel, carefully pry around the edges to disengage the clips, then pull the center panel forward to disconnect the center speaker, hazard switch, and information display connectors. For the lower trim panel, remove the upper trim panel, shift knob, and console shift indicator panel, then carefully pry the panel forward to disengage the clips and remove it, disconnecting any electrical connectors. For the upper storage bin on earlier models, remove the center trim panel, then remove the upper storage bin retaining screws, disengage the storage bin mounting clips, and remove the upper storage bin. For the knee bolster trim panel and knee bolster on later models, remove the weather strip sill panel and kick panel, then remove the instrument cluster hood panel, hood release lever, and screws from the panel, carefully prying it to disengage the clips. Remove the fasteners securing the knee bolster, with installation being the reverse of removal. For the glove box on earlier models, disengage the damper clip, grasp the hinge areas, push in to disengage the hinge pins, and remove the glove box, with installation being the reverse of removal. For later models, open the glove box, squeeze the strut locking tabs together, slide the strut off, squeeze the glove box stops in, and allow it to come down enough to disengage it from the lower panel before removal, with installation being the reverse of removal.


Related Mazda Parts
 Mazda Washer Pump
 Mazda Coolant Reservoir
 Mazda Wiper Blade
 Mazda Battery Hold Downs
 Mazda Body Mount Hole Plug
 Mazda Door Screws
 Mazda Exhaust Nut
 Mazda Headlight Screws
 Mazda Washer Reservoir
 Mazda Weather Strip
 Mazda Windshield Wiper Arms
 Mazda Windshield Wiper Motors