×
- Hello
- Login or Register
- Quick Links
- Live Chat
- Track Order
- Parts Availability
- RMA
- Help Center
- Contact Us
- Shop for
- Mazda Parts
My Garage
My Account
Cart
Genuine Mazda Windshield Wiper Motors
Wiper Motor- Select Vehicle by Model
- Select Vehicle by VIN
Select Vehicle by Model
orMake
Model
Year
Select Vehicle by VIN
For the most accurate results, select vehicle by your VIN (Vehicle Identification Number).
71 Windshield Wiper Motors found

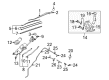
Mazda Wiper Motor Part Number: DGH9-67-450
$111.90 MSRP: $149.23You Save: $37.33 (26%)Ships in 1-2 Business DaysProduct Specifications- Other Name: Motor; Rear Motor
- Replaced by: DGH9-67-450A

Mazda Wiper Motor Assembly Part Number: ECY1-67-4L0G
$95.66 MSRP: $127.57You Save: $31.91 (26%)Ships in 1-2 Business DaysProduct Specifications- Other Name: Wiper Set, Back Window; Rear Motor
- Replaces: EC01-67-450E, ECY1-67-4L0E, EC01-67-450C, ECY1-67-4L0F, EC01-67-450, ECY1-67-4L0A, EC01-67-450A, EC01-67-450D, ECY1-67-4L0C, EC01-67-450B, ECY1-67-7L0A, ECY1-67-4L0, ECY1-67-4L0D

Mazda Wiper Motor Part Number: DFR5-67-450
$105.63 MSRP: $140.87You Save: $35.24 (26%)Ships in 1-2 Business DaysProduct Specifications- Other Name: Motor; Rear Motor
- Replaced by: DFR5-67-450A

Mazda Wiper Motor Part Number: KB7W-67-450
$120.31 MSRP: $160.45You Save: $40.14 (26%)Ships in 1-2 Business DaysProduct Specifications- Other Name: Motor; Rear Motor

Mazda Wiper Motor Part Number: KD53-67-450
$120.35 MSRP: $160.50You Save: $40.15 (26%)Ships in 1-2 Business DaysProduct Specifications- Other Name: Motor; Rear Motor

Mazda Wiper Motor Part Number: GP7A-67-340A
$120.45 MSRP: $160.63You Save: $40.18 (26%)Ships in 1-2 Business DaysProduct Specifications- Other Name: Motor, Wiper; Front Motor
- Replaces: GP7A-67-340

Mazda Wiper Motor Part Number: D10E-67-450
$129.66 MSRP: $172.92You Save: $43.26 (26%)Ships in 1-2 Business DaysProduct Specifications- Other Name: Motor; Rear Motor

Mazda Wiper Motor Part Number: BHS2-67-450
$135.58 MSRP: $180.81You Save: $45.23 (26%)Ships in 1-2 Business DaysProduct Specifications- Other Name: Motor; Rear Motor

Mazda Wiper Motor Part Number: CC29-67-340C
$136.09 MSRP: $181.48You Save: $45.39 (26%)Ships in 1-2 Business DaysProduct Specifications- Other Name: Motor, Wiper; Front Motor
- Replaces: CC29-67-340B, CC29-67-340A

Mazda Wiper Motor Part Number: VA45-67-450
$137.79 MSRP: $183.75You Save: $45.96 (26%)Ships in 1-2 Business DaysProduct Specifications- Other Name: Motor; Rear Motor
- Replaced by: VA45-67-450A

Mazda Wiper Motor Part Number: TD12-67-340
$152.41 MSRP: $203.27You Save: $50.86 (26%)Ships in 1-2 Business DaysProduct Specifications- Other Name: Motor, Wiper; Front Motor

Mazda Motor Part Number: LC62-67-450A
$142.25 MSRP: $189.71You Save: $47.46 (26%)Ships in 1-2 Business DaysProduct Specifications- Other Name: Rear Motor

Mazda Wiper Motor Part Number: EG21-67-340
$143.24 MSRP: $191.03You Save: $47.79 (26%)Ships in 1-2 Business DaysProduct Specifications- Other Name: Motor, Wiper; Front Motor

Mazda Wiper Motor Part Number: BCKN-67-450
$129.66 MSRP: $172.92You Save: $43.26 (26%)Ships in 1-2 Business DaysProduct Specifications- Other Name: Motor; Rear Motor
- Replaced by: BCKN-67-450A

Mazda Wiper Motor Part Number: DB2W-67-340
$159.60 MSRP: $212.85You Save: $53.25 (26%)Ships in 1-2 Business DaysProduct Specifications- Other Name: Motor, Wiper; Front Motor

Mazda Wiper Motor Part Number: KD53-67-340D
$159.63 MSRP: $212.88You Save: $53.25 (26%)Ships in 1-2 Business DaysProduct Specifications- Other Name: Motor, Wiper; Front Motor
- Replaces: KD53-67-340B, KD53-67-340, KD53-67-340C, KD53-67-340A
Mazda Wiper Motor Part Number: BJT6-67-450
$161.26 MSRP: $215.05You Save: $53.79 (26%)Ships in 1-2 Business DaysProduct Specifications- Other Name: Motor; Rear Motor
Mazda Wiper Motor Part Number: TD11-67-340
$153.60 MSRP: $204.84You Save: $51.24 (26%)Ships in 1-2 Business DaysProduct Specifications- Other Name: Motor, Wiper; Front Motor

Mazda Wiper Motor Part Number: GS3L-67-340
Product Specifications- Other Name: Motor, Wiper

Mazda Motor Part Number: C235-67-450
Product Specifications- Other Name: Rear Motor
| Page 1 of 4 |Next >
1-20 of 71 Results
Mazda Windshield Wiper Motors
Mazda Windshield Wiper Motors transform electricity into precise back-and-forth blade motion that keeps glass clear in a matter of moments, giving drivers unfettered visibility in the rain or road spray. Mazda has built a world-renowned legacy of combining spirited performance with practical efficiency, from its rotary innovations of yesteryear to modern Skyactiv engines that sip fuel and deliver punchy response. The company's Kodo design wraps each model in flowing lines suggesting motion even at rest, and i-Activsense technologies add smart lane keeping, radar cruise, and adaptable all-wheel drive that inspires confidence on winding or wet roads. By combining these elements, Mazda is providing vehicles that feel young, reliable, and environmentally conscious without compromising on driving enjoyment. Complementing that philosophy, Windshield Wiper Motors throughout the lineup hold the same commitment to balance and reliability. Compact casings conceal worm gears that increase torque, linkages convert spin into sweeping arcs, and multi-speed circuits allow drivers to match wipe rate to drizzle or downpour so focus is kept on the journey. Modern seals resist moisture intrusion, and corrosion-proof housings stand up to salted winter slush, increasing service life and minimizing hassle. Regular checks of Windshield Wiper Motors help to spot silence after switch activation or grinding noises at an early stage so that they can be replaced quickly and total clarity is restored, and every Mazda is ready for sudden storms. These lowly but essential components are a testament to the diligence of detail that goes into supporting the greater Mazda promise of safe, enjoyable mobility.
You'll get great performance and real durability when you pick genuine OEM Windshield Wiper Motors. Mazda builds these using high-quality materials and official factory methods to ensure they hold up mile after mile. You deserve that Mazda reliability without the headache of cheap knockoffs. It is easy to find exactly what you need in our huge inventory of genuine parts. Plus, every OEM part carries a real manufacturer's warranty for your peace of mind. You will love our low prices too. Order today and we will ship your brand-new parts fast. They often reach your door in just a few days.
Mazda Windshield Wiper Motors Parts and Q&A
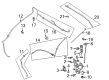
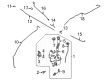
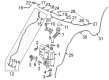
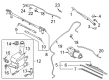
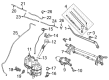
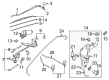
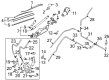
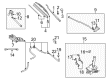
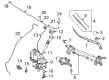
- Q: How to remove Windshield Wiper Motors and link assembly on Mazda 3?A:Take away the wiper arm nuts and measure the position of the wiper arms in relation to their shafts and then remove the two wiper arms. Next, take off the upper and the bottom cowl panels. Apply a tape on the lower ends of the windshield to avoid breaking the glass. The next step is to extract the wiper motor and link assembly mounting bolts, and slide the motor and link assembly forward and off the locating pin to remove the wiper motor and link assembly. Unplug the electric connector with the wiper motor and remove the nut holding the crank arm to the shaft of the motor. Indicate the connection between the crank arm and the motor shaft and take the crank arm off the shaft. Lastly, disassemble the screwdriver on the motor that secures the motor to the mounting bracket, and remove the motor out of the mounting bracket, and install it back into the mounting bracket likewise.
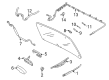
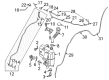
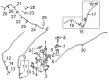
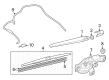
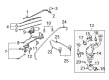
- Q: How to remove and install rear Windshield Wiper Motors on Mazda 929?A:The rear wiper motor of the 323 can be fitted and removed by disconnection of the negative battery cable, the installation angle of the wiper arm, unscrewing the screw connecting the arm and then removing it. On hatchbacks the motor is usually placed behind a panel in the rear hatch, and on sedan cars the motor is usually placed behind the rear seat, remove the relevant panel, detach the electrical connector and remove the mounting bolts, then carefully slide the shaft right through the rubber seal and do not bend or damage it. To install it, invert the steps of removal and put the rubber seal back in case it broke. On 1979-87 626, do the same, but, after following the first steps, pull the panel out of the back hatch, disconnect the electrical connector and pull out the motor and the mount bracket straight toward you again, being careful that the shaft stays straight through the rubber seal. During installation, move the mounting bracket to the new motor. On 1988-89 626 and MX-6, disconnect the negative battery cable, disconnect the rear wiper arm, and lift the rear hatch to expose the motor assembly by taking off the trim. Carefully take off the rear hatch screen so that it can be used later, take off the motor connector, loosen the bolts and remove the motor. Installation During installation, place the motor and install the bolts, wiring, re-install the hatch screen, and trim, and install the wiper arm and re-connect the battery cable to test the system. On RX-7 models that have a rear glass hatch, unscrew the negative battery connection, unscrew the wiper arm, the bushings, nuts and shaft seal, and unscrew the motor connector and remove the motor off the mounting plate. To install, fit the motor, screws, wiring and close the hatch, and it may be required to replace the shaft seal: reassemble the wiper arm and reconnect the battery cable to test the system.


Related Mazda Parts
 Mazda A/C Condenser
 Mazda Fuel Filter
 Mazda Timing Chain Tensioner
 Mazda Air Bag Sensor
 Mazda Automatic Transmission Shift Levers
 Mazda Coolant Pipe Seal
 Mazda Differential Bearing
 Mazda Door Check
 Mazda EGR Tube Gaskets
 Mazda Heater Hose
 Mazda Power Steering Cylinder Boot Kit
Browse by Model
2 Windshield Wiper Motors 3 Windshield Wiper Motors 323 Windshield Wiper Motors 5 Windshield Wiper Motors 6 Windshield Wiper Motors 626 Windshield Wiper Motors 929 Windshield Wiper Motors B2000 Windshield Wiper Motors B2200 Windshield Wiper Motors B2300 Windshield Wiper Motors B2500 Windshield Wiper Motors B2600 Windshield Wiper Motors B3000 Windshield Wiper Motors B4000 Windshield Wiper Motors CX-3 Windshield Wiper Motors CX-30 Windshield Wiper Motors CX-5 Windshield Wiper Motors CX-50 Windshield Wiper Motors CX-7 Windshield Wiper Motors CX-9 Windshield Wiper Motors Miata Windshield Wiper Motors Millenia Windshield Wiper Motors MPV Windshield Wiper Motors MX-30 EV Windshield Wiper Motors MX-5 Miata Windshield Wiper Motors MX-6 Windshield Wiper Motors Protege Windshield Wiper Motors Protege5 Windshield Wiper Motors RX-7 Windshield Wiper Motors RX-8 Windshield Wiper Motors Tribute Windshield Wiper Motors