×
- Hello
- Login or Register
- Quick Links
- Live Chat
- Track Order
- Parts Availability
- RMA
- Help Center
- Contact Us
- Shop for
- Mazda Parts
My Garage
My Account
Cart
Genuine Mazda Millenia Oil Pump
Oil Fluid Pump- Select Vehicle by Model
- Select Vehicle by VIN
Select Vehicle by Model
orMake
Model
Year
Select Vehicle by VIN
For the most accurate results, select vehicle by your VIN (Vehicle Identification Number).
2 Oil Pumps found

Mazda Millenia Oil Pump Part Number: KL01-14-100J
$353.78 MSRP: $471.79You Save: $118.01 (26%)Ships in 1-2 Business Days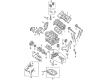
Mazda Millenia Oil Pump Part Number: KJ01-14-100A
$379.81 MSRP: $510.60You Save: $130.79 (26%)Ships in 1-2 Business Days
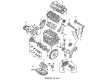
Mazda Millenia Oil Pump
Looking for Oil Pump with proven quality? Choose OEM Oil Pump. Mazda designs and builds them to strict factory specs. Every piece goes through rigorous quality checks. You'll get parts that fit right and work like new. Shop our huge inventory of OEM Mazda Millenia parts. Enjoy the highly competitive prices online. Our site is your one-stop shop. Each genuine Millenia part includes a manufacturer's warranty. Buy with confidence. Our return policy is simple and hassle-free. In a rush? Choose expedited delivery at checkout. You'll love the streamlined experience from search to checkout to receiving your order.
Mazda Millenia Oil Pump Parts and Q&A
- Q: How to service the oil pump and oil pump gasket assembly on Mazda Millenia?A:One has to remove the 2.3L engine oil pump assembly out of the vehicle because of space limitation to service the assembly. The steps to follow include first disconnection of the negative battery cable and a safe support of the vehicle. Disassemble Timing Belt, crankshaft damper retaining bolt, and damper as well as timing belt sprocket, empty the engine oil and remove the Oil Pan. Then take off the oil pump pickup lube -oil pump bolts, tube, and gasket. Removing the pump housing off the front of the block, be aware of any other engine block support components that can make it difficult to do so; do not pry between the mating surfaces of the gaskets and draw the pump out; pull it off. Then remove the bolts of the oil pump housing-to-cylinder block, the pump, and the gasket (where present). Where necessary, remove the oil seal on the pump and wipe the seal bore. Wipe down all gasket mounting areas, check the wear of pump and gears. To install, use continuous bead of silicone sealer on the surface of the oil pump gasket being careful not to get into the outlet hole of the pump. Install in a new O-ring into the pump body and then hook the oil pump to the cylinder block without damaging the lip of the oil seal, and fit the bolts before tightening them to specifications. Install the oil pump pickup lube, a new gasket, the oil pan and the crankshaft sprocket by screwing on the sprocket bolt up to specification. Lastly, reconnect negative battery cable, and refill the crankcase, start engine and look at the leaks. In the case of the front seal, disconnect the negative battery cable and place the vehicle on support and then take the timing belt, crankshaft damper retaining bolt, and damper, timing belt sprocket, and sprocket key off the crankshaft. Carefully pry off the oil seal off the engine block using a small prybar without damaging the crankshaft or seal seat and clean the seal bore. Installation should be done by lubricating the seal lip with clean engine oil and then drive the new seal to the engine until it is firmly seated and then install it in reverse sequence by ensuring all the bolts are tightened to fit the required specification.

Related Mazda Millenia Parts
 Mazda Millenia Belt Tensioner
 Mazda Millenia Crankshaft Pulley
 Mazda Millenia Crankshaft Seal
 Mazda Millenia Piston
 Mazda Millenia Rod Bearing
 Mazda Millenia Timing Belt Idler Pulley
 Mazda Millenia Timing Cover
 Mazda Millenia Timing Cover Gasket
 Mazda Millenia Valve Cover Gasket
 Mazda Millenia Valve Lifter
 Mazda Millenia Valve Spring
 Mazda Millenia Valve Stem Seal