×
- Hello
- Login or Register
- Quick Links
- Live Chat
- Track Order
- Parts Availability
- RMA
- Help Center
- Contact Us
- Shop for
- Mazda Parts
My Garage
My Account
Cart
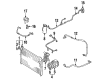
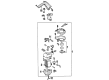
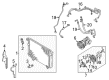
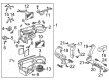
Genuine Mazda MPV A/C Evaporator Core
A/C Evaporators- Select Vehicle by Model
- Select Vehicle by VIN
Select Vehicle by Model
orMake
Model
Year
Select Vehicle by VIN
For the most accurate results, select vehicle by your VIN (Vehicle Identification Number).
5 A/C Evaporator Cores found

Mazda MPV Core Part Number: LA0161J10

Mazda MPV Core Part Number: LB4061J10
Mazda MPV Evaporator Assembly Part Number: LB83-61-870B

Mazda MPV Evaporator Core Part Number: LC70-61-J10A

Mazda MPV Evaporator Part Number: LC74-61-P10A
Mazda MPV A/C Evaporator Core
Looking for A/C Evaporator Core with proven quality? Choose OEM A/C Evaporator Core. Mazda designs and builds them to strict factory specs. Every piece goes through rigorous quality checks. You'll get parts that fit right and work like new. Shop our huge inventory of OEM Mazda MPV parts. Enjoy the highly competitive prices online. Our site is your one-stop shop. Each genuine MPV part includes a manufacturer's warranty. Buy with confidence. Our return policy is simple and hassle-free. In a rush? Choose expedited delivery at checkout. You'll love the streamlined experience from search to checkout to receiving your order.
Mazda MPV A/C Evaporator Core Parts and Q&A
- Q: How to remove and install the A/C Evaporator Core in an air conditioning system on Mazda MPV?A:One must empty the cooling system by first pumping the air conditioning, and pulling out the negative cable attached to the battery when removing the front evaporator. The second step is to remove the passenger side lower glovebox and trim to reveal the cooling unit case. Find and remove the refrigerant lines at the firewall location, then use a backup wrench to help avoid twisting of the tubing, and seal all the refrigerant lines to seal out moisture. To install the evaporator case, which is located on the passenger side of the firewall, remove the grommets, disconnect the electrical connector on the thermo switch and remove the attaching nuts. Remove the screws that hold the upper and lower halves of the evaporator and remove the evaporator. To install, turn the process of removal in reverse and make sure to fill the cooling system up, then evacuate, recharge, and leak test the air conditioning system with a qualified shop. In the case of the rear evaporator, release air conditioning system, and unhook the negative cable with battery. Take out the trim panel on the left rear side, switch the refrigerant lines off the evaporator and then take out all the electrical connections and hoses to the cooling unit assembly. Dismantle by un-bolstering the evaporator by detaching the rear cooling unit nuts and bolts and then detach the upper and lower half of the case to gain access to the evaporator and remove it. Installation is the opposite of the removal process and the same will be necessary in evacuation, recharging and leak testing of air conditioning system.
Related Mazda MPV Parts
 Mazda MPV A/C Clutch
 Mazda MPV Axle Beam Mount
 Mazda MPV Blower Motor Resistor
 Mazda MPV Control Arm
 Mazda MPV Control Arm Bushing
 Mazda MPV Cooling Fan Assembly
 Mazda MPV Heater Core
 Mazda MPV Ignition Lock Cylinder
 Mazda MPV Water Pump Gasket
 Mazda MPV Wheel Seal
Browse by Year
2006 A/C Evaporator Core 2005 A/C Evaporator Core 2004 A/C Evaporator Core 2003 A/C Evaporator Core 2002 A/C Evaporator Core 2001 A/C Evaporator Core 2000 A/C Evaporator Core 1998 A/C Evaporator Core 1997 A/C Evaporator Core 1996 A/C Evaporator Core 1995 A/C Evaporator Core 1994 A/C Evaporator Core 1993 A/C Evaporator Core 1992 A/C Evaporator Core 1991 A/C Evaporator Core 1990 A/C Evaporator Core 1989 A/C Evaporator Core