×
- Hello
- Login or Register
- Quick Links
- Live Chat
- Track Order
- Parts Availability
- RMA
- Help Center
- Contact Us
- Shop for
- Mazda Parts
My Garage
My Account
Cart
Genuine Mazda MPV Control Arm
Suspension Arm- Select Vehicle by Model
- Select Vehicle by VIN
Select Vehicle by Model
orMake
Model
Year
Select Vehicle by VIN
For the most accurate results, select vehicle by your VIN (Vehicle Identification Number).
5 Control Arms found

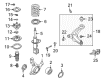
Mazda MPV Lower Control Arm Part Number: LC62-34-350C
$394.78 MSRP: $530.73You Save: $135.95 (26%)Ships in 1-2 Business DaysMazda MPV Lower Control Arm Part Number: LC62-34-300C
$415.11 MSRP: $558.06You Save: $142.95 (26%)Ships in 1-2 Business Days
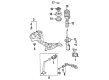
Mazda MPV Control Arm Part Number: LB82-34-300
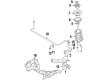
Mazda MPV Lower Control Arm Part Number: LA12-34-350C
Mazda MPV Lower Control Arm Part Number: LA12-34-300C
Mazda MPV Control Arm
Looking for Control Arm with proven quality? Choose OEM Control Arm. Mazda designs and builds them to strict factory specs. Every piece goes through rigorous quality checks. You'll get parts that fit right and work like new. Shop our huge inventory of OEM Mazda MPV parts. Enjoy the highly competitive prices online. Our site is your one-stop shop. Each genuine MPV part includes a manufacturer's warranty. Buy with confidence. Our return policy is simple and hassle-free. In a rush? Choose expedited delivery at checkout. You'll love the streamlined experience from search to checkout to receiving your order.
Mazda MPV Control Arm Parts and Q&A
- Q: How to remove the control arm for 2WD on Mazda MPV?A:Relax the rear wheel lug nuts, lift the rear part of the car and place it on jackstands in order to remove the wheels. Place a floor jack beneath the differential to support the axle housing, and (where it is fitted) remove the air line fitting between the shock absorbers. Remove the lower part of the Panhard rod of the axle housing, and the lower parts of the shock absorbers of the axle. Use chains to fix the coil springs to the axle so that they do not come flying away when the axle is lowered, when there is sufficient slack in the chain the coil springs can fully extend. When all the compression is removed carefully lower the jack, bearing out the axle and then taking out the coil springs. Check the bump stoppers and spring seats at the ends of every coil spring, (upper up to the end and lower down to the end). Inspect the springs, checking them against breakage, nicks, and cracks, replacing the springs that exhibit these signs. To install, make sure the coil springs are correctly seated with the ends of the larger diameter coils in a downward preposition, loop the safety chains over the springs and then carefully raise the axle by using the jack. The rest of the installation is just in reverse sequence of uninstallation.
- Q: How to properly replace the control arm on Mazda MPV?A:Lift the back of the vehicle and place it safely on jackstands under the frame rails and block the front wheels. Place a floor jack beneath the differential and raise it a little. Use chains to fasten the Coil Springs to the axle housing in order to stop any cases of the springs leaving their seats in case of jack failure. Take out the upper arm-to-rear axle pivot bolt and nut with the flat surface of the nut up towards the rear when attaching back. The second step is to take out the upper arm of the vehicle by removing the upper arm-to-frame bracket pivot bolt and nut. Check the bushings at every end of the arm and change the upper arm assembly when any is broken or worn out. Installation requires fitting the forward length of the suspension arm in the frame bracket with a new pivot bolt and nut and not fully tightening them. Insert the opposite end of the arm into its mounting bracket on the axle housing, and might require jacking up the rear axle to align, and connecting a new pivot bolt and nut with the flat side of the nut towards the rear, but not tightened. Install the axle and install the fasteners to the desired torque by raising the axle to normal ride height. In the lower arm, undo the lower arm-to-axle bracket pivot bolt and nut, next remove the lower arm-to-frame bracket pivot bolt and nut and then remove the arm out of the vehicle. Test the rubber insulators attached to the washers and replace them in case they are dry, cracked, or rotted, and also the bushings at each end of the arm, when needed. Installation To install, place the lower arm into the mounted bracket of the frame and insert a new pivot bolt, washer, and nut with the nut facing in but do not completely tighten them. Install a new pivot bolt, washer and nut with the nut inward and position the trailing end of the lower suspension arm in the rear axle bracket. Lastly, the axle is lifted as a simulation of normal ride height and the pivot bolt nuts are tightened.
Related Mazda MPV Parts
 Mazda MPV Sway Bar Link
 Mazda MPV Axle Bearing Lock Rings
 Mazda MPV Axle Pivot Bushing
 Mazda MPV Coil Spring Insulator
 Mazda MPV Coil Springs
 Mazda MPV Control Arm Bracket
 Mazda MPV Lateral Link
 Mazda MPV Radius Arm
 Mazda MPV Steering Knuckle
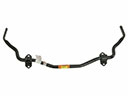 Mazda MPV Sway Bars
 Mazda MPV Trailing Arm
 Mazda MPV Wheel Seal
Browse by Year
2006 Control Arm
2005 Control Arm
2004 Control Arm
2003 Control Arm
2002 Control Arm
2001 Control Arm
2000 Control Arm
1998 Control Arm 1997 Control Arm 1996 Control Arm 1995 Control Arm 1994 Control Arm 1993 Control Arm 1992 Control Arm 1991 Control Arm 1990 Control Arm 1989 Control Arm