×
- Hello
- Login or Register
- Quick Links
- Live Chat
- Track Order
- Parts Availability
- RMA
- Help Center
- Contact Us
- Shop for
- Mazda Parts
My Garage
My Account
Cart
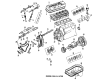
Genuine Mazda MPV Rocker Arm
Engine Rocker Arm- Select Vehicle by Model
- Select Vehicle by VIN
Select Vehicle by Model
orMake
Model
Year
Select Vehicle by VIN
For the most accurate results, select vehicle by your VIN (Vehicle Identification Number).
5 Rocker Arms found

Mazda MPV Rocker Arms Part Number: G601-12-150A
$82.45 MSRP: $109.95You Save: $27.50 (26%)Ships in 1-2 Business Days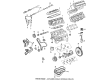
Mazda MPV Rocker Arms Part Number: JE01-12-150D
$82.74 MSRP: $110.34You Save: $27.60 (26%)Ships in 1-2 Business DaysMazda MPV Rocker Arms Part Number: JE01-12-130E
$13.96 MSRP: $18.32You Save: $4.36 (24%)Ships in 1-2 Business DaysMazda MPV Rocker Arms Part Number: G601-12-130A
Mazda MPV Rocker Arms Part Number: AJ03-12-130A
Mazda MPV Rocker Arm
Looking for Rocker Arm with proven quality? Choose OEM Rocker Arm. Mazda designs and builds them to strict factory specs. Every piece goes through rigorous quality checks. You'll get parts that fit right and work like new. Shop our huge inventory of OEM Mazda MPV parts. Enjoy the highly competitive prices online. Our site is your one-stop shop. Each genuine MPV part includes a manufacturer's warranty. Buy with confidence. Our return policy is simple and hassle-free. In a rush? Choose expedited delivery at checkout. You'll love the streamlined experience from search to checkout to receiving your order.
Mazda MPV Rocker Arm Parts and Q&A
- Q: How to remove and inspect the camshaft bearing caps and rocker arm assembly on Mazda MPV?A:The camshaft bearing caps are also taken out and the rocker arm assembly. To ensure that the other end of the camshaft does not pop-up with tension of the timing chain after the assembly has been lifted off, an assistant should also keep the opposite end down by holding the opposite end bearing cap in place until reassembled. Check the caps and the camshaft bearing journals whilst the caps have been removed. First, loosen the lid of the Valve Cover and place the Piston with the number one on Top Dead Center. Hold the transmission end of the camshaft in place with an assistant, loosen the camshaft bearing cap bolts one or two steps at a time but leave the bolts in place. Install the bearing cap at the transmission end to hold the camshaft in place, and then remove the rocker arms and shaft assembly out of the cylinder head. Should it be desired to disassemble and examine the rocker arm assemblies, loosen the retaining bolts and then take the rocker arms, springs and bearing caps off the shafts, making note of their relative positions so that they can be reassembled. Wipe off and check the wear and damages including checking the faces, tips and surfaces of rocker arms and shafts on scoring and excessive wear and replacing damaged parts. Assemble all the parts with either assembly lube or engine oil, before reassembling the shafts, ensuring that the markings on the shafts and caps are oriented. Installation lubricant should be applied to the cam lobes and journals, anaerobic sealant to the contact surfaces of the cylinder head of the bearing caps, and the rocker arm assembly should be installed. Install the camshaft bearing cap bolts to the recommended amount in a series of small steps and reinstall in that order of removal. Lastly, bring the engine to test, oil leakage, and correct functioning.
Related Mazda MPV Parts
 Mazda MPV Engine Mount
 Mazda MPV Belt Tensioner
 Mazda MPV Crankshaft
 Mazda MPV Crankshaft Seal
 Mazda MPV Crankshaft Timing Gear
 Mazda MPV Cylinder Head
 Mazda MPV Idler Pulley
 Mazda MPV Oil Pan
 Mazda MPV Oil Pan Baffle
 Mazda MPV Timing Chain Tensioner
 Mazda MPV Valve Cover
 Mazda MPV Valve Spring Retainer