×
- Hello
- Login or Register
- Quick Links
- Live Chat
- Track Order
- Parts Availability
- RMA
- Help Center
- Contact Us
- Shop for
- Mazda Parts
My Garage
My Account
Cart
Genuine Mazda MX-5 Miata Camshaft
Cam- Select Vehicle by Model
- Select Vehicle by VIN
Select Vehicle by Model
orMake
Model
Year
Select Vehicle by VIN
For the most accurate results, select vehicle by your VIN (Vehicle Identification Number).
5 Camshafts found


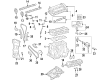
Mazda MX-5 Miata Camshaft Part Number: L3E3-12-420
$685.64 MSRP: $936.86You Save: $251.22 (27%)Ships in 1-2 Business Days
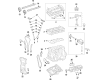
Mazda MX-5 Miata Camshaft Part Number: PEES-12-440
$181.94 MSRP: $242.62You Save: $60.68 (26%)Ships in 1-2 Business DaysMazda MX-5 Miata Camshaft Part Number: PE31-12-440
$192.33 MSRP: $256.48You Save: $64.15 (26%)Ships in 1-2 Business Days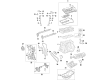
Mazda MX-5 Miata Camshaft Part Number: PE01-12-420
$196.23 MSRP: $261.68You Save: $65.45 (26%)Ships in 1-2 Business DaysMazda MX-5 Miata Camshaft Part Number: PE31-12-420
$236.56 MSRP: $315.47You Save: $78.91 (26%)Ships in 1-2 Business Days
Mazda MX-5 Miata Camshaft
Looking for Camshaft with proven quality? Choose OEM Camshaft. Mazda designs and builds them to strict factory specs. Every piece goes through rigorous quality checks. You'll get parts that fit right and work like new. Shop our huge inventory of OEM Mazda MX-5 Miata parts. Enjoy the highly competitive prices online. Our site is your one-stop shop. Each genuine MX-5 Miata part includes a manufacturer's warranty. Buy with confidence. Our return policy is simple and hassle-free. In a rush? Choose expedited delivery at checkout. You'll love the streamlined experience from search to checkout to receiving your order.
Mazda MX-5 Miata Camshaft Parts and Q&A
- Q: How to remove and replace Camshaft, Camshaft Seal and Valve Lifter on Mazda MX-5 Miata?A:In order to extract the components, disconnect the cable with the negative battery terminal first. To adjust the base of each camshaft lobe to the hydraulic lifters, with models that are 1997 and earlier, turn the engine over until the base of the lobes of each camshaft lobe is in contact with the huddles, and then measure the clearance with a feeler gauge, and when it is more than the limit, replace the lifter, and record the location of any huddles that need cleaning or replacing. Proceed to take off the timing belt/chain cover(s) and the timing belt/chain. Measure thrust clearance of the camshaft(s) using dial indicator and change any parts in case thrust clearance is more than indicated. To access the models of the year 2005 and below, take out the back timing belt cover. Take off the camshaft sprockers, using a gradual process of loosening the camshaft bearing cap bolts and noting their position of installation. Record the bearing cap old oil seal depth so as to be referred to later. Label the cams to ensure they are reinstalled accordingly and take them out, as well as the oil seals (2005 and older models). Have a magnet in order to lift out every lifter of the valves and put them into numbered containers where they were originally located. Check all components to ensure they are not damaged, clearance of the oil in each camshaft journal, with Plastigage, and replace damaged parts. Scuffing Lifters should be examined and their diameters measured, replacing those that are unusually worn. Examine lobes and journals of cam followers visually and check their height and diameter and replace nonconforming items. In 2006 and newer models mark the orientation of the VVT actuator, after which it should be removed along with the washer, followed by installing a new washer and tightening the actuator bolt. To install: Use the lubricant to the lifters and fit them into their respective places of origin where they travel smoothly. Apply lubricant to the lobe and journals of the camshaft and realign the camshafts, making sure that the exhaust and intake camshafts are installed in the correct positions. Models previous to 2005 When using the old models, apply RTV sealant to the bearing cap surfaces around the camshaft seals, then fit the caps in the restricted sequence and clique the bolts. Install the timing belt or camshaft sprockers and timing belt. In the case of models created in 1997 and earlier, the camshaft position sensor needs the O-ring replaced and lubricated prior to being put back. Install the rest of the parts (in reverse sequence) and test the engine to test proper operation and coolant leakages. To replace the camshaft oil seals on models made before 2005, disconnect the negative battery terminal, clog the rear wheels, and align cylinder number one to the TDC on the compression stroke. Disassemble the timing belt and camshaft sprockers and then, taking great care, pry the camshaft seal out of the bore or use a screw to force the seal out of the bore and be careful not to scratch the camshaft. Liberally apply clean engine oil to the lip of the new seal, then install it to the edge of the camshaft cap, and then reassemble the components in the opposite order to be sure it is functioning.

Related Mazda MX-5 Miata Parts
 Mazda MX-5 Miata Crankshaft Gear
 Mazda MX-5 Miata Crankshaft Thrust Washer
 Mazda MX-5 Miata Crankshaft Timing Gear
 Mazda MX-5 Miata Intake Valve
 Mazda MX-5 Miata Oil Pump
 Mazda MX-5 Miata Piston
 Mazda MX-5 Miata Rocker Arm
 Mazda MX-5 Miata Spool Valve
 Mazda MX-5 Miata Timing Chain Guide
 Mazda MX-5 Miata Timing Chain Tensioner
 Mazda MX-5 Miata Valve Cover
 Mazda MX-5 Miata Valve Spring Retainer Keeper