×
- Hello
- Login or Register
- Quick Links
- Live Chat
- Track Order
- Parts Availability
- RMA
- Help Center
- Contact Us
- Shop for
- Mazda Parts
My Garage
My Account
Cart
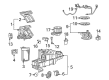
Genuine Mazda Tribute Heater Core
HVAC Heater Core- Select Vehicle by Model
- Select Vehicle by VIN
Select Vehicle by Model
orMake
Model
Year
Select Vehicle by VIN
For the most accurate results, select vehicle by your VIN (Vehicle Identification Number).
2 Heater Cores found

Mazda Tribute Heater Core Part Number: ZZC0-61-A10


Mazda Tribute Heater Core Part Number: EC01-61-A08
Mazda Tribute Heater Core
Looking for Heater Core with proven quality? Choose OEM Heater Core. Mazda designs and builds them to strict factory specs. Every piece goes through rigorous quality checks. You'll get parts that fit right and work like new. Shop our huge inventory of OEM Mazda Tribute parts. Enjoy the highly competitive prices online. Our site is your one-stop shop. Each genuine Tribute part includes a manufacturer's warranty. Buy with confidence. Our return policy is simple and hassle-free. In a rush? Choose expedited delivery at checkout. You'll love the streamlined experience from search to checkout to receiving your order.
Mazda Tribute Heater Core Parts and Q&A
- Q: How to replace the heater core, and what are the steps on Mazda Tribute?A:For 2007 and earlier models, start by disconnecting the cable from the negative battery terminal, then drain the cooling system and disconnect the heater hoses from the heater core inlet and outlet pipes at the firewall by squeezing the tabs on the spring clamps with pliers. Next, remove the instrument panel, pry the lever off the heater blend door shaft, and take out the actuating rod from the lever. Remove the heater core cover screws and pull the heater core out of the housing. Installation is the reverse of removal, ensuring to reconnect the heater core inlet and outlet hoses at the firewall and refill the cooling system. For 2008 through 2012 models, have the air conditioning system discharged and recovered by a service facility, disconnect the negative battery terminal, drain the engine coolant, and remove the entire instrument panel. Disconnect the air conditioning refrigerant lines from the engine side of the firewall and the heater hoses from the heater core at the same location. Remove the heater core housing mounting nuts from the instrument panel studs, pull the right side of the heater core housing to the rear, and slide it to the right to remove it from the vehicle. Remove the seal from the heater core tubes, take out the bracket securing the heater core, and slide the heater core out. Installation is the reverse of removal, checking for coolant leaks and having the air conditioning system evacuated and recharged. For 2013 and later models, begin by having the air conditioning system discharged and recovered, disconnect the negative battery terminal, and drain the engine coolant. Remove the cowl panel, air filter outlet, and turbo intake pipes, then disconnect the electrical connector to the pressure transducer and remove the nut and air conditioning refrigerant lines from the engine side of the firewall. Disconnect the heater hose quick-connect fittings from the heater core at the firewall, being prepared for coolant loss. Remove the entire instrument panel, then take out the evaporator housing bracket bolts and bracket from the heater/evaporator housing and instrument panel center brace. Remove the instrument panel-to-firewall seal, evaporator tube support bracket fastener, heater core tube mounting bracket, and evaporator cover fasteners, lifting the cover off the heater/evaporator housing. On the opposite side, remove the four air plenum cover fasteners and cover, then take out the five lower heater core cover fasteners and remove the heater core along with the cover from the heater/evaporator housing. Installation is the reverse of removal, checking for coolant leaks and having the air conditioning system evacuated and recharged.

Related Mazda Tribute Parts
 Mazda Tribute A/C Compressor
 Mazda Tribute Cabin Air Filter
 Mazda Tribute A/C Accumulator
 Mazda Tribute A/C Compressor Clutch
 Mazda Tribute A/C Compressor Cut-Out Switches
 Mazda Tribute A/C Hose
 Mazda Tribute A/C System Valve Core
 Mazda Tribute Blend Door Actuator
 Mazda Tribute Blower Motor
 Mazda Tribute Blower Motor Resistor
 Mazda Tribute Evaporator
 Mazda Tribute HVAC Pressure Switch