×
- Hello
- Login or Register
- Quick Links
- Live Chat
- Track Order
- Parts Availability
- RMA
- Help Center
- Contact Us
- Shop for
- Mazda Parts
My Garage
My Account
Cart
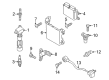
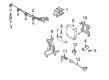
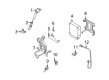
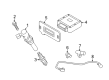
Genuine Mazda Tribute Spark Plug
Ignition Spark Plug- Select Vehicle by Model
- Select Vehicle by VIN
Select Vehicle by Model
orMake
Model
Year
Select Vehicle by VIN
For the most accurate results, select vehicle by your VIN (Vehicle Identification Number).
4 Spark Plugs found


Mazda Tribute Spark Plug Part Number: LFJD-18-110-9U
$18.35 MSRP: $24.48You Save: $6.13 (26%)Ships in 1-2 Business Days

Mazda Tribute Spark Plug Part Number: L845-18-110
$15.08 MSRP: $20.10You Save: $5.02 (25%)Ships in 1-2 Business Days
Mazda Tribute Spark Plug Part Number: GY01-18-110
$4.84 MSRP: $6.45You Save: $1.61 (25%)Ships in 1-2 Business Days
Mazda Tribute Spark Plug Part Number: ZZC4-18-110B
$4.03 MSRP: $5.36You Save: $1.33 (25%)
Mazda Tribute Spark Plug
Looking for Spark Plug with proven quality? Choose OEM Spark Plug. Mazda designs and builds them to strict factory specs. Every piece goes through rigorous quality checks. You'll get parts that fit right and work like new. Shop our huge inventory of OEM Mazda Tribute parts. Enjoy the highly competitive prices online. Our site is your one-stop shop. Each genuine Tribute part includes a manufacturer's warranty. Buy with confidence. Our return policy is simple and hassle-free. In a rush? Choose expedited delivery at checkout. You'll love the streamlined experience from search to checkout to receiving your order.
Mazda Tribute Spark Plug Parts and Q&A
- Q: What tools and steps are necessary for replacing spark plugs on Mazda Tribute?A:These engines have the spark plugs positioned at the engine head, and the materials needed to replace it often have a spark plug socket that can be attached to a ratchet, several extensions, and a gap gauge to check and adjust the gaps on the new plugs, where a torque wrench is often advised to tighten the fittings. It is also recommended to buy new plugs before hand, adjust them to correct spacing and change one at a time, making sure that the correct type of plug is bought to fit the type of engine. Ensure that the engine is completely cool before unscrewing any plugs to prevent any damage to the aluminum cylinder heads and in the meantime, inspect the new plugs on the openings and trie the gaps. This is checked by passing the proper-thickness gauge between the electrodes, making sure that it slides with a little drag; otherwise the side electrode can be changed and cracks in the porcelain insulator checked. On models with an engine cover, this is to be removed, and on certain engines individual Ignition Coils might need to be accessed before the plugs. Assuming that there is some compressed air available, then clear out any dirt in the spark plug hole with the compressed air first and then then use a spark plug socket to unscrew the spark plug in the counterclockwise direction. Compare old spark plug to new ones to evaluate the running condition of the engine, add a small portion of the anti-seize compound to the threads of the new plug and screw it in until it is not possible to turn it by hand and then use a torque wrench or a ratchet to screw it in. A piece of rubber hose can be utilized to assist in threading the plug in, so that it does not cross-thread and break. In the case of coil-over plug, inspect the ignition coil prior to installation, and the same process should be repeated with rest of the spark plugs.

Related Mazda Tribute Parts
 Mazda Tribute Ignition Coil
 Mazda Tribute Ignition Switch
 Mazda Tribute Air Bag Sensor
 Mazda Tribute Airbag
 Mazda Tribute Antenna
 Mazda Tribute Camshaft Position Sensor
 Mazda Tribute Crankshaft Position Sensor
 Mazda Tribute Engine Control Module
 Mazda Tribute Knock Sensor
 Mazda Tribute Relay
 Mazda Tribute Spark Plug Wire
 Mazda Tribute Temperature Sender