×
- Hello
- Login or Register
- Quick Links
- Live Chat
- Track Order
- Parts Availability
- RMA
- Help Center
- Contact Us
- Shop for
- Mazda Parts
My Garage
My Account
Cart
Genuine Mazda Tribute Timing Chain
Engine Timing Chain- Select Vehicle by Model
- Select Vehicle by VIN
Select Vehicle by Model
orMake
Model
Year
Select Vehicle by VIN
For the most accurate results, select vehicle by your VIN (Vehicle Identification Number).
4 Timing Chains found


Mazda Tribute Timing Belt Part Number: L305-12-201
$63.58 MSRP: $84.79You Save: $21.21 (26%)Ships in 1-2 Business Days


Mazda Tribute Timing Chain Part Number: L301-12-201
$60.13 MSRP: $80.19You Save: $20.06 (26%)Ships in 1-2 Business Days
Mazda Tribute Timing Chain Part Number: ZZDA-12-201
$101.94 MSRP: $135.95You Save: $34.01 (26%)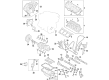
Mazda Tribute Timing Chain Part Number: GY01-12-201C
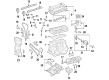
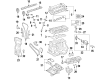
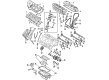
Mazda Tribute Timing Chain
The Mazda Tribute Timing Chain makes the engine of the SUV take steps in breathing in by connecting the crankshaft and camshaft with the scope of opening and closing the valves at the right time to provide power and fuel economy. The metal chain is submerged in the front of the motor, constantly soaked in engine oil in comparison to rubber belts, and therefore it hardly requires a scheduled replacement. Since all Mazda engines are dependent on precise synchronization, the hardened steel links of the chain cause the crank and the cam to rotate in perfect synchronization, such that there is no likelihood of catastrophic collisions between the piston and the valve. The source material describes two chain layouts, a longer loop applied in standard overhead-cam design and a short drive applied in pushrod design with crank and cam side by side, the shorter alternative being quieter than the greater number of torque reversals that would raise the whine of the gears and wear them away. Current Mazda engines use tensioners and plastic faced guides to maintain slack within the system, but when there is low oil or when the tensioner fails, chain chatter may ensue. The owners of the new Tribute must pay attention to a sharp rattle from the front part of the engine because this sound frequently reminds them that something is wrong with the Timing Chain that is stretched and needs to be checked. By keeping the oil fresh and full, the Timing Chain, tensioner, and guides are able to endure hundreds of thousands of miles. The majority of Mazda customers enjoy this robust design as it reduces the cost of long-term service and offers quietness, dependability, and timing precision.
Looking for Timing Chain with proven quality? Choose OEM Timing Chain. Mazda designs and builds them to strict factory specs. Every piece goes through rigorous quality checks. You'll get parts that fit right and work like new. Shop our huge inventory of OEM Mazda Tribute parts. Enjoy the highly competitive prices online. Our site is your one-stop shop. Each genuine Tribute part includes a manufacturer's warranty. Buy with confidence. Our return policy is simple and hassle-free. In a rush? Choose expedited delivery at checkout. You'll love the streamlined experience from search to checkout to receiving your order.
Mazda Tribute Timing Chain Parts and Q&A
- Q: Is performing this procedure installed challenging due to limited clearance for Timing Chain, Timing Chain Guide and Timing Chain Tensioner on Mazda Tribute?A:Because of minimal clearance, the task of installing the engine may be extremely difficult when it is still in the aircraft and may be simplified in case of the necessity to do extensive work. It is a complicated timing system and any error made may cause serious damage to the engine and this procedure should only be undertaken by very experienced people and an expert should be consulted in case of any doubt. The first step is to take the timing chain cover off and slide the crankshaft position sensor trigger wheel off the crankshaft then remove the spark plugs and mark the exact location of the pulse wheel so it can be replaced back. Install the crankshaft retaining bolt with the pulley and then turn the crankshaft clockwise until the 11 o'clock setting of the keyway, but make sure the 1 cylinder cylinder is at TDC at the compression stroke by checking the index marks on the camshaft sprockets. Ensure the alignment and then proceed to position the camshafts in their neutral range by rotating the crankshaft until all the bolts attaching the rear timing chain tensioner and its arm have been removed, labeling all reusable components and ensuring that they are reinstalled properly. Take the rear timing chain off the sprockets, the rear chain guide, and slide the rear timing chain sprocket off the crankshaft. Turn the crankshaft 600 degrees clockwise to position the camshafts of the front cylinder head with the armature to the neutral position, and then loosen the tensioner of the front timing chain and detach the arm, and lift the front timing chain off the sprockets. Wipe down everything with solvent and examine the chain tensioners, guides and chains to confirm they are in great shape, and change any parts that may be suspicious. Check Before proceeding to start the engine, the crankshaft must be turned by hand at least two full revolutions, with resistance. Install timing chain tensioners: Timing chain tensioners are prepared by compressing and locking in place and the crankshaft sprocket is installed in the front timing chain, with the keyway at 11 o'clock. Shim the index indices on the sprockets with colored links of the chain, fit the front timing chain guide and fix with bolts. Install front timing chain around the sprockets, again this must be properly aligned and follow this by attaching the front tensioner arm and assembly, and again making sure that everything is in place. Do the same procedures with the back timing chain making sure that everything in it is in place. Once all locking pins have been removed on the tensioners, turn the crankshaft back to the 11 o'clock position, fit the crankshaft position sensor pulse wheel and ensure that it does not bind when rotating the engine by hand. Last, replace the timing chain cover, reinstall all other components, refill the crankcase and other systems with relevant fluids, reconnect the battery, and start the engine with the lookout of leaks, so that the Powertrain Control Module can re-learn its idle and fuel trim strategy to achieve maximum performance.

Related Mazda Tribute Parts
 Mazda Tribute Engine Mount
 Mazda Tribute Oil Pan
 Mazda Tribute Timing Belt
 Mazda Tribute Dipstick Tube
 Mazda Tribute Engine Mount Torque Strut
 Mazda Tribute Engine Oil Cooler
 Mazda Tribute Harmonic Balancer
 Mazda Tribute Oil Drain Plug
 Mazda Tribute Oil Filler Cap
 Mazda Tribute Oil Filter Gasket
 Mazda Tribute Rod Bearing
 Mazda Tribute Variable Timing Solenoid