×
- Hello
- Login or Register
- Quick Links
- Live Chat
- Track Order
- Parts Availability
- RMA
- Help Center
- Contact Us
- Shop for
- Mazda Parts

My Garage
My Account
Cart
Genuine Mazda 3 Crankshaft
Crank Shaft- Select Vehicle by Model
- Select Vehicle by VIN
Select Vehicle by Model
orMake
Model
Year
Select Vehicle by VIN
For the most accurate results, select vehicle by your VIN (Vehicle Identification Number).
7 Crankshafts found
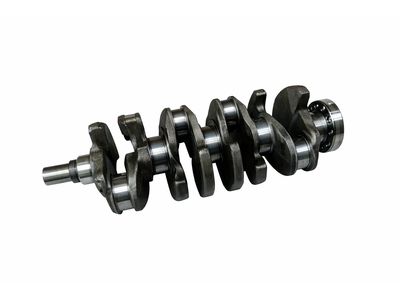
Mazda 3 Crankshaft Part Number: PY8W-11-300
$1174.97 MSRP: $1605.47You Save: $430.50 (27%)Ships in 1-2 Business Days
Mazda 3 Crankshaft Part Number: L3K9-11-300A
$1175.24 MSRP: $1605.84You Save: $430.60 (27%)Ships in 1-2 Business Days
Mazda 3 Crankshaft Part Number: PEDD-11-300
$390.34 MSRP: $524.76You Save: $134.42 (26%)Ships in 1-2 Business Days
Mazda 3 Crankshaft Part Number: L591-11-300
$652.37 MSRP: $891.39You Save: $239.02 (27%)Ships in 1-2 Business Days
Mazda 3 Crankshaft Part Number: LF02-11-301
$1002.00 MSRP: $1369.12You Save: $367.12 (27%)Ships in 1-2 Business DaysMazda 3 Crankshaft Part Number: PE01-11-300A
$550.01 MSRP: $739.41You Save: $189.40 (26%)Ships in 1-2 Business Days
Mazda 3 Crankshaft Part Number: L320-11-300
$213.92 MSRP: $280.79You Save: $66.87 (24%)Ships in 1-2 Business Days
Mazda 3 Crankshaft
The Mazda 3 Crankshaft is the durable steel backbone that converts the up-down hits of the pistons into consistent spinning energy for the transmission and wheels. This precision shaft is located deep in the engine block, with offset crank throws to which the connecting rods are attached, and thus every stroke of a cylinder is a rotation that ultimately drives the Mazda forward. There have been two predominant material designs in the history of the small Mazda line, cost-effective cast-iron designs which were appropriate for the lower output models and heavier forged steel designs which were designed to handle the increased horsepower load. The fundamental distinction is strength and ductility, where forging provides a harder grain structure and more resistance to bending or cracking when spirited driving occurs. No matter what type, all Crankshafts roll on polished journals which must remain in a state of clean oil, as the presence of grit or a decrease in the flow will score the surfaces, creating wider clearances and the much-dreaded knocking vibration that a driver may experience even at idle speed. Proper lubrication ensures that the Crankshaft lasts longer than the car, but neglect or wandering debris can require replacement, which is a labor-intensive task that necessitates removing the whole engine, lifting the damaged Crankshaft free, placing a new one, aligning fresh bearings and torquing caps in series, and this can take only about 3 hours for an experienced do-it-yourselfer. Due to the strong metallurgy and careful design, it is the unsung hero that grants reliability and buttery rotation to the Mazda engine.
Looking for Crankshaft with proven quality? Choose OEM Crankshaft. Mazda designs and builds them to strict factory specs. Every piece goes through rigorous quality checks. You'll get parts that fit right and work like new. Shop our huge inventory of OEM Mazda 3 parts. Enjoy the highly competitive prices online. Our site is your one-stop shop. Each genuine 3 part includes a manufacturer's warranty. Buy with confidence. Our return policy is simple and hassle-free. In a rush? Choose expedited delivery at checkout. You'll love the streamlined experience from search to checkout to receiving your order.
Mazda 3 Crankshaft Parts and Q&A
- Q:How can the crankshaft be removed and installed on Mazda 3?A:Crankshaft removal only becomes possible after extracting the engine out of the vehicle, assuming that the flywheel, crankshaft pulley, timing belt, oil pan, oil pump body, oil filter and Piston/connecting rod assemblies have been removed. Measuring Before the endplay of the crankshaft is measured with a dial indicator positioned on the crankshaft. Crankshaft The crankshaft must be pried to the rear, then to the front, and the indicator should be proven to be between 0.003 and 0.010 inch (0.076 to 0.254 mm) zero. In the absence of a dial indicator, it is possible to use feeler gauges to measure clearance. Slacken the main bearing cap assembly bolts slowly, and by tapping the cap off, and by lifting the crankshaft out of the engine (preferably with help) gradually. To install, make sure that the engine block and the crankshaft are clean and checked. Place the block in an upside-down position and strip off the support beams and cap and lubricate the bearing surfaces. Install new upper main bearing inserts in the saddles, making sure that the oil holes are lined up, and install lower inserts in the caps. Wipe the crankshaft journals and wipe the oil holes. Install the crankshaft then verify the main bearing oil clearance with Plastigage; make sure it is not outside specification limits. In case of need, change bearing inserts to the right size. Once the Plastigage has been removed, grease or assembly lube on the bearing surfaces and thrust faces then re-mount the crankshaft and bearing cap assembly, tightening the bolts to the proper order. Test crankshaft endplay again and make sure that the rotation is smooth and with minimum torque. Lastly, replace rear main oil seal.
Related Mazda 3 Parts
 Mazda 3 Oil Filter
 Mazda 3 Belt Tensioner
 Mazda 3 Cylinder Head
 Mazda 3 Oil Pump
 Mazda 3 Timing Chain
 Mazda 3 Timing Cover
 Mazda 3 Balance Shaft Chain
 Mazda 3 Piston Ring Set
 Mazda 3 Rocker Arm
 Mazda 3 Timing Belt Idler Pulley
 Mazda 3 Variable Timing Solenoid
 Mazda 3 Variable Timing Sprocket
Browse by Year
2024 Crankshaft 2023 Crankshaft 2022 Crankshaft 2021 Crankshaft 2018 Crankshaft 2017 Crankshaft 2016 Crankshaft 2015 Crankshaft 2014 Crankshaft 2013 Crankshaft 2012 Crankshaft 2011 Crankshaft 2010 Crankshaft 2009 Crankshaft 2008 Crankshaft 2007 Crankshaft 2006 Crankshaft 2005 Crankshaft 2004 Crankshaft