×
- Hello
- Login or Register
- Quick Links
- Live Chat
- Track Order
- Parts Availability
- RMA
- Help Center
- Contact Us
- Shop for
- Mazda Parts
My Garage
My Account
Cart
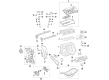
Genuine Mazda 3 Piston
Engine Pistons- Select Vehicle by Model
- Select Vehicle by VIN
Select Vehicle by Model
orMake
Model
Year
Select Vehicle by VIN
For the most accurate results, select vehicle by your VIN (Vehicle Identification Number).
19 Pistons found


Mazda 3 Piston Part Number: PEY3-11-SA0A
$97.58 MSRP: $130.13You Save: $32.55 (26%)Ships in 1-2 Business Days

Mazda 3 Piston Part Number: PEY9-11-SA0
$101.90 MSRP: $135.90You Save: $34.00 (26%)Ships in 1-2 Business Days

Mazda 3 Piston Part Number: LFY5-11-010
$181.18 MSRP: $241.62You Save: $60.44 (26%)Ships in 1-2 Business Days
Mazda 3 Piston Part Number: PYY3-11-SA0
$69.44 MSRP: $92.60You Save: $23.16 (26%)Ships in 1-2 Business DaysMazda 3 Piston Part Number: PEY6-11-SA0
$81.40 MSRP: $108.56You Save: $27.16 (26%)Ships in 1-2 Business Days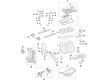
Mazda 3 Piston Part Number: PYY5-11-SA0
$84.85 MSRP: $113.16You Save: $28.31 (26%)Ships in 1-2 Business Days
Mazda 3 Piston Part Number: PEY1-11-SA0C
$101.91 MSRP: $135.92You Save: $34.01 (26%)Ships in 1-2 Business Days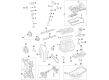
Mazda 3 Piston Part Number: PYY6-11-SA0
$106.78 MSRP: $142.39You Save: $35.61 (26%)Ships in 1-2 Business Days
Mazda 3 Piston Part Number: L3Y4-11-SA0
$110.56 MSRP: $147.45You Save: $36.89 (26%)Ships in 1-2 Business Days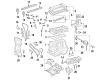
Mazda 3 Piston Part Number: L3Y0-11-SA0
$111.89 MSRP: $149.21You Save: $37.32 (26%)Ships in 1-2 Business Days
Mazda 3 Piston Part Number: L5Y3-11-SA0
$146.20 MSRP: $194.97You Save: $48.77 (26%)Ships in 1-2 Business DaysMazda 3 Piston Part Number: L33L-11-210A
$152.51 MSRP: $203.40You Save: $50.89 (26%)Ships in 1-2 Business DaysMazda 3 Piston Part Number: LFY2-11-010
$163.59 MSRP: $218.16You Save: $54.57 (26%)Ships in 1-2 Business DaysMazda 3 Piston Part Number: L3Y7-11-010
$178.29 MSRP: $237.76You Save: $59.47 (26%)Ships in 1-2 Business DaysMazda 3 Piston Part Number: L3YD-11-010
$178.69 MSRP: $238.29You Save: $59.60 (26%)Ships in 1-2 Business Days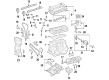
Mazda 3 Piston Part Number: L3Y9-11-010
$184.91 MSRP: $246.60You Save: $61.69 (26%)Ships in 1-2 Business Days
Mazda 3 Piston Part Number: PYY1-11-SA0
Mazda 3 Piston Part Number: LFY7-11-010
Mazda 3 Piston Part Number: LFY4-11-010
Mazda 3 Piston
The essence of the Mazda 3 Piston's work is to convert the explosive power of combusting fuel into the smooth crankshaft rotation propelling the car down the road. A Mazda engine has a Piston made of lightweight aluminum alloy that makes it slide up and down the cylinder, its rings closing the combustion gases so that the pressure causes the connecting rod to draw rather than spurt out. The spraying of oil on the lower parts helps maintain temperatures in the car using concealed cooling cavities, an important fact to the enthusiast character of Mazda they are to buy. The early models of the compact were based on the sturdy trunk design with ample skirt length that balanced the rod and accommodated the side loads of day-to-day traffic. With improvements in the model, engineers cut down the mass with a slipper style unit with skirts trimmed off to allow the rev-happy petrol motors to turn faster and consume less fuel without losing strength. They are both made with forged or cast aluminum, but the slipper one has a better footprint because it has a lower footprint, whereas the trunk has more longevity and less noise. Regardless of the style, every Piston keeps the combustion energy aimed at the crankshaft and hence the second 3 on the tailgate is always vibrant whenever any driver presses the accelerator. The owners of Mazdas are hardly likely to consider this little piece of metal, but it is what makes the difference between the fun of zoom which the Mazda company is associated with.
Looking for Piston with proven quality? Choose OEM Piston. Mazda designs and builds them to strict factory specs. Every piece goes through rigorous quality checks. You'll get parts that fit right and work like new. Shop our huge inventory of OEM Mazda 3 parts. Enjoy the highly competitive prices online. Our site is your one-stop shop. Each genuine 3 part includes a manufacturer's warranty. Buy with confidence. Our return policy is simple and hassle-free. In a rush? Choose expedited delivery at checkout. You'll love the streamlined experience from search to checkout to receiving your order.
Mazda 3 Piston Parts and Q&A
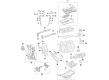
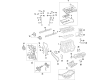
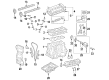
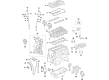
- Q: What steps must be taken before removing the piston and connecting rod assemblies on Mazda 3?A:The oil pan and the cylinder head should be removed before the displacement of the piston and connecting rod assembly. Feel your finger to the upper limit of the ring travel, about 1/4-inch below the top of each cylinder; this should have no ridges as a result of carbon deposition or wear, or it will cause piston breakage; if in any case there are ridges, they must be entirely removed by a special tool as directed by the manufacturer. Once the ridges of the cylinder have been removed, position the engine such that the Crankshaft is facing upward and take out the balance shaft assembly. Prior to removing main bearing cap assembly and connecting rods, measure the connecting rod endplay using a feeler gauge, make sure the play is not more than the stated limits, otherwise new connecting rods can be required. Mark the connecting rods and caps with paint or marker where there are none, and firmly tighten the connecting rod cap bolts until they are easy enough to loosen. Carefully remove the number one connecting rod cap and the bearing insert and then force the connecting rod/piston assembly out through the top of the engine, be sure that all the ridges are removed. It should then be repeated to the rest of the cylinders and once removed, the connecting rod caps and bearing inserts should be reassembled in their respective rods with the old inserts being left as they provide protection against damage. The connecting rods and pistons can then be inspected and overhauled. Check the end gaps of the rings, and the clearance at the piston ringside, before putting in the new rings. Prepare the assemblies of piston/connecting rod and new sets of rings to match. Install the upper ring into the first cylinder and test the end gap using feeler gauges and make sure that it fits within the values specified; in case of any alterations, the ends of the ring can be carefully filed. Do the same with each of the rings and fit them on the pistons beginning with the oil control ring, then the middle ring, and the top ring with the right orientation. Prior to installation, the walls of the cylinder should be clean, the top edge of the individual cylinder bores should be chamfered, and a crankshaft should be installed. Wipe clean the bearing surfaces of the connecting rod and cap then fit in the new upper bearing insert and then make sure that it fits in without lubrication. Install piston rings by spacing the gaps of the piston rings at intervals of 90 degrees, lubricating the piston ring, and then installing the piston ring with the help of a piston ring compressor. Install the piston/connecting rod assembly into the cylinder bore with connecting rod journal in the bottom dead center position and apply oil to the walls of the cylinder. Precisely set the assembly where it will not meet with resistance. When the installation is complete, examine the connecting rod bearing oil clearance with Plastigage so that bearing inserts are of the right size and condition. Wipe the faces of the bearings, put grease or assembly lube and screw on the rod cap using new bolts and tighten them to the required torque. Do the same with the rest of the assemblies, making sure that they are clean, and are facing the right way. Once all assemblies have been installed, rotate the crankshaft to test bindings and also confirm the endplay of the connecting rod, and make corrections where needed in case new parts have been fitted.
Related Mazda 3 Parts
 Mazda 3 Valve Cover Gasket
 Mazda 3 Camshaft
 Mazda 3 Cylinder Head
 Mazda 3 Harmonic Balancer
 Mazda 3 Timing Chain
 Mazda 3 Balance Shaft Chain
 Mazda 3 Crankshaft Gear
 Mazda 3 Crankshaft Seal
 Mazda 3 Crankshaft Thrust Washer
 Mazda 3 Crankshaft Timing Gear
 Mazda 3 Rod Bearing
 Mazda 3 Variable Timing Solenoid