×
- Hello
- Login or Register
- Quick Links
- Live Chat
- Track Order
- Parts Availability
- RMA
- Help Center
- Contact Us
- Shop for
- Mazda Parts
My Garage
My Account
Cart
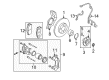
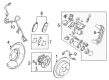
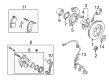
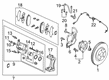
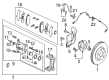
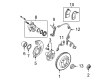
Genuine Mazda 6 Brake Pad Set
Disc Brake Pad Set- Select Vehicle by Model
- Select Vehicle by VIN
Select Vehicle by Model
orMake
Model
Year
Select Vehicle by VIN
For the most accurate results, select vehicle by your VIN (Vehicle Identification Number).
16 Brake Pad Sets found

Mazda 6 Brake Pads Part Number: GPYB-33-28ZF
$84.51 MSRP: $112.71You Save: $28.20 (26%)Ships in 1-2 Business Days
Mazda 6 Brake Pads Part Number: GPYA-26-43ZC
$80.85 MSRP: $107.82You Save: $26.97 (26%)Ships in 1-2 Business Days

Mazda 6 Brake Pads Part Number: GPYB-26-43Z
$83.46 MSRP: $111.31You Save: $27.85 (26%)Ships in 1-2 Business Days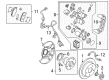
Mazda 6 Rear Pads Part Number: GPYB-26-48Z
$83.46 MSRP: $111.31You Save: $27.85 (26%)Ships in 1-2 Business Days
Mazda 6 Brake Pads Part Number: GPYB-33-23ZG
$90.31 MSRP: $120.43You Save: $30.12 (26%)Ships in 1-2 Business Days
Mazda 6 Brake Pads Part Number: GHY1-33-28ZB
$98.45 MSRP: $131.30You Save: $32.85 (26%)Ships in 1-2 Business DaysMazda 6 Brake Pads Part Number: GPYA-26-48ZD
$114.45 MSRP: $152.63You Save: $38.18 (26%)Ships in 1-2 Business DaysMazda 6 Brake Pads Part Number: G2YS-33-28Z
$123.69 MSRP: $164.95You Save: $41.26 (26%)Ships in 1-2 Business DaysMazda 6 Brake Pads Part Number: GFY1-33-28Z
$123.79 MSRP: $165.08You Save: $41.29 (26%)Ships in 1-2 Business Days
Mazda 6 Brake Pads Part Number: GHY9-26-48ZD
$128.04 MSRP: $170.75You Save: $42.71 (26%)Ships in 1-2 Business DaysMazda 6 Brake Pads Part Number: GFY0-33-28Z
$129.23 MSRP: $172.33You Save: $43.10 (26%)Ships in 1-2 Business Days
Mazda 6 Brake Pads Part Number: GMY0-26-43ZC
$139.69 MSRP: $186.28You Save: $46.59 (26%)Ships in 1-2 Business Days
Mazda 6 Brake Pads Part Number: GPYA-33-23ZG
$134.04 MSRP: $178.75You Save: $44.71 (26%)Ships in 1-2 Business DaysMazda 6 Brake Pads Part Number: G4YA-33-28ZB
$163.30 MSRP: $217.77You Save: $54.47 (26%)Ships in 1-2 Business Days
Mazda 6 Rear Pads Part Number: GDYL-26-43Z
$134.89 MSRP: $179.89You Save: $45.00 (26%)Ships in 1-2 Business Days
Mazda 6 Brake Pads Part Number: GKYA-26-43Z
Mazda 6 Brake Pad Set
Looking for Brake Pad Set with proven quality? Choose OEM Brake Pad Set. Mazda designs and builds them to strict factory specs. Every piece goes through rigorous quality checks. You'll get parts that fit right and work like new. Shop our huge inventory of OEM Mazda 6 parts. Enjoy the highly competitive prices online. Our site is your one-stop shop. Each genuine 6 part includes a manufacturer's warranty. Buy with confidence. Our return policy is simple and hassle-free. In a rush? Choose expedited delivery at checkout. You'll love the streamlined experience from search to checkout to receiving your order.
Mazda 6 Brake Pad Set Parts and Q&A
- Q: How to replace a Brake Pad Set on Mazda 6?A:Then take off the cap of the brake fluid reservoir, loosen the lug nuts of the wheels and raise the vehicle then place it well on jack stands and block its wheels on the other end. Take the wheels off, and do one brakes assembly at a time, referring to the brake already completed, where there is need to do so. Check the Brake Disc, and in case of machining take off the disc, when the pads may be taken off. Wipe all the brake with brake system cleaner then let it dry, and place drain pan beneath the brake before disassembling the brake and force all the brake dust out of it, it should not be done with compressed air. To replace the front brake pads, one will need to press the piston into the lower part of its bore into the caliper using a large C-clamp to allow the new pads to fit without spilling the fluid in the master cylinder reservoir. Hold the guide pin in place, loosen the caliper mounting bolt with two wrenches and remove the caliper off the mounting bracket and reattach it to the suspension using a rigid piece of wire. Take out the retrusion springs of the brake pads, the inner and outer brake pads, clean the two caliper guide pins, putting on high-temperature grease and then replace them. In 2005 and earlier models, do the same with lower mounting pin and upper bolt. Clean and lubricate the pad slide clips, and again fit on the caliper mounting bracket. Insert the stainless-steel shims into the rear of each pad, apply anti-squeal compound to the outboard side of the shims, and insert the pads in the caliper mounting bracket and install the upper and lower pad retraction springs and then install the caliper and tighten the mounting bolt(s) to the recommended weight. To carry out the replacement of the rear brake pad, grab the clip on the Parking Brake Cable and unscrew it off the lever. Grab the caliper guide pins with one wrench and loosen the caliper mounting bolts then grab the caliper and work the piston clockwise in the caliper with needle nose pliers and push it back into the fluid in the master cylinder reservoir without letting the fluid overflow. One of the notches should be at the lowest position so as to match the pin on the inner pad. Take off the inner and outer pad of brakes, clean the slide clips and grease up the pad contact points with high temperature brake grease. Fix the shims on the outer surface of each pad, anti-squeal compound on the back of the shims followed by cleaning and greasing the caliper guide pins and then installing them into the caliper bracket again. Install the pads, the caliper, tighten mounting bolts, and reconnect the parking brake cable, verify the functionality of the parking brake and reposition it, should the need arise. Also, when installing the caliper back, the mounting bolts should be tightened to the required torque. When the job is done, press a few times with the brake pedal to ensure that the pads are in contact with the disc, inspect the brake fluid level, adding more where needed and ensure that the brakes are functioning properly before returning the vehicle to regular service.

Related Mazda 6 Parts
 Mazda 6 A/C Compressor
 Mazda 6 CV Joint
 Mazda 6 Ignition Switch
 Mazda 6 Parking Sensors
 Mazda 6 Window Regulator
 Mazda 6 Air Bag Clockspring
 Mazda 6 Canister Purge Valves
 Mazda 6 CV Joint Boot
 Mazda 6 Door Lock Switch
 Mazda 6 Hood Hinge
 Mazda 6 Oil Pump Gasket
Browse by Year
2021 Brake Pad Set 2020 Brake Pad Set 2019 Brake Pad Set 2018 Brake Pad Set 2017 Brake Pad Set 2016 Brake Pad Set 2015 Brake Pad Set 2014 Brake Pad Set 2013 Brake Pad Set 2012 Brake Pad Set 2011 Brake Pad Set 2010 Brake Pad Set 2009 Brake Pad Set 2008 Brake Pad Set 2007 Brake Pad Set 2006 Brake Pad Set 2005 Brake Pad Set 2004 Brake Pad Set 2003 Brake Pad Set