×
- Hello
- Login or Register
- Quick Links
- Live Chat
- Track Order
- Parts Availability
- RMA
- Help Center
- Contact Us
- Shop for
- Mazda Parts
My Garage
My Account
Cart
Genuine Mazda 6 Oil Pan
Oil Drain Pan- Select Vehicle by Model
- Select Vehicle by VIN
Select Vehicle by Model
orMake
Model
Year
Select Vehicle by VIN
For the most accurate results, select vehicle by your VIN (Vehicle Identification Number).
18 Oil Pans found


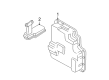
Mazda 6 Oil Pan Part Number: PYFB-10-4AXC
$174.03 MSRP: $232.07You Save: $58.04 (26%)Ships in 1-2 Business Days


Mazda 6 Oil Pan Part Number: FZ01-21-51XB
$48.29 MSRP: $64.39You Save: $16.10 (25%)Ships in 1-2 Business Days


Mazda 6 Transmission Pan Part Number: FSL0-21-51XB
$57.70 MSRP: $76.95You Save: $19.25 (26%)Ships in 1-2 Business Days


Mazda 6 Oil Pan Part Number: ZZJ1-10-400
$151.70 MSRP: $202.31You Save: $50.61 (26%)


Mazda 6 Oil Pan Part Number: L3K9-10-400H
$454.72 MSRP: $611.30You Save: $156.58 (26%)Ships in 1-2 Business Days


Mazda 6 Oil Pan Part Number: L506-10-400D
$597.80 MSRP: $803.66You Save: $205.86 (26%)Ships in 1-2 Business Days
Mazda 6 Oil Pan Part Number: PYFA-10-400C
$132.24 MSRP: $176.35You Save: $44.11 (26%)Ships in 1-2 Business Days
Mazda 6 Oil Pan Part Number: PYD5-10-4AXB
$174.35 MSRP: $232.51You Save: $58.16 (26%)Ships in 1-2 Business Days

Mazda 6 Oil Pan Part Number: L506-10-402
$9.46 MSRP: $12.62You Save: $3.16 (26%)Ships in 1-2 Business Days
Mazda 6 Oil Pan Part Number: FN11-21-51XB
$47.73 MSRP: $63.65You Save: $15.92 (26%)Ships in 1-2 Business Days
Mazda 6 Transmission Pan Part Number: FZC1-21-51X
$53.09 MSRP: $70.79You Save: $17.70 (25%)Ships in 1-2 Business Days
Mazda 6 Transmission Pan Part Number: FP01-21-520
$62.86 MSRP: $83.83You Save: $20.97 (26%)Ships in 1-2 Business Days
Mazda 6 Transmission Pan Part Number: AW01-21-520
$107.08 MSRP: $142.79You Save: $35.71 (26%)Ships in 1-2 Business Days
Mazda 6 Oil Pan Part Number: ZZC6-10-400
$137.58 MSRP: $183.47You Save: $45.89 (26%)
Mazda 6 Oil Pan Part Number: ZZDA-10-400A
$141.95 MSRP: $189.30You Save: $47.35 (26%)
Mazda 6 Oil Pan Part Number: ZZC2-10-400
$266.31 MSRP: $355.15You Save: $88.84 (26%)


Mazda 6 Oil Pan Part Number: L309-10-400C
Mazda 6 Oil Pan Part Number: L3G2-10-400A
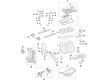
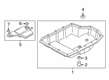
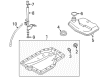
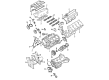
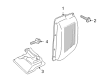
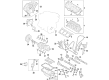
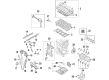
Mazda 6 Oil Pan
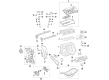
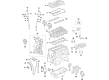
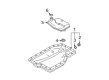
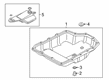
The Mazda 6 Oil Pan is the necessary lower engine reservoir where the supply of oil is stored and is designed to protect the Mazda 6 powerplant and ensure internal components are kept oily with a continual flow of lubricant. The Oil Pan sits just below the block as the core of a wet sump system, which is employed on virtually all Mazda cars, whereby the spent oil is allowed to pool in the sump before being pumped back upstairs to be circulated once again. The pan seals the pool, effectively preventing leaks, shields the oil against road debris, and offers a convenient location when changing the drain plug. Baffles are applied within the same shell to ensure that oil flow is not affected by sudden braking or turning corners except by a sharp angular turn where the pickup tube and bearings can be exposed to starvation. Pan depth is important to the designers because a deeper sump may require that the engine be raised a notch higher in the chassis, a compromise offset by clearance on the ground and carrying capacity. Racing machinery occasionally converts to a dry sump, where the lubricant is held in an external tank and a second scavenge pump is applied to remove the lubricant from a shallow crankcase, allowing the engine to be lower in the chassis, but Mazda continues to use the simpler wet sump because it is more reliable in everyday operation. Pan shape is also stamped steel or aluminum across the generations, with slight modifications to bolt pattern, gasket groove, and baffle position; thus the main task and working principle are the same, while the new Mazda work also adjusted the Oil Pan gasket channel for cleaner and faster service.
Looking for Oil Pan with proven quality? Choose OEM Oil Pan. Mazda designs and builds them to strict factory specs. Every piece goes through rigorous quality checks. You'll get parts that fit right and work like new. Shop our huge inventory of OEM Mazda 6 parts. Enjoy the highly competitive prices online. Our site is your one-stop shop. Each genuine 6 part includes a manufacturer's warranty. Buy with confidence. Our return policy is simple and hassle-free. In a rush? Choose expedited delivery at checkout. You'll love the streamlined experience from search to checkout to receiving your order.
Mazda 6 Oil Pan Parts and Q&A
- Q: How to remove and reinstall the oil pan for four cylinder engine on Mazda 6?A:The next step to take is to lift the vehicle to a stable position on jackstands and pull off the oil pan. Drain engine oil, clean engine oil drain plug, install engine oil drain plug and remove oil filter and discard it. The air filter housing and the engine lower splash shield should be taken out next. In cases of models having an automatic transaxle, the battery and battery tray are to be removed. Shake the engine, pushing it further back of the engine using an engine support fixture and pushing the transaxle up using a floor jack. Relax the upper engine-to-transaxle mounting bolts and back them off approximately 0.20-inch, thereafter loosen the left-side and right-side engine-to-bellhousing bolts. Take off the bolts of the oil pan-to-bellhousing, bellhousing-to-pan bolt, timing chain cover to-oil pan bolts. Slide a screwdriver between the engine and transaxle until the bellhousing has dislodged the block. The oil pan has oil pan retaining bolts that are screwed in and are unscrewed in circular motion (starting at the centre and extending to the last) and then the oil pan seal is loosened using a rubber mallet and the oil pan is lowered, rotating as necessary to clear the exhaust system. Wipe off and grease the lower engine block / crankcase and oil pan mating surfaces, remove all traces of sealant. Apply a bead of sealant, 1/8-inch wide, to the flange of the oil pan, and be sure to regard the inner edge of the bolt holes and the front face of the flange where it meets the timing chain cover, and place the bolts of the oil pan finger tightened. Install the timing chain cover-to-oil pan fasteners and attach them and tighten, then attach the oil pan-to-engine block bolts in a criss-cross fashion. Distance the oil pan to bellhousing bolts and transaxle to engine bolts equally. Reduce the car and allowed the sealant to dry fully, a minimum of 1 hour, before replacing the engine with oil, trimming away any surplus sealant and changing the oil filter.
- Q: How to remove and reinstall the Oil Pan components for V6 engine on Mazda 6?A:In 3.7L engines, the process can only be done when the engine is out; it is assumed that the 3.7L engine has been pulled out, and so all the steps that do not apply should be disregarded. Start with removing the cable on the negative battery terminal and then lift the vehicle and place on jackstands. Empty the engine oil, replace the oil drain plug and screw it to the required torque with a new sealing washer. Take out the oil filter and unconnect the oxygen sensor connector(s). The next step would be to take out crossover and flexible exhaust pipe and converter assembly and then the driveplate access cover. 3.7L engines have the nut and stud on the alternator removed and the bolts that held the oil pan on the transaxle are removed. Disassemble the timing chain cover, Flywheel driveplate, and crankshaft position sensor timing ring and place the engine on an engine stand by making sure that only the bellhousing flange is bolted. Unscrew the fasteners of the oil pan and the oil pan, keeping track of the whereabouts of the stud bolts. In the case of 3.7L engines, two of the original oil pan bolts with threads at the front and back of the pan should be installed into the two holes and tightened to have all the oil pan slide away, in a straight line, with the block. Removal of the oil screen and pick-up tube is done by removing the oil pan gasket, and, where there are fasteners that hold the oil screen and the pick-up tube, removal of the fasteners is necessary, followed by removal of the screen and tube assembly. Wipe the oil pan and cylinder block mating surfaces with lacquer thinner or acetone and make sure that they do not have any residue. In order to do this, should it be removed, place a new O-ring seal on the oil pick-up tube and then install the tube and screen assembly, tightening the retaining fasteners to the recommended torque. Install another self-locking nut that will hold the pick-up tube support bracket and clamp it to the given torque. In case of 3.0L engines, install a new gasket on the oil pan and apply a bead of RTV sealant (1/8-inch) to the oil pan gasket at the place where the timing chain cover-to-cylinder block parting line is. Install the pan bolts, then tighten them by hand, and make sure to install any stud bolts in the mentioned positions when removing. Install the oil pan-to-transaxle bolts and press the oil pan firmly against the transaxle and secure the pan-to-transaxle bolts firmly and then gradually and uniformly screw the oil pan bolts to the required torque. With 3.7L engines, place RTV, 1/8-inch, on the flange of the oil pan and place the pan on such that only the 4 corner bolts are hand tightened. Place the pan face to the boss beneath the alternator and use a straightedge to place the pan in contact to the rear side of the block in a hurry and install the remaining bolts and tighten them in a criss-cross pattern until they are all in place and to the correct torque. The rest of the installation procedure is the opposite of the un-installation procedure which is to tighten all the fasteners to the required torque values, in all instances replace disturbed self-locking nuts during the removal, fill the engine with new engine oil, and fit a new oil filter. Lastly, turn on the engine and inspect it.


Related Mazda 6 Parts
 Mazda 6 Timing Chain
 Mazda 6 Dipstick
 Mazda 6 Engine Mount
 Mazda 6 Oil Pan Gasket
 Mazda 6 Crankshaft Seal
 Mazda 6 Timing Belt Tensioner
 Mazda 6 Balance Shaft Gear
 Mazda 6 Intake Valve
 Mazda 6 Oil Pan Baffle
 Mazda 6 Oil Pump Rotor Set
 Mazda 6 Rocker Arm
 Mazda 6 Valve Spring
Browse by Year
2021 Oil Pan 2020 Oil Pan 2019 Oil Pan 2018 Oil Pan 2017 Oil Pan 2016 Oil Pan 2015 Oil Pan 2014 Oil Pan 2013 Oil Pan 2012 Oil Pan 2011 Oil Pan 2010 Oil Pan 2009 Oil Pan 2008 Oil Pan 2007 Oil Pan 2006 Oil Pan 2005 Oil Pan 2004 Oil Pan 2003 Oil Pan