×
- Hello
- Login or Register
- Quick Links
- Live Chat
- Track Order
- Parts Availability
- RMA
- Help Center
- Contact Us
- Shop for
- Mazda Parts
My Garage
My Account
Cart
Genuine Mazda A/C Accumulator
Accumulator- Select Vehicle by Model
- Select Vehicle by VIN
Select Vehicle by Model
orMake
Model
Year
Select Vehicle by VIN
For the most accurate results, select vehicle by your VIN (Vehicle Identification Number).
34 A/C Accumulators found


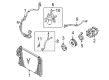
Mazda Receiver Part Number: GS3L-61-500
$42.54 MSRP: $56.73You Save: $14.19 (26%)Ships in 1-2 Business DaysProduct Specifications- Other Name: Tank, Liquid; Drier


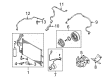
Mazda Dehydrator Part Number: GJ6A-61-501A
$112.98 MSRP: $150.66You Save: $37.68 (26%)Ships in 1-2 Business DaysProduct Specifications- Other Name: Tank, Liquid; Accumulator, Drier
- Replaces: BBM4-61-501


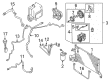
Mazda Drier Part Number: BJ3D-61-500A
$80.70 MSRP: $107.63You Save: $26.93 (26%)Ships in 1-2 Business DaysProduct Specifications- Other Name: Tank, Liquid

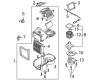
Mazda Accumulator Part Number: DN4J-61-5A0
$829.47 MSRP: $1133.38You Save: $303.91 (27%)Ships in 1-2 Business DaysProduct Specifications- Other Name: Tank, Liquid; Cooler Assembly

Mazda Drier Part Number: ZZDA-61-500
$51.03 MSRP: $68.05You Save: $17.02 (26%)Ships in 1-2 Business DaysProduct Specifications- Other Name: Tank, Liquid; Accumulator
- Replaces: ZZCA-61-500

Mazda Dehydrator Part Number: N243-61-501
$73.25 MSRP: $97.68You Save: $24.43 (26%)Ships in 1-2 Business DaysProduct Specifications- Other Name: Tank, Liquid; Drier

Mazda Drier Part Number: ZZD0-61-500B
$74.06 MSRP: $98.77You Save: $24.71 (26%)Product Specifications- Other Name: Tank, Liquid; Accumulator
- Replaces: ZZD0-61-500, ZZD0-61-500A

Mazda Dehydrator Part Number: NE51-61-501
$78.88 MSRP: $105.19You Save: $26.31 (26%)Ships in 1-2 Business DaysProduct Specifications- Other Name: Tank, Liquid; Drier

Mazda Dehydrator Part Number: BJ0M-61-500
$79.68 MSRP: $106.26You Save: $26.58 (26%)Ships in 1-2 Business DaysProduct Specifications- Other Name: Tank, Liquid; Drier

Mazda Accumulator Part Number: ZZC2-61-460
$99.60 MSRP: $132.82You Save: $33.22 (26%)Product Specifications- Other Name: Tank, Liquid


Mazda Drier Part Number: TK48-61-501
$108.46 MSRP: $144.64You Save: $36.18 (26%)Ships in 1-2 Business DaysProduct Specifications- Other Name: Tank, Liquid; Accumulator

Mazda Dehydrator Part Number: D651-61-501A
$129.73 MSRP: $173.00You Save: $43.27 (26%)Ships in 1-2 Business DaysProduct Specifications- Other Name: Tank, Liquid; Drier
- Replaces: BP4K-61-501, BP4K-61-501A, D651-61-501
Mazda Drier Part Number: EC01-61-5A0C
$169.05 MSRP: $225.45You Save: $56.40 (26%)Ships in 1-2 Business DaysProduct Specifications- Other Name: Tank, Liquid; Accumulator
- Replaces: EC01-61-5A0, EC01-61-5A0A, EC01-61-5A0B

Mazda Dehydrator Part Number: T001-61-501
$43.97 MSRP: $57.71You Save: $13.74 (24%)Ships in 1-2 Business DaysProduct Specifications- Other Name: Tank, Liquid; Drier

Mazda Orifice Part Number: EC01-61-4G9
$5.36 MSRP: $7.16You Save: $1.80 (26%)Ships in 1-2 Business DaysProduct Specifications- Other Name: Orifice, Tube-Green
Mazda Orifice Part Number: EC52-61-4G9
$5.81 MSRP: $7.76You Save: $1.95 (26%)Ships in 1-2 Business DaysProduct Specifications- Other Name: Orifice, Tube
- Replaces: EC05-61-4G9
Mazda Dehydrator Part Number: EA70-61-500
$69.94 MSRP: $93.26You Save: $23.32 (26%)Ships in 1-2 Business DaysProduct Specifications- Other Name: Receiver, Tank; Drier
Mazda Receiver Part Number: LB40-61-500
$263.86 MSRP: $351.89You Save: $88.03 (26%)Ships in 1-2 Business DaysProduct Specifications- Other Name: Tank, Liquid

Mazda Dehydrator Part Number: ZZS0-61-500
Product Specifications- Other Name: Tank, Liquid; Drier
Mazda Drier Part Number: ZZEA-61-500
Product Specifications- Other Name: Tank, Liquid; Accumulator
| Page 1 of 2 |Next >
1-20 of 34 Results
Mazda A/C Accumulator
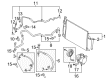
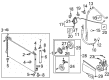
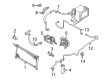
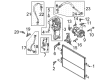
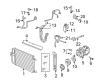
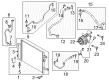
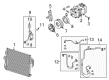
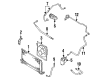
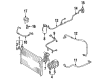
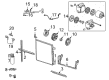
The Mazda A/C Accumulator protects the air conditioning system by removing moisture and debris before the refrigerant returns to the compressor to maintain strong cooling performance on every drive. Mazda is unique for its Kodo Soul of Motion styling that gives every vehicle a sense of energy even when it's parked, Skyactiv engines and transmissions that squeeze more power out of every drop of fuel, and i-Activsense technology that watches the road to assist the driver with lane keeping and radar cruise. The brand began in 1931 and earned fame through the rotary engine in the 1960s and now is experimenting with i-Activ AWD on rough terrain, as well as electric and mild-hybrid power, all to ensure every Mazda combines spirited handling with smart efficiency. While that driving excitement occurs on the road, the A/C Accumulator inside a Mazda engine bay works quietly under the hood. Located between the evaporator outlet and the compressor inlet, the A/C Accumulator catches excess oil, filters out metal flakes, and contains a bag of desiccant that can trap water so that it cannot clog the lines and damage parts with ice. Its sturdy cylinder prevents only clean gaseous refrigerant from moving forward, which stabilizes pressure and maintains crisp vent temperatures. Replacing the unit each time the sealed loop is opened does keep any Mazda cool, comfortable, and ready for more adventures.
You'll get great performance and real durability when you pick genuine OEM A/C Accumulator. Mazda builds these using high-quality materials and official factory methods to ensure they hold up mile after mile. You deserve that Mazda reliability without the headache of cheap knockoffs. It is easy to find exactly what you need in our huge inventory of genuine parts. Plus, every OEM part carries a real manufacturer's warranty for your peace of mind. You will love our low prices too. Order today and we will ship your brand-new parts fast. They often reach your door in just a few days.
Mazda A/C Accumulator Parts and Q&A
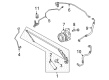
- Q: How to replace the A/C Accumulator on Mazda MX-5 Miata?A:For models from 2000 and earlier, the A/C Accumulator is located at the right end of the condenser. Begin by having the refrigerant discharged and recovered by a qualified repair facility. Disconnect the battery negative cable, block the rear wheels to prevent rolling, jack up the front end, and secure it on jackstands. Remove the splash shield and air guide panels from under the front of the vehicle. Disconnect the refrigerant lines from the A/C Accumulator, capping the open fittings immediately to prevent moisture entry. For 1997 and earlier models, remove the bolt from the A/C Accumulator clamping band and take out the A/C Accumulator. For 1999 and 2000 models, remove the two nuts securing the A/C Accumulator to the mounting bracket on the condenser. For models from 2001 through 2005, the A/C Accumulator is an integral component of the condenser, and if it needs replacement, the condenser must also be replaced, although a separate A/C Accumulator may be available in the aftermarket. For models from 2006 and later, have the air conditioning system refrigerant discharged and recovered by a qualified repair facility, raise the front of the vehicle and secure it on jackstands, remove the engine compartment under cover, and take out the flange bolt securing the inlet and outlet refrigerant lines to the A/C Accumulator. Remove the mounting bracket bolt and take out the A/C Accumulator from the condenser. Discard the old refrigerant line O-rings and always use new ones when reattaching the refrigerant line flange to the A/C Accumulator. Installation is the reverse of removal, ensuring to replace any O-rings with new ones made for the refrigerant type in your system and lubricate them with refrigerant oil before installation. Finally, have the system evacuated, charged, and leak tested by the facility that discharged it, and if the A/C Accumulator was replaced, ensure they add new refrigerant oil to the high-pressure side of the compressor, using only oil compatible with your system.
- Q: How to properly discharge and replace the A/C Accumulator in a vehicle's refrigerant system on Mazda Protege?A:First step will be having the refrigerant emptied and retrieved by a certified repair institute. In 1990-1994 models, take off the radiator grille whereas in 1995 -plus, remove the splash shield of the driver side and fender mud guard. In 1995 and subsequent models, also detach the coolant reservoir, fresh air duct, air cleaner and resonance chamber (where applicable), wring disconnect the A/C Accumulator pressure switch electrical connector. In all models, after emptying the system, disconnect the refrigerant lines to the A/C Accumulator by removing the refrigerant line clamp bolt and once the lines are disconnected, one should cover the open lines with a cap to avoid entry of moisture. The next step is to remove the A/C Accumulator mounting bolts and the A/C Accumulator. Installation is done in reverse sequence of removal i.e. any O-ring that is broken should be replaced with a new O-ring which is in accordance with the type of refrigerant in the system and lubricated with refrigerant oil before being installed. Lastly, evacuate, charge and test the system leaks by the same shop that emptied it and in case the A/C Accumulator was changed, add new refrigerant oil to the high pressure side of the compressor, but only with oil that is compatible with the system.


Related Mazda Parts
 Mazda Cabin Air Filter
 Mazda A/C Compressor
 Mazda A/C Compressor Clutch
 Mazda A/C Condenser
 Mazda Ambient Temperature Sensor
 Mazda Blend Door Actuator
 Mazda Blower Motor
 Mazda A/C Compressor Cut-Out Switches
 Mazda A/C Expansion Valve
 Mazda A/C Hose
 Mazda HVAC Pressure Switch
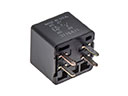 Mazda HVAC Relay
Browse by Model
2 A/C Accumulator 3 A/C Accumulator 323 A/C Accumulator 5 A/C Accumulator 6 A/C Accumulator 626 A/C Accumulator 929 A/C Accumulator B2300 A/C Accumulator B2500 A/C Accumulator B3000 A/C Accumulator B4000 A/C Accumulator CX-5 A/C Accumulator CX-7 A/C Accumulator CX-9 A/C Accumulator Millenia A/C Accumulator MPV A/C Accumulator MX-3 A/C Accumulator MX-30 EV A/C Accumulator MX-5 Miata A/C Accumulator MX-6 A/C Accumulator Protege A/C Accumulator Protege5 A/C Accumulator RX-7 A/C Accumulator Tribute A/C Accumulator