×
- Hello
- Login or Register
- Quick Links
- Live Chat
- Track Order
- Parts Availability
- RMA
- Help Center
- Contact Us
- Shop for
- Mazda Parts
My Garage
My Account
Cart
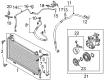
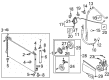
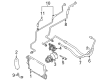
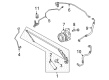
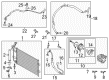
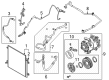
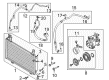
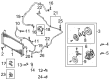
Genuine Mazda A/C Compressor
Air Conditioning Compressor- Select Vehicle by Model
- Select Vehicle by VIN
Select Vehicle by Model
orMake
Model
Year
Select Vehicle by VIN
For the most accurate results, select vehicle by your VIN (Vehicle Identification Number).
59 A/C Compressors found


Mazda Compressor Part Number: BHAA-61-450
$740.11 MSRP: $1011.29You Save: $271.18 (27%)Ships in 1-2 Business DaysProduct Specifications- Other Name: Compressor Assembly


Mazda Compressor Part Number: BBM4-61-450C
$797.29 MSRP: $1089.43You Save: $292.14 (27%)Ships in 1-2 Business DaysProduct Specifications- Other Name: Compressor Assembly
- Replaces: BBM4-61-450A, BBM4-61-450B


Mazda Compressor Part Number: TD15-61-450A
$908.81 MSRP: $1241.80You Save: $332.99 (27%)Ships in 1-2 Business DaysProduct Specifications- Other Name: Compressor Assembly
- Replaces: TD15-61-K00


Mazda Compressor Part Number: BDGF-61-450
$550.76 MSRP: $740.41You Save: $189.65 (26%)Ships in 1-2 Business DaysProduct Specifications- Other Name: Compressor Assembly
- Replaces: BDGH-61-450


Mazda Compressor Part Number: NA1J-61-450
$612.39 MSRP: $836.77You Save: $224.38 (27%)Ships in 1-2 Business DaysProduct Specifications- Other Name: Compressor Assembly


Mazda Compressor Part Number: DR61-61-450
$701.95 MSRP: $959.14You Save: $257.19 (27%)Ships in 1-2 Business Days


Mazda Compressor Part Number: BFD1-61-450A
$744.09 MSRP: $1016.73You Save: $272.64 (27%)Ships in 1-2 Business DaysProduct Specifications- Other Name: Compressor Assembly
- Replaces: BFD1-61-450


Mazda Compressor Part Number: EG21-61-450G
$774.55 MSRP: $1058.34You Save: $283.79 (27%)Ships in 1-2 Business DaysProduct Specifications- Other Name: Compressor Assembly
- Replaces: EG21-61-450E, EG21-61-K00C, EG21-61-450D, EG21-61-450F


Mazda Compressor Part Number: NC72-61-K00
$952.89 MSRP: $1302.02You Save: $349.13 (27%)Ships in 1-2 Business DaysProduct Specifications- Other Name: Compressor, Air


Mazda Compressor Part Number: NEY1-61-450
$953.66 MSRP: $1303.07You Save: $349.41 (27%)Ships in 1-2 Business DaysProduct Specifications- Other Name: Compressor Assembly
- Replaces: NE51-61-K00, NE51-61-450B, NE51-61-450A

Mazda Compressor Part Number: BBN2-61-450D
$719.71 MSRP: $983.42You Save: $263.71 (27%)Ships in 1-2 Business DaysProduct Specifications- Other Name: Compressor Assembly
- Replaces: BBN2-61-450C, BBN2-61-450B

Mazda Compressor Part Number: KMW7-61-450
$822.65 MSRP: $1124.05You Save: $301.40 (27%)Ships in 1-2 Business Days
Mazda Compressor Part Number: KD45-61-450A
$857.04 MSRP: $1171.05You Save: $314.01 (27%)Ships in 1-2 Business DaysProduct Specifications- Other Name: Compressor Assembly
- Replaces: KD45-61-450

Mazda Compressor Part Number: GP9A-61-K00B
$640.89 MSRP: $875.71You Save: $234.82 (27%)Ships in 1-2 Business DaysProduct Specifications- Other Name: Compressor, Air Conditioner; Compressor Assembly
- Replaces: GP9A-61-K00A, GP9A-61-450D, GP9A-61-K00
Mazda Compressor Part Number: DRZ8-61-450
$652.83 MSRP: $892.03You Save: $239.20 (27%)Ships in 1-2 Business Days
Mazda Compressor Part Number: B25F-61-450B
$732.78 MSRP: $1001.26You Save: $268.48 (27%)Ships in 1-2 Business Days
Mazda Compressor Part Number: TC44-61-450
$811.97 MSRP: $1109.47You Save: $297.50 (27%)Ships in 1-2 Business DaysProduct Specifications- Other Name: Compressor(Only); Compressor Assembly

Mazda Compressor Part Number: D09W-61-450
$849.11 MSRP: $1160.22You Save: $311.11 (27%)Ships in 1-2 Business DaysProduct Specifications- Other Name: Compressor Assembly

Mazda Compressor Part Number: CC43-61-450E
$957.41 MSRP: $1308.19You Save: $350.78 (27%)Ships in 1-2 Business DaysProduct Specifications- Other Name: Compressor, Air Conditioner


Mazda Compressor Part Number: TK48-61-450
$1003.94 MSRP: $1371.78You Save: $367.84 (27%)Ships in 1-2 Business Days
| Page 1 of 3 |Next >
1-20 of 59 Results
Mazda A/C Compressor
Mazda A/C Compressor keeps cabin cool on scorching days, quickly pumping chilled air through the vents for calm and focused driving. Mazda as a brand is known for its lively driving, Kodo styling that appears to be on the move and innovative Skyactiv engines that sip fuel but deliver punchy response. Drivers love the way Mazda combines practical safety aids such as i-Activsense with a fun-loving attitude, and available i-Activ AWD and emerging electric options demonstrate that the company is thinking ahead to the many types of roads and futures. This balance of efficiency, safety, and fun makes Mazda appealing to people who want an engaging ride without compromising modern convenience. At the center of that comfort is the A/C Compressor, the workhorse of the air conditioning loop. The Mazda A/C Compressor takes in low-pressure refrigerant gas, compresses it to high pressure high temperature, and then discharges it to the condenser to take out the heat before returning to the cabin with cooled fluid. By ensuring the refrigerant stays in motion at the appropriate pressure, this ensures that the blower can supply a constant stream of cool air and also prevents the system from overworking, which contributes to fuel savings and longevity of the components in the whole range of the vehicles. A reliable Mazda delivers on its promise of driving joy when every breath taken inside the vehicle is crisp, and its promise is based upon a healthy A/C Compressor.
You'll get great performance and real durability when you pick genuine OEM A/C Compressor. Mazda builds these using high-quality materials and official factory methods to ensure they hold up mile after mile. You deserve that Mazda reliability without the headache of cheap knockoffs. It is easy to find exactly what you need in our huge inventory of genuine parts. Plus, every OEM part carries a real manufacturer's warranty for your peace of mind. You will love our low prices too. Order today and we will ship your brand-new parts fast. They often reach your door in just a few days.
Mazda A/C Compressor Parts and Q&A
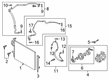
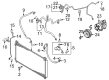
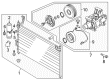
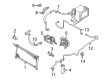
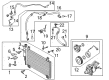
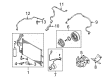
- Q: What steps should be taken when replacing a failed A/C Compressor in an air conditioning system on Mazda 3?A:If the A/C Compressor is being replaced due to failure, the rest of the system should be flushed by a technician to remove particles or contaminants. Begin by having the air conditioning system discharged by an automotive air conditioning technician. Disconnect the cable from the negative terminal of the battery. Loosen the right front wheel lug nuts, raise the vehicle, and support it securely on jackstands before removing the wheel and splash shields. For 2.0L and 2.3L engines, remove the compressor cover mounting nuts and cover. Remove the drivebelt. Disconnect the electrical connector from the compressor clutch field coil, and for 2010 and later models, disconnect the harness clips attached to the outlet line of the compressor. Disconnect the compressor inlet and outlet lines, removing and discarding the old O-rings, then remove the compressor mounting bolts and take out the compressor. If a new compressor is being installed, follow the directions that came with it regarding the draining of excess oil prior to installation, and transfer the clutch from the original to the new compressor if necessary. Before reconnecting the inlet and outlet lines, replace all manifold O-rings and lubricate them with refrigerant oil. Installation is otherwise the reverse of removal, and have the system evacuated, recharged, and leak-tested by the shop that discharged it.
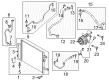
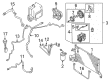
- Q: How to remove and install an A/C Compressor on Mazda Protege?A:Empty the refrigerant and recycle them through a certified repair center, then un-hook the negative cable off the battery. Unscrew both the undercover and splash shield on the passenger side beneath the car and then the drivebelt of the A/C Compressor. Disconnect the refrigerant lines and compressor electrical connector, unbolt the A/C Compressor and remove it out of the car. When a new or rebuilt compressor is being fitted observe the instructions that come with it about the correct amount of refrigerant oil before the compressor is installed. Installation The opposite of de-installation is to install it, the bolts of the A/C Compressor should be firmly screwed, and any O-rings on them must be new ones matching the refrigerant type used in your system, and greased with refrigerant oil beforehand. Do not apply compressor oil on the fitting nuts and tighten refrigerant line bolts firmly. Lastly, evacuate, recharge and leak test by the system that discharged the system at the shop.


Related Mazda Parts
 Mazda Cabin Air Filter
 Mazda A/C Compressor Clutch
 Mazda Ambient Temperature Sensor
 Mazda Blower Motor
 Mazda Blower Motor Resistor
 Mazda Heater Core
 Mazda A/C Compressor Cut-Out Switches
 Mazda A/C Expansion Valve
 Mazda A/C Hose
 Mazda A/C Service Cap
 Mazda A/C Switch
 Mazda HVAC Relay
Browse by Model
2 A/C Compressor 3 A/C Compressor 323 A/C Compressor 5 A/C Compressor 6 A/C Compressor 626 A/C Compressor 929 A/C Compressor B2300 A/C Compressor B2500 A/C Compressor B3000 A/C Compressor B4000 A/C Compressor CX-3 A/C Compressor CX-30 A/C Compressor CX-5 A/C Compressor CX-50 A/C Compressor CX-7 A/C Compressor CX-70 A/C Compressor CX-9 A/C Compressor CX-90 A/C Compressor Miata A/C Compressor Millenia A/C Compressor MPV A/C Compressor MX-30 EV A/C Compressor MX-5 Miata A/C Compressor MX-6 A/C Compressor Navajo A/C Compressor Protege A/C Compressor Protege5 A/C Compressor RX-8 A/C Compressor Tribute A/C Compressor