×
- Hello
- Login or Register
- Quick Links
- Live Chat
- Track Order
- Parts Availability
- RMA
- Help Center
- Contact Us
- Shop for
- Mazda Parts
My Garage
My Account
Cart
Genuine Mazda Liftgates
- Select Vehicle by Model
- Select Vehicle by VIN
Select Vehicle by Model
orMake
Model
Year
Select Vehicle by VIN
For the most accurate results, select vehicle by your VIN (Vehicle Identification Number).
44 Liftgates found


Mazda Lift Gate Part Number: KBY0-62-02XD
$796.17 MSRP: $1087.89You Save: $291.72 (27%)Ships in 1-2 Business DaysProduct Specifications- Other Name: Body, Lift Gate
- Replaced by: KBY0-62-02XE
- Replaces: KBY0-62-02X, KBY0-62-02XB, KBY0-62-02XC


Mazda Lift Gate Part Number: KDY6-62-02XD
$655.60 MSRP: $895.81You Save: $240.21 (27%)Ships in 1-2 Business DaysProduct Specifications- Other Name: Body, Lift Gate
- Replaces: KDY6-62-02X, KDY6-62-02XC, KDY6-62-02XA, KDY6-62-02XB


Mazda Lift Gate Part Number: BDY0-62-02XA
$405.96 MSRP: $545.76You Save: $139.80 (26%)Ships in 1-2 Business DaysProduct Specifications- Other Name: Body, Lift Gate
- Replaces: BDY0-62-02X


Mazda Lift Gate Part Number: TKY1-62-02XB
$952.82 MSRP: $1301.92You Save: $349.10 (27%)Ships in 1-2 Business DaysProduct Specifications- Other Name: Body, Lift Gate
Mazda Lift Gate Part Number: KBY1-62-02XD
$734.03 MSRP: $1002.97You Save: $268.94 (27%)Ships in 1-2 Business DaysProduct Specifications- Other Name: Body, Lift Gate
- Replaced by: KBY1-62-02XE
- Replaces: KBY1-62-02X, KBY1-62-02XB, KBY1-62-02XC, KEY0-62-02X

Mazda Body, Lift Gate Part Number: VAY1-62-02XA
$725.90 MSRP: $991.87You Save: $265.97 (27%)Ships in 1-2 Business DaysProduct Specifications- Other Name: BODY,LIFT GATE; Lift Gate
- Replaces: VAY1-62-02X
Mazda Lift Gate Part Number: TKY9-62-02X
$828.48 MSRP: $1132.03You Save: $303.55 (27%)Ships in 1-2 Business DaysProduct Specifications- Other Name: Body, Lift Gate
Mazda Lift Gate Part Number: KDY5-62-02XD
$655.60 MSRP: $895.81You Save: $240.21 (27%)Ships in 1-2 Business DaysProduct Specifications- Other Name: Body, Lift Gate
- Replaces: KDY5-62-02X, KDY5-62-02XA, KDY5-62-02XB, KDY5-62-02XC

Mazda Lift Gate Part Number: BBY9-62-02XE
$780.47 MSRP: $1066.44You Save: $285.97 (27%)Ships in 1-2 Business DaysProduct Specifications- Other Name: Body, Lift Gate
- Replaces: BBY9-62-02XB, BBY9-62-02XD, BBY9-62-02XC

Mazda Lift Gate Part Number: EGY1-62-02XE
$984.69 MSRP: $1345.48You Save: $360.79 (27%)Ships in 1-2 Business DaysProduct Specifications- Other Name: Body, Lift Gate
- Replaces: EGY1-62-02XD, EGY1-62-02XC, EGY1-62-02XB, EGY1-62-02XA

Mazda Body, Lift Gate Part Number: KMY1-62-02X
$1458.36 MSRP: $1992.70You Save: $534.34 (27%)Ships in 1-2 Business DaysProduct Specifications- Other Name: BODY,LIFT GATE; Lift Gate
- Replaces: KMY3-62-02X

Mazda Lift Gate Part Number: DGY2-62-02XA
$552.99 MSRP: $743.42You Save: $190.43 (26%)Ships in 1-2 Business DaysProduct Specifications- Other Name: Body, Lift Gate
- Replaces: DGY2-62-02X, DAY5-62-02X

Mazda Lift Gate Part Number: DGY1-62-02XA
$607.75 MSRP: $817.02You Save: $209.27 (26%)Ships in 1-2 Business DaysProduct Specifications- Other Name: Body, Lift Gate
- Replaces: DAY4-62-02X, DGY1-62-02X
Mazda Body, Lift Gate Part Number: VAY0-62-02XA
$618.18 MSRP: $831.05You Save: $212.87 (26%)Ships in 1-2 Business DaysProduct Specifications- Other Name: BODY,LIFT GATE; Lift Gate
- Replaces: VAY0-62-02X

Mazda Lift Gate Part Number: DNY1-62-02X
$701.30 MSRP: $958.26You Save: $256.96 (27%)Ships in 1-2 Business DaysProduct Specifications- Other Name: Body, Lift Gate
Mazda Lift Gate Part Number: BBY6-62-02XB
$737.81 MSRP: $1008.13You Save: $270.32 (27%)Ships in 1-2 Business DaysProduct Specifications- Other Name: Body, Lift Gate
- Replaces: BBY6-62-02X, BBY6-62-02XA

Mazda Lift Gate Part Number: BRYV-62-02XF
$821.50 MSRP: $1122.50You Save: $301.00 (27%)Ships in 1-2 Business DaysProduct Specifications- Other Name: Body, Lift Gate
- Replaces: BRYV-62-02XB, BRYV-62-02XE, BRYV-62-02XD
Mazda Lift Gate Part Number: B3YP-62-02XD
$830.47 MSRP: $1134.74You Save: $304.27 (27%)Ships in 1-2 Business DaysProduct Specifications- Other Name: Body, Lift Gate
- Replaces: B3YP-62-02XB, B3YP-62-02X, B3YP-62-02XC
Mazda Lift Gate Part Number: TKY8-62-02X
$853.34 MSRP: $1166.00You Save: $312.66 (27%)Ships in 1-2 Business DaysProduct Specifications- Other Name: Body, Lift Gate
Mazda Lift Gate Part Number: TKY0-62-02XB
$853.34 MSRP: $1166.00You Save: $312.66 (27%)Ships in 1-2 Business DaysProduct Specifications- Other Name: Body, Lift Gate
| Page 1 of 3 |Next >
1-20 of 44 Results
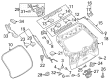
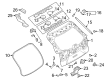
Mazda Liftgates
Mazda Liftgates provide drivers with quick, weather-tight access to cargo, which makes every grocery run or road trip simpler. Mazda began producing vehicles in 1931 and gained worldwide renown for its rotary engine, which it later followed with even higher efficiency via Skyactiv powertrains that combine vibrant performance with reduced fuel consumption. The brand wraps its cars in Kodo Soul of Motion styling so even a parked hatchback looks ready to leap and i-Activsense safety aids like lane keeping and radar cruise help protect everyone inside. Exploring electric drive, mild hybrids, and tried and tested all-wheel drive, Mazda keeps fun-to-drive handling at the heart of every model. While the vehicles shine on winding roads, the rear openings are as important in daily practice and, in this regard, Mazda Liftgates are shining across the range. Hinged at the roof, each gate rises smoothly to bumper height, providing a wide loading zone that eliminates awkward bending and protects the cabin from rain or dust when closed. Uniform hinge patterns, latch points, and seal grooves mean these Liftgates have similar operation and finding replacements is easy, something appreciated by owners who value longevity. Sturdy stamped steel resists flex, an integrated glass gives clear rearward vision, and a tight seal keeps valuables dry, attention to Liftgates design that helps reinforce Mazda's commitment to combining convenience with durability.
You'll get great performance and real durability when you pick genuine OEM Liftgates. Mazda builds these using high-quality materials and official factory methods to ensure they hold up mile after mile. You deserve that Mazda reliability without the headache of cheap knockoffs. It is easy to find exactly what you need in our huge inventory of genuine parts. Plus, every OEM part carries a real manufacturer's warranty for your peace of mind. You will love our low prices too. Order today and we will ship your brand-new parts fast. They often reach your door in just a few days.
Mazda Liftgates Parts and Q&A
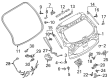
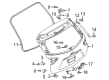
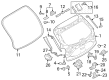
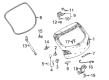
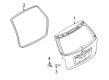
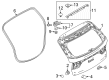
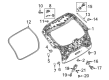
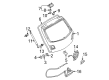
- Q: How can liftgates be removed and installed safely and effectively on Mazda 6?A:The liftgate is heavy and somewhat awkward to remove and install, so at least two people should perform this procedure. Begin by disconnecting the cable from the negative battery terminal. Open the liftgate fully and support it. Carefully pry out the liftgate trim panels using a trim tool. Press the harness connector for the liftgate in and down to free it, then disconnect the harness connector, ground wire, and rear window defogger connector, removing the rubber grommet from the liftgate. Mark around the door hinges with a pen or scribe to facilitate realignment during reassembly. With an assistant holding the door, pry off the support struts stay bands and pull the support strut(s) from the ball stud at each end. Remove the hinge-to-liftgate bolts and lift off the door, drawing a reference line around the hinges before removing the bolts. Installation is the reverse of removal. Proper liftgate-to-body alignment is critical for a well-functioning door assembly; check the liftgate hinge pins for excessive play. Fully open the liftgate and lift up and down on the door without lifting the body. If there is 1/16-inch or more excessive play, the hinges should be replaced. Adjustments for liftgate-to-body alignment are made by loosening the hinge-to-body or hinge-to-door bolts and moving the door until the top is parallel with the roof section, the sides are flush with the rear quarter panels, and the bottom aligns with the lower door sill. If these goals can't be reached through adjustments, body alignment shims may need to be purchased and inserted behind the hinges. To adjust the door-closed position, mark around the striker plate for reference and check that the door latch contacts the center of the latch striker; adjust the up and down position first if necessary. Finally, adjust the latch striker sideways to ensure the door panel is flush with the rear quarter panel and provides positive engagement with the latch mechanism.
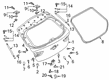
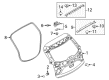
- Q: How can liftgates be removed and installed safely and correctly on Mazda 3?A:The liftgate is bulky and quite cumbersome to take out and put in thus at least two individuals are required to carry out this task. Start by removing the cable of the negative battery terminal. Open the liftgate as much as you can, and support it. The trim panels of the C-pillar (rear of the vehicle opening) and upper trim panel (rear of the opening) are then carefully pried out using a trim tool. Unscrew the mounting bolts and nuts of the hinge on the rear of the headliner, and retract it so far that you can reach the mounting bolts and nuts. Disconnect the hose of rear wiper washer and Liftgate harness electrical connector. The liftgate hinges are marked to assist in re-aligning the liftgate during the re-assembling process. Having an assistant to hold the liftgate have the support strut stay bands pried off, then pull the support strut(s) off the ball stud at each end. Unbolster the hinge, taking care to trace a reference line around the hinges, and then unbolster the liftgate, removing the bolts. The opposite of removal is installation. To adjust, it is necessary to check the liftgate hinge pins to ensure that the pins have no more than 1/16-inch of excessive play; otherwise, the hinges need to be replaced. The liftgate to body or liftgate to hinge bolts can be loosened and then the liftgate moved until the top is parallel to the roof, the sides fit the rear quarter, and the bottom fits the lower sill of the liftgate. In case proper adjustment is impossible due to adjustments, body alignment shims might be bought and stuck behind the hinges. Adjusting the liftgate-closed position To change the position of the liftgate-closed, mark about the striker plate to provide reference and be sure the liftgate latch contacts the center of the latch striker; change the up and down position first, if needed. Lastly, position the latch striker left-right to have the liftgate panel align with the rear quarter panel and have a positive contact with the latch spring device.


Related Mazda Parts
 Mazda Door Lock Actuator
 Mazda Fuel Door
 Mazda Windshield
 Mazda Car Mirror
 Mazda Door Latch Cable
 Mazda Door Screws
 Mazda Instrument Panel Light Bulb
 Mazda Side View Mirrors
 Mazda Tailgate Handle
 Mazda Windshield Washer Fluid Reservoir
 Mazda Windshield Washer Hose
 Mazda Wiper Pivot
Browse by Model
2 Liftgates 3 Liftgates 5 Liftgates 6 Liftgates B2200 Liftgates B2300 Liftgates B2500 Liftgates B2600 Liftgates B3000 Liftgates B4000 Liftgates CX-3 Liftgates CX-30 Liftgates CX-5 Liftgates CX-50 Liftgates CX-7 Liftgates CX-70 Liftgates CX-9 Liftgates CX-90 Liftgates MPV Liftgates MX-30 EV Liftgates Protege5 Liftgates RX-7 Liftgates Tribute Liftgates