×
- Hello
- Login or Register
- Quick Links
- Live Chat
- Track Order
- Parts Availability
- RMA
- Help Center
- Contact Us
- Shop for
- Mazda Parts
My Garage
My Account
Cart
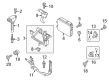
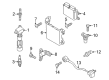
Genuine Mazda MX-5 Miata Crankshaft Position Sensor
Engine Crankshaft Position Sensor- Select Vehicle by Model
- Select Vehicle by VIN
Select Vehicle by Model
orMake
Model
Year
Select Vehicle by VIN
For the most accurate results, select vehicle by your VIN (Vehicle Identification Number).
2 Crankshaft Position Sensors found


Mazda MX-5 Miata Crankshaft Position Sensor Part Number: PE01-18-221
$66.09 MSRP: $88.13You Save: $22.04 (26%)Ships in 1-2 Business Days
Mazda MX-5 Miata Crankshaft Position Sensor Part Number: L3G2-18-221
$66.98 MSRP: $89.32You Save: $22.34 (26%)Ships in 1-2 Business Days
Mazda MX-5 Miata Crankshaft Position Sensor
Looking for Crankshaft Position Sensor with proven quality? Choose OEM Crankshaft Position Sensor. Mazda designs and builds them to strict factory specs. Every piece goes through rigorous quality checks. You'll get parts that fit right and work like new. Shop our huge inventory of OEM Mazda MX-5 Miata parts. Enjoy the highly competitive prices online. Our site is your one-stop shop. Each genuine MX-5 Miata part includes a manufacturer's warranty. Buy with confidence. Our return policy is simple and hassle-free. In a rush? Choose expedited delivery at checkout. You'll love the streamlined experience from search to checkout to receiving your order.
Mazda MX-5 Miata Crankshaft Position Sensor Parts and Q&A
- Q: How is the Crankshaft Position Sensor removed and installed on Mazda MX-5 Miata?A:In models 1995 to 2005, the CKP sensor is located at the lower front section of the engine, and is to the left of the crankshaft pulley in 1995 to 1997 models, and to the right in 1999 to 2005 models, and the process of removal, adjustment and installation is the same. Unhook the cable on the negative battery terminal first, and then follow the wiring harness out of the CKP sensor and trace it to the electrical connector, unhooking it and releasing the harness of whatever retaining it. Unscrew the fitting bolt of the CKP sensor and dismount the sensor. During installation, place the sensor such that there is a distance between the sensor and one of the timing lugs on the timing plate ranging between 0.020 to 0.059 inch and firmly screw the mounting bolt. In the case of 2006 and subsequent models, the CKP sensor is fitted on the lower front of the engine, on the right of the crankshaft pulley. Begin by taking out the battery and battery tray then next out the air filter housing and serpentine drive belt. Lift the front of the vehicle up and stand it firmly on jackstands and then remove the under-cover on the engine compartment. Loose the electrical connector of the CKP sensor, and the mounting bolts and extract the sensor. To install, take the No. 1 piston to the TDC, check the CKP sensor trigger wheel or timing plate attached to the rear of the crankshaft pulley, and find the blank spot on the edge of the timing plate. Five teeth should be counted in a counterclockwise direction around this blank area and then a straight line should be drawn through the center of this fifth tooth and the center of the crankshaft pulley. Install the CKP sensor, by aligning its centre with the line drawn and tighten the sensor bolts. The rest of the installation is in the opposite sequence of uninstallation.

Related Mazda MX-5 Miata Parts
 Mazda MX-5 Miata Camshaft Position Sensor
 Mazda MX-5 Miata Coolant Temperature Sensor
 Mazda MX-5 Miata Door Jamb Switch
 Mazda MX-5 Miata Engine Control Module
 Mazda MX-5 Miata Ignition Coil
 Mazda MX-5 Miata Ignition Switch
 Mazda MX-5 Miata Knock Sensor
 Mazda MX-5 Miata MAP Sensor
 Mazda MX-5 Miata Oxygen Sensor
 Mazda MX-5 Miata Rear Window Defroster Relay
 Mazda MX-5 Miata Spark Plug
 Mazda MX-5 Miata Speedometer
Browse by Year
2025 Crankshaft Position Sensor 2024 Crankshaft Position Sensor 2023 Crankshaft Position Sensor 2022 Crankshaft Position Sensor 2021 Crankshaft Position Sensor 2020 Crankshaft Position Sensor 2019 Crankshaft Position Sensor 2018 Crankshaft Position Sensor 2017 Crankshaft Position Sensor 2016 Crankshaft Position Sensor 2015 Crankshaft Position Sensor 2014 Crankshaft Position Sensor 2013 Crankshaft Position Sensor 2012 Crankshaft Position Sensor 2011 Crankshaft Position Sensor 2010 Crankshaft Position Sensor 2009 Crankshaft Position Sensor 2008 Crankshaft Position Sensor 2007 Crankshaft Position Sensor 2006 Crankshaft Position Sensor