×
- Hello
- Login or Register
- Quick Links
- Live Chat
- Track Order
- Parts Availability
- RMA
- Help Center
- Contact Us
- Shop for
- Mazda Parts
My Garage
My Account
Cart
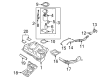
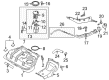
Genuine Mazda MX-5 Miata Fuel Tank
Gas Tank- Select Vehicle by Model
- Select Vehicle by VIN
Select Vehicle by Model
orMake
Model
Year
Select Vehicle by VIN
For the most accurate results, select vehicle by your VIN (Vehicle Identification Number).
2 Fuel Tanks found

Mazda MX-5 Miata Fuel Tank Part Number: NE51-42-110N
$677.15 MSRP: $925.25You Save: $248.10 (27%)Ships in 1-2 Business Days
Mazda MX-5 Miata Fuel Tank Part Number: NA1J-42-110
$587.02 MSRP: $789.15You Save: $202.13 (26%)Ships in 1-2 Business Days
Mazda MX-5 Miata Fuel Tank
Looking for Fuel Tank with proven quality? Choose OEM Fuel Tank. Mazda designs and builds them to strict factory specs. Every piece goes through rigorous quality checks. You'll get parts that fit right and work like new. Shop our huge inventory of OEM Mazda MX-5 Miata parts. Enjoy the highly competitive prices online. Our site is your one-stop shop. Each genuine MX-5 Miata part includes a manufacturer's warranty. Buy with confidence. Our return policy is simple and hassle-free. In a rush? Choose expedited delivery at checkout. You'll love the streamlined experience from search to checkout to receiving your order.
Mazda MX-5 Miata Fuel Tank Parts and Q&A
- Q: How to safely remove a fuel tank on Mazda MX-5 Miata?A:This process is far simpler when the fuel tank is empty, and certain models have a drain plug to do this; though, where the drain plug cannot be removed, then the work must wait until the tank is empty or empty the contents into a recognized container with a siphoning kit, which can be found in most auto parts outlets. The first step is to take the fuel filler cap out to release the pressure in the fuel tank and the cable attached to the negative battery terminus. In case the tank is full or almost full drain fuel into a certified fuel container. Lift the vehicle and set it safely on jackstands then become acquainted with the fuel tank assembly design before moving on to disconnect the hoses of the fuel pump and the electrical connections. Take out the frame of the power plant, drive shaft and differential, and hold the entire rear suspension/crossmember assembly up with a transmission jack, unbolt the suspension to the body and get it out of the car, which will also involve loosening the brake lines at the crossmember and unattaching the parking brake cables at the calipers. Secondly, take off tank protector and prop the fuel tank with a floor jack with a rigid plank between the jack head and the fuel tank to support it. Within the trunk, unlock the access panel, unbolt the fuel filler neck, and unattach the hoses at the tank, and be sure to reconnect the hoses so that the fuel system is not leaked and contaminated. Peel the bolts on the fuel tank retaining brackets and withdraw the tank out of the car. Installing is the opposite of dismantling, and also, do not forget to bleed the brakes.

Related Mazda MX-5 Miata Parts
 Mazda MX-5 Miata Air Filter
 Mazda MX-5 Miata Fuel Filler Hose
 Mazda MX-5 Miata Fuel Filter
 Mazda MX-5 Miata Fuel Injection Pump
 Mazda MX-5 Miata Fuel Pressure Regulator
 Mazda MX-5 Miata Fuel Pump
 Mazda MX-5 Miata Fuel Pump Gasket
 Mazda MX-5 Miata Fuel Pump Strainer
 Mazda MX-5 Miata Fuel Tank Lock Ring
 Mazda MX-5 Miata Intake Manifold
 Mazda MX-5 Miata Mass Air Flow Sensor
 Mazda MX-5 Miata Throttle Body Gasket