×
- Hello
- Login or Register
- Quick Links
- Live Chat
- Track Order
- Parts Availability
- RMA
- Help Center
- Contact Us
- Shop for
- Mazda Parts
My Garage
My Account
Cart
Genuine Mazda MX-5 Miata Valve Cover
Cylinder Head Cover- Select Vehicle by Model
- Select Vehicle by VIN
Select Vehicle by Model
orMake
Model
Year
Select Vehicle by VIN
For the most accurate results, select vehicle by your VIN (Vehicle Identification Number).
2 Valve Covers found

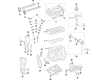
Mazda MX-5 Miata Valve Cover Part Number: PEES-10-210D
$317.68 MSRP: $423.65You Save: $105.97 (26%)Ships in 1-2 Business Days
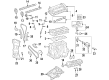
Mazda MX-5 Miata Valve Cover Part Number: LFE2-10-210C
Mazda MX-5 Miata Valve Cover
Looking for Valve Cover with proven quality? Choose OEM Valve Cover. Mazda designs and builds them to strict factory specs. Every piece goes through rigorous quality checks. You'll get parts that fit right and work like new. Shop our huge inventory of OEM Mazda MX-5 Miata parts. Enjoy the highly competitive prices online. Our site is your one-stop shop. Each genuine MX-5 Miata part includes a manufacturer's warranty. Buy with confidence. Our return policy is simple and hassle-free. In a rush? Choose expedited delivery at checkout. You'll love the streamlined experience from search to checkout to receiving your order.
Mazda MX-5 Miata Valve Cover Parts and Q&A
- Q: How to remove and install the valve cover on Mazda MX-5 Miata?A:On 2005 and earlier models, you will first of all detach the negative cable off the battery and next the Positive Crankcase Ventilation (PCV) valve and breather hoses off the valve cover. Label and loosen the spark plug wires, then the bolts attached to the valve cover to the Cylinder Head in the reverse order of tightening. Unscrew any tubing or parts that are in the way of the valve cover and unscrew it, maybe under the influence of a rubber mallet so as not to pry between the sealing surfaces. Before installation, the mating surfaces of the housing or cylinder head and cover should be clean, and the old sealant and the gasket material should be removed with a gasket scraper and a rag wetted with lacquer thinner or acetone. When fitting a new valve cover gasket, put silicone sealant in the groove then fit the gasket, when reusing make sure that the gasket and the groove are clean, put RTV sealant and re-fit the gasket. Lightly apply RTV sealant onto areas to be sealed, install the valve cover and install the bolts by hand, tightening them in a desired order to the desired torque. Install the rest of the parts in reverse and ensure that there is no oil spillage following an engine run. To do it on 2006 model and others that follow, first unconnect the negative battery terminal and engine cover. Unscrew the PCV hose of the valve cover, take the strut bar and windshield wiper motor of the car and disconnect the electrical connector of the Oil Control valve (OCV). Take out the ignition coils and the electrical connector of the Camshaft Position (CMP) sensor and remove the valve cover bolts and the valve cover itself. Check the valve cover gaskets, change them in case of leakage or damage and apply silicone sealant to the identified areas and install the valve cover. Install the valve cover bolts in the order that they were removed in to the correct torque, and install them in the opposite order.

Related Mazda MX-5 Miata Parts
 Mazda MX-5 Miata Cooling Fan Bracket
 Mazda MX-5 Miata Crankshaft Seal
 Mazda MX-5 Miata CV Joint
 Mazda MX-5 Miata Door Lock Switch
 Mazda MX-5 Miata EGR Valve
 Mazda MX-5 Miata Fuel Filter
 Mazda MX-5 Miata Fuel Injection Pump
 Mazda MX-5 Miata Shock and Strut Boot
 Mazda MX-5 Miata Throttle Position Sensor
 Mazda MX-5 Miata Washer Reservoir Cap
 Mazda MX-5 Miata Wiper Linkage
Browse by Year
2023 Valve Cover 2022 Valve Cover 2021 Valve Cover 2020 Valve Cover 2019 Valve Cover 2018 Valve Cover 2017 Valve Cover 2016 Valve Cover 2015 Valve Cover 2014 Valve Cover 2013 Valve Cover 2012 Valve Cover 2011 Valve Cover 2010 Valve Cover 2009 Valve Cover 2008 Valve Cover 2007 Valve Cover 2006 Valve Cover