×
- Hello
- Login or Register
- Quick Links
- Live Chat
- Track Order
- Parts Availability
- RMA
- Help Center
- Contact Us
- Shop for
- Mazda Parts
My Garage
My Account
Cart
Genuine Mazda Transfer Case
Speed Transfer Case- Select Vehicle by Model
- Select Vehicle by VIN
Select Vehicle by Model
orMake
Model
Year
Select Vehicle by VIN
For the most accurate results, select vehicle by your VIN (Vehicle Identification Number).
13 Transfer Cases found


Mazda Transfer Case Part Number: KN03-27-500
$1460.90 MSRP: $1996.17You Save: $535.27 (27%)Ships in 1-2 Business DaysProduct Specifications- Other Name: Transfer
- Replaced by: KN03-27-500A

Mazda Case Part Number: 1F71-17-910B
$355.65 MSRP: $466.83You Save: $111.18 (24%)Ships in 1-2 Business DaysProduct Specifications- Other Name: Case, Transfer; Transfer Case

Mazda Transfer Case Part Number: KN01-27-500A
$2093.32 MSRP: $2860.31You Save: $766.99 (27%)Ships in 1-2 Business DaysProduct Specifications- Other Name: Transfer
- Replaced by: KN01-27-500B
- Replaces: KN01-27-500
Mazda Transfer Case Part Number: CN01-27-500A
$947.88 MSRP: $1295.18You Save: $347.30 (27%)Ships in 1-2 Business DaysProduct Specifications- Other Name: Transfer
- Replaces: CN01-27-500
Mazda Transfer Part Number: KN04-27-500C
$2085.29 MSRP: $2849.32You Save: $764.03 (27%)Ships in 1-2 Business DaysProduct Specifications- Other Name: Transfer Case
- Replaced by: KN04-27-500D
Mazda Transfer Part Number: TNB2-27-500A
$2722.37 MSRP: $3719.83You Save: $997.46 (27%)Ships in 1-2 Business DaysProduct Specifications- Other Name: Transfer Case
Mazda Transfer Part Number: TNA2-27-500
$2938.00 MSRP: $4014.47You Save: $1076.47 (27%)Ships in 1-2 Business DaysProduct Specifications- Other Name: Transfer Case


Mazda Transfer Case Part Number: AW21-27-500R-9U
Product Specifications- Other Name: Transfer
- Replaces: AW21-27-500K-9U, AW21-27-500N-9U, AW21-27-500P, AW21-27-500R, AW21-27-500P-9U, AW21-27-500K, AW21-27-500N
Mazda Transfer Case Part Number: ZZC0-27-500A
Product Specifications- Other Name: Transfer
Mazda Transfer Case Part Number: ZZ2A-27-500A
Product Specifications- Other Name: Transfer
Mazda Transfer Case Part Number: LN11-27-500A
Product Specifications- Other Name: Transfer
Mazda Transfer Case Part Number: LN03-27-500M
Product Specifications- Other Name: Transfer
Mazda Case Part Number: 1FAB-17-910A
Product Specifications- Other Name: Case, Transfer; Transfer Case
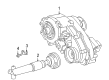
Mazda Transfer Case
Mazda Transfer Case sends power to both axles to allow drivers to seamlessly shift from efficient two-wheel cruising to confidence-building four-wheel traction, making it the heart of capability. Mazda cars have long been a balance between spirited performance and practical everyday use, starting with their legendary rotary innovations and moving on to fuel-sipping Skyactiv engines that make road trips fun but also economical. Mazda combines that energetic driving with Kodo styling that appears to be in motion even when sitting still, while i-Activsense features like lane-keep and radar cruise bring calm to any commute. Exploring electrified powertrains and perfecting all-wheel drive, Mazda's lineup is always ready for winding tarmac or gravel spurs. Behind that poised feel, the Transfer Case stands ready across the range, a compact gearbox bolted after the transmission which splits torque between front and rear differentials and synchronizes wheel speed so surfaces change without drama. Modern versions provide both part-time and full-time operation, with the use of strong chains, precision gears or a clever center differential to direct the grip to just where it is needed and an electric actuator for the driver to use a fingertip to engage modes. Because it carries an optional low range, the Mazda Transfer Case also multiplies torque when going up steep hills or through deep snow, adding adventure potential to every Mazda without sacrificing the light steering and crisp feedback that drivers love.
You'll get great performance and real durability when you pick genuine OEM Transfer Case. Mazda builds these using high-quality materials and official factory methods to ensure they hold up mile after mile. You deserve that Mazda reliability without the headache of cheap knockoffs. It is easy to find exactly what you need in our huge inventory of genuine parts. Plus, every OEM part carries a real manufacturer's warranty for your peace of mind. You will love our low prices too. Order today and we will ship your brand-new parts fast. They often reach your door in just a few days.
Mazda Transfer Case Parts and Q&A
- Q: How to remove and install the transfer case on Mazda Tribute?A:On 2004 and earlier four-cylinder models, loosen the wheel lug nuts on the right front, raise the front-end of the car and place it safely on jackstands and then remove the wheel. Unscrew the front section of the driveshaft, and hang it using wire, then dismantle the right driveaxle and intermediate shaft. The next step would be to take out the four bolts holding the crossmember together and then extract it out, then extract the upper two mounting nuts and two lower mounting bolts on the right side of the transfer case to disjoin it with the vehicle. To install them, follow these procedures in reverse, be sure to put a new O-ring seal in place, tighten the driveshaft and transfer case bolts to the proper recommended torque, pour more transfer case fluid in, and lastly put in the wheel lug nuts. In case of V6, the procedure begins by removing the wheel cover or the hub cap, loosening the hub nut, and the wheel lug nuts. Once the vehicle has been lifted and supported, loosen the front section of the driveshaft and then suspend it, then do the same to the right driveaxle, intermediate shaft, crossover pipe of the exhaust system and rear exhaust manifold. Take off crossmember and alternator then take off the transfer case bracket off the engine block and take off the transfer case mounting bolts. In 2005 to 2008 models, lift up the vehicle, empty the transfer case fluid, take out the driveshaft, and crossmember brace. On manual transaxle models, loosen 2 mounting bolts and nuts of transaxle and pull the transfer case forward off the rear stud, discarding the big O-ring. In automatic transaxle, delete the right driveaxle, intermediate shaft, interfering exhaust manifold, transfer case heat shield and mounting bracket and delete the vent tube and transfer case mounting bolts. In 2009 and subsequent models, lift the vehicle, jack it up, take off the under-vehicle splash shield, empty the transfer case fluid and take off the driveshaft. To 2012 and earlier, dismantle the crossmember brace, right driveaxle, intermediate shaft, interfering exhaust manifold, turbocharger outlet pipe, heat shield, and two exhaust bracket nuts then dismantle the transfer case support bracket and vent tube then loosen the transfer case mounting bolts. Installation is the opposite of the removal and it will make sure that a new O-ring seal is laid, that exhaust system and driveshaft fasteners are tightened to the specified torque, that transfer case is filled with the correct lubricant, and that the wheel lug nuts are tight.
Related Mazda Parts
 Mazda Clutch Slave Cylinder
 Mazda Flywheel
 Mazda Torque Converter
 Mazda Automatic Transmission Filter
 Mazda Automatic Transmission Shift Levers
 Mazda Clutch Fork
 Mazda Clutch Release Bearing
 Mazda Manual Transmission Extension Housing Seal
 Mazda Transfer Case Gasket
 Mazda Transfer Case Seal
 Mazda Transmission Gasket
 Mazda Valve Body