×
- Hello
- Login or Register
- Quick Links
- Live Chat
- Track Order
- Parts Availability
- RMA
- Help Center
- Contact Us
- Shop for
- Mazda Parts
My Garage
My Account
Cart
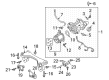
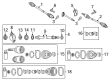
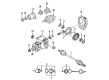
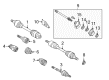
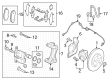
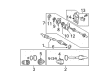
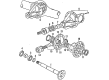
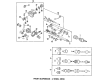
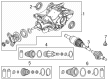
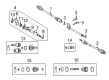
Genuine Mazda Axle Shaft Seal
CV Axle Seal- Select Vehicle by Model
- Select Vehicle by VIN
Select Vehicle by Model
orMake
Model
Year
Select Vehicle by VIN
For the most accurate results, select vehicle by your VIN (Vehicle Identification Number).
96 Axle Shaft Seals found


Mazda Axle Seal Part Number: KA01-27-238
$9.50 MSRP: $12.67You Save: $3.17 (26%)Ships in 1-2 Business DaysProduct Specifications- Other Name: Seal, Oil


Mazda Inner Seal Part Number: GA67-25-744
$10.06 MSRP: $13.43You Save: $3.37 (26%)Ships in 1-2 Business DaysProduct Specifications- Other Name: Seal, Dust; Bracket Seal
- Position: Driver Side

Mazda Dust Seal Part Number: G560-25-744
$9.86 MSRP: $13.16You Save: $3.30 (26%)Ships in 1-2 Business DaysProduct Specifications- Position: Driver Side


Mazda Oil Seal Part Number: M0A7-27-238A
$16.69 MSRP: $22.25You Save: $5.56 (25%)Ships in 1-2 Business DaysProduct Specifications- Other Name: Seal, Oil; Axle Seal
- Replaces: M0A7-27-238

Mazda Seal Part Number: ZZL2-26-157
$17.69 MSRP: $23.59You Save: $5.90 (26%)Product Specifications- Other Name: Oil Seal; Axle Seal, Bearing Seal
- Replaces: ZZL0-26-157, ZZL0-26-157A

Mazda Outer Seal Part Number: GA67-25-742
$18.39 MSRP: $24.53You Save: $6.14 (26%)Ships in 1-2 Business DaysProduct Specifications- Other Name: Seal, Dust
- Position: Outer
- Replaces: GG30-25-742

Mazda Axle Seals Part Number: F003-27-238C
$10.65 MSRP: $14.20You Save: $3.55 (25%)Ships in 1-2 Business DaysProduct Specifications- Other Name: Seal, Oil; Axle Seal
- Replaces: F003-27-238, F003-27-238A, F003-27-238B, F001-27-238

Mazda Seal Part Number: M054-27-165
$15.63 MSRP: $20.83You Save: $5.20 (25%)Ships in 1-2 Business DaysProduct Specifications- Other Name: Oil Seal; Pinion Seal, Pinion Shaft Seal

Mazda Dust Seal Part Number: G003-25-744A
$8.81 MSRP: $11.75You Save: $2.94 (26%)Ships in 1-2 Business DaysProduct Specifications- Other Name: Bearing Dust Shield
- Position: Driver Side
- Replaces: G003-25-744
Mazda Axle Seals Part Number: MA02-27-238A
$10.44 MSRP: $13.93You Save: $3.49 (26%)Ships in 1-2 Business DaysProduct Specifications- Other Name: Seal, Oil; Axle Seal, Differential Carrier Oil Seal
- Replaces: MA02-27-238

Mazda Seal Kit Part Number: VAY0-33-26Z
$12.94 MSRP: $17.26You Save: $4.32 (26%)Ships in 1-2 Business DaysProduct Specifications- Other Name: Seal & Boot Set, Caliper-Front

Mazda Seal Part Number: GA21-25-742
$5.19 MSRP: $6.92You Save: $1.73 (25%)Ships in 1-2 Business DaysProduct Specifications- Other Name: Seal, Dust; Outer Seal
Mazda Pinion Seal Part Number: 0604-27-018
$5.85 MSRP: $7.81You Save: $1.96 (26%)Ships in 1-2 Business DaysProduct Specifications- Other Name: Oil Seal
Mazda Pinion Seal Part Number: M0A3-27-165
$10.86 MSRP: $14.48You Save: $3.62 (25%)Ships in 1-2 Business DaysProduct Specifications- Other Name: Oil Seal; Hub Oil Seal, Inner Seal, Rear Seal

Mazda Seal, Oil Part Number: RA21-27-238
$11.25 MSRP: $15.00You Save: $3.75 (25%)Ships in 1-2 Business DaysProduct Specifications- Other Name: SEAL,OIL; Axle Seal, Output Shaft Seal

Mazda Seal Part Number: G003-25-742A
$11.41 MSRP: $15.22You Save: $3.81 (26%)Ships in 1-2 Business DaysProduct Specifications- Other Name: Seal, Dust; Bearing Dust Shield, Inner Seal, Outer Seal
- Position: Passenger Side
- Replaces: G003-25-742

Mazda Seal Part Number: 1F70-27-018
$12.54 MSRP: $16.72You Save: $4.18 (25%)Ships in 1-2 Business DaysProduct Specifications- Other Name: Seal, Oil; Pinion Seal
- Replaces: 1F00-27-018, 1F00-27-018A

Mazda Bearing Seal Part Number: B210-33-065
$13.06 MSRP: $17.42You Save: $4.36 (26%)Ships in 1-2 Business DaysProduct Specifications- Other Name: Oil Seal; Bearing Inner Seal, Hub Seal

Mazda Dust Seal Part Number: G569-25-742
$13.10 MSRP: $17.47You Save: $4.37 (26%)Ships in 1-2 Business DaysProduct Specifications- Other Name: Seal, Dust; Inner Seal, Outer Seal, Support Bracket Seal

Mazda Seal Part Number: G304-33-065
$13.70 MSRP: $18.27You Save: $4.57 (26%)Ships in 1-2 Business DaysProduct Specifications- Other Name: Oil Seal
| Page 1 of 5 |Next >
1-20 of 96 Results
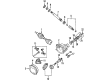
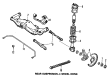
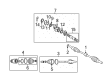
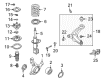
Mazda Axle Shaft Seal
Mazda Axle Shaft Seal is responsible for maintaining essential lubricant within the transmission or differential and protecting the drivetrain against friction while preventing dirt that can reduce component life. Mazda began building vehicles in 1931 and captured the affection of fans worldwide with the high-spirited rotary engine, then fine-tuned for efficiency with Skyactiv powertrains that sip fuel without dulling the fun. The Kodo Soul of Motion design provides every model with a poised stance, while i-Activsense features such as radar cruise and lane keep ensure a calm confidence. Whether hatch, sedan, or SUV, each Mazda is a mix of agile handling, smart tech, and reliability to turn daily driving into an engaging experience. The Axle Shaft Seal is one of the simple functions that complements the philosophy described above. Forged out of rubber bonded to metal, the Axle Shaft Seal sandwiches the spinning CV shaft and the housing, which remains stationary; its flexible lip moves with tiny shaft runout so fluid stays in and grit stays out. Tight manufacturing tolerances, which are a trademark for Mazda, assist the seal in maintaining pressure despite heat and vibration to keep gears coated and bearings smooth. When the seal performs, acceleration feels crisp and driveways stay clean, underscoring how a small component protects big performance for the entire life of a Mazda drivetrain.
You'll get great performance and real durability when you pick genuine OEM Axle Shaft Seal. Mazda builds these using high-quality materials and official factory methods to ensure they hold up mile after mile. You deserve that Mazda reliability without the headache of cheap knockoffs. It is easy to find exactly what you need in our huge inventory of genuine parts. Plus, every OEM part carries a real manufacturer's warranty for your peace of mind. You will love our low prices too. Order today and we will ship your brand-new parts fast. They often reach your door in just a few days.
Mazda Axle Shaft Seal Parts and Q&A
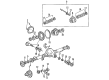
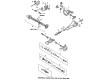
- Q: How to perform removals and installations for rear Axle Shaft, Axle Shaft Seal and Wheel Bearing on Mazda B2200?A:Removals and installations To carry out removals and installations, you should put the jackstands in place to support the rear end up and then remove the wheel and brake drum then the brake shoes and parking brake cable retainer. Disassemble and disconnect the brake lines at the wheel cylinders followed by removing the bolts which hold the backing plate/bearing housing and sliding the axle shaft out of the axle housing without damaging the oil seal. In case of damage of the seal, a slide hammer and adapter should be used to replace it. Take out two overlapping plate bolts at right angles to each other, grind the bearing retaining collar until near 5mm remains, and snap the collar off with a chisel, taking care not to spoil the shaft. A press or a puller is used to remove the hub and bearing assembly, the bearing and seal are removed off the hub with a drift being tapped on the race. Inspect all components of wear or damage and replace both races where one is replaced and replace the bearing and seals as a set. To install, the outer race is pressed using an arbor press and the inner race forced into place. Wipe the hub with lithium-based wheel bearing grease, pound a new oil seal into the axle bearing-housing, and a new spacer into the shaft with the greater plain surface side up. Replacement of the seal in the hub, pack bearings grease-filled, and forcefully fit the assembly (hub and bearing) on to the shaft. Install the new collar onto the shaft with the recommended press pressure of between 9,240-13,420 lb. by observing that the bearing plays with a dial indicator and if needed, Shims are applied to adjust the bearing plays. Install the other sleeve, and torque the backing plate bolts and re-check the play. Lastly, put in the brake drums and wheels and bleed the brake system. In the case of the Navajo model, the negative battery connection should be disconnected, the vehicle raised, the rear wheels and brakes drums should be taken off, and the lubricant in the rear axle should be drained. On axles other than 3.73:1 or 4.10:1 ratios, loosen the differential pinion shaft lock bolt, and pinion shaft, push the axle shafts towards the center to dislodge the C-lockwasher, and take out the axle shafts. To remove the pinion shaft lock bolt in case of 3.73:1 and 4.10:1 ratios, push the pinion shaft out of the slot and then remove C-lockwasher and the axle shaft. Removal of bearing and seal To remove bearing and seal, use a bearing and seal remover with a slide hammer. Installation To install, lubricate the new bearing and press in the housing bore, rub lubricant between the lips of the axle shaft seal, and fit a new axle shaft seal. Slide the axle shaft into the housing taking great care to avoid breaking the oil seal, and connect the splines to the side gear. Install the C-lockwasher, and extract the shaft outboard and install the differential pinon shaft over the case and tighten the lock bolt. Wipe down the area of gasket mountings, put silicone sealant, cover and screw in the bolts. Add lubricant until it is 14 in. below the filler hole and put in filler plug.
- Q: How to remove and install the Axle Shaft, Axle Shaft Seal and Wheel Bearing on Mazda B2000?A:To change and fit the axle parts of the 1972 to 1984 models, the first thing to do is to raise and put the rear portion on jackstands and then carry out the removal of the wheels and the brake drums and then the brake shoes and the parking brake cable retainer. Break and disconnect the brake lines following the wheel cylinders and then loosen bolts of the backing plate and bearing housing and slide axle shaft out of the axle housing. Take out and destroy the oil seal, bend the tabs of the lockwasher, and remove the nut and lockwasher on the axle shaft. Take off the bearing and race of the shaft, and the spacer, and outer seal of the bearing housing, and the gasket of the baffle. Install new seals and a new gasket in that reverse order, provisionally clamping the bearing/backing plate bolts to 16 ft. lbs. without the brake shoes or drum. Check axle shaft endplay measurement by dial indicator; 0.05-0.15mm when one of the two shafts has been removed and 0.66-0.84mm after replacement of the first shaft. Tighten endplay where required and screw up the bearing retainer/backing plate bolts to 40-50 ft. lbs. With models dating 1986 to 1989, lifting and propping the rear end on jackstands, dismounting the wheel and brake drum, and then dismounting the brake shoes and parking brake cable retainer. Disassemble and disconnect brake lines after which the bolts that hold the backing plate and bearing housing are removed slide the axle shaft out of the axle housing being careful not to fail the oil seal. In case it has a broken seal, one has to replace it with a slide hammer and an adapter. Eliminate two support plate bolts at a right angle, cut the bearing retaining collar diagonally until approximately 5mm is left and snap the collar in a chisel. Take the hub and bearing assembly out with press or puller, and then tap the race off the hub with a drift, take the bearing out and seal out of the hub. Inspect all its components, including checking for wear or damage, and assembling the outer race by an arbor press when replacing either of the races, and force the inner race into the axle housing. Fill the hub with lithium impact bearing grease, punch a fresh oil seal into the axle housing and screw on a fresh spacer on the shaft with the broader flat surface upward. Install a new hub seal, grease the bearing and press the bearing and hub assembly onto the shaft and press the new collar onto the shaft with an applied pressure. Install a single shaft in the housing, with bearing play being checked in case of a single shaft having been serviced and bolts on the backing plate tightened to 80 ft. lbs. to place a dial indicator on the backing plate to measure axial play and ensure that it does not exceed the standard requirements. Install the rest of the shaft, tighten the backing plate bolts, check the play and use shims to adjust the play where needed and then install the brake drums and the brake wheels and bleed the brake system.

Related Mazda Parts
 Mazda Brake Pads
 Mazda ABS Sensor
 Mazda Brake Caliper
 Mazda ABS Control Module
 Mazda Brake Caliper Bolt
 Mazda Brake Caliper Repair Kit
 Mazda Brake Line
 Mazda Brake Rotor
 Mazda Brake Shoe Set
 Mazda Hydraulic Hose
 Mazda Spindle Nut
 Mazda Vacuum Check Valve
Browse by Model
2 Axle Shaft Seal 3 Axle Shaft Seal 323 Axle Shaft Seal 5 Axle Shaft Seal 6 Axle Shaft Seal 626 Axle Shaft Seal 929 Axle Shaft Seal B2000 Axle Shaft Seal B2200 Axle Shaft Seal B2300 Axle Shaft Seal B2500 Axle Shaft Seal B2600 Axle Shaft Seal B3000 Axle Shaft Seal B4000 Axle Shaft Seal CX-3 Axle Shaft Seal CX-30 Axle Shaft Seal CX-5 Axle Shaft Seal CX-50 Axle Shaft Seal CX-7 Axle Shaft Seal CX-70 Axle Shaft Seal CX-9 Axle Shaft Seal CX-90 Axle Shaft Seal GLC Axle Shaft Seal Miata Axle Shaft Seal Millenia Axle Shaft Seal MPV Axle Shaft Seal MX-3 Axle Shaft Seal MX-5 Miata Axle Shaft Seal MX-6 Axle Shaft Seal Navajo Axle Shaft Seal Protege Axle Shaft Seal Protege5 Axle Shaft Seal RX-7 Axle Shaft Seal RX-8 Axle Shaft Seal Tribute Axle Shaft Seal