×
- Hello
- Login or Register
- Quick Links
- Live Chat
- Track Order
- Parts Availability
- RMA
- Help Center
- Contact Us
- Shop for
- Mazda Parts
My Garage
My Account
Cart
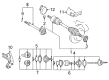
Genuine Mazda Tribute Axle Shaft
Car Axle Shaft- Select Vehicle by Model
- Select Vehicle by VIN
Select Vehicle by Model
orMake
Model
Year
Select Vehicle by VIN
For the most accurate results, select vehicle by your VIN (Vehicle Identification Number).
13 Axle Shafts found

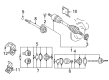
Mazda Tribute Drive Axle Part Number: GG36-25-50XB
$119.36 MSRP: $159.17You Save: $39.81 (26%)Ships in 1-2 Business DaysMazda Tribute Drive Axle Part Number: ZZDA-25-60XC
$140.43 MSRP: $187.26You Save: $46.83 (26%)
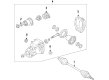
Mazda Tribute Axle Assembly Part Number: ZZCA-25-500
$58.95 MSRP: $77.38You Save: $18.43 (24%)Ships in 1-2 Business Days
Mazda Tribute Drive Axle Part Number: ZZC0-25-50X
$61.98 MSRP: $81.35You Save: $19.37 (24%)Ships in 1-2 Business Days
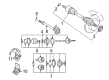
Mazda Tribute Axle Assembly Part Number: ZZCA-26-500
$239.20 MSRP: $313.98You Save: $74.78 (24%)Ships in 1-2 Business Days


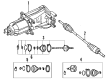
Mazda Tribute Shaft Part Number: GG07-25-700A

Mazda Tribute Drive Axle Part Number: ZZCA-25-60XA

Mazda Tribute Drive Axle Part Number: ZZC3-25-50XB
Mazda Tribute Drive Axle Part Number: ZZC2-25-60X
Mazda Tribute Drive Axle Part Number: ZZC0-25-60XA

Mazda Tribute Drive Axle Part Number: GG20-25-60XA
Mazda Tribute Shaft Part Number: GG06-25-700
Mazda Tribute Drive Axle Part Number: GD30-25-60XC
Mazda Tribute Axle Shaft
Looking for Axle Shaft with proven quality? Choose OEM Axle Shaft. Mazda designs and builds them to strict factory specs. Every piece goes through rigorous quality checks. You'll get parts that fit right and work like new. Shop our huge inventory of OEM Mazda Tribute parts. Enjoy the highly competitive prices online. Our site is your one-stop shop. Each genuine Tribute part includes a manufacturer's warranty. Buy with confidence. Our return policy is simple and hassle-free. In a rush? Choose expedited delivery at checkout. You'll love the streamlined experience from search to checkout to receiving your order.
Mazda Tribute Axle Shaft Parts and Q&A
- Q: How to remove and install an axle shaft on Mazda Tribute?A:To take out the axle shaft, one should loosen the wheel lug nuts, lift up the vehicle and place it on jackstands to hold it in place and then remove the wheel. Remember to remove the under-vehicle splash shield, should it be present. Put a punch on the top of the brake disc cooling vanes over the caliper mounting bracket and then shake off and dispose of the axle shaft/hub nut. In case of vehicles that have antilock brakes, take out the wheel speed sensor and store it aside. Unhook the strut assembly brake hose and put it aside. Disconnect the lower control arm with the steering knuckle, swing the knuckle/hub assembly out until the axle shaft is clear. When the axle shaft splines become stuck, knock off the end with a brass drift and hammer, and hold the outer end with a piece of wire so it is not strained on the inner CV joint. Pry the inner CV joint off the intermediate shaft in case of older models that have the right axle shaft; pry the intermediate shaft bearing support strap in case of newer 2WD models. Left Axle Shaft: Pry the inner CV joint out of the transaxle without damaging the Differential seal, and then support the CV joints and remove the axle shaft. Installation requires changing the old spring clip to a new one, lubricating the differential or intermediate shaft seal and pushing the axle shaft into place, but holding the CV joints. Make sure that the spring clip is in place, insert the inner CV joint into the differential or intermediate shaft, smear the outer CV joint splines with grease and fit the stub axle into the hub. For newer models, make sure that the intermediate shaft support bearing strap is attached, and tighten the nuts. Take the balljoint stud and insert it into the steering knuckle and tighten the pinch bolt, and replace it with new ones where necessary. Install a new axle shaft/hub nut and tighten it: it is important to make sure that this is done prior to lowering the vehicle to avoid damaging the wheel bearing. Fit the inner CV joint housing by making sure that the axle shaft is placed correctly, and then fit the wheel and lug nuts, by pushing the vehicle down and screwing the lug nuts. Removal of the intermediate shafts: To remove the intermediate shafts, make the hub nut loose, the lug nuts on the wheels loose and then place the vehicle on jackstands to ensure proper support to remove the wheel. Unscrew the lower control arm and steering knuckle, take off the axle shaft/hub nut and swing the knuckle/hub assembly out until the axle shaft is free. Take out the axle shaft and bearing support nuts sliding the intermediate shaft out of the transaxle but being careful not to scratch the differential seal. Make sure the support bearing is smoothly running and change where needed. To install, lubricate transaxle seal, insert the intermediate shaft into the side gear of the transaxle and mount bearing support mounting nuts and tighten them accordingly. The rest of the installation occurs in the opposite of removal. To remove rear axle shaft on 4WD models, block front wheels, position rear of vehicle up and away and hold it firmly on jackstands before removing wheel and axle shaft/hub nut. Take out coil spring and unscrew the trailing arm and lower suspension arm balljoint and pry the trailing arm outward to take the outward end of the axle shaft out of the hub. Pry the inner end of the axle shaft out of the differential and take it out. Installation requires replacing the old spring clip, smear the inner CV joint stub shaft with grease, and then install it in the differential, with the spring clip in place. Lubricate the outer CV splines and push the trailing arm away and force the outer end into the hub. Fit the coil spring again, attach the trailing arm to the lower suspension arm and loosen the nut to a required torque. Install a new axle shaft/hub nut and screw it, this must be carried out prior to the descent of the vehicle. On the models produced in certain years, block the front wheel and lift up the car and place it firmly on jackstands then take off the front wheel and rear wheel axle shaft hub nut. Take off the coil spring, wheel speed sensor wiring harness mounting bolt and the stabilizer bar bracket bolts then use a floor jack to hold the knuckle. Disassemble the lower balljoint bolt, part the balljoint and the knuckle, unscrew the inner and outer ends of the axle shaft and the differential and hub, but be careful not to tear the CV joints and boots. The opposite of removal is the installation, when it is necessary to tighten the axle shaft/hub nut and all the suspension fasteners to the required torque. In newer models, the steps to follow during removal and installation are also similar with the only difference that the axle shaft/hub nut and the suspension fasteners should also be tightened accordingly.

Related Mazda Tribute Parts
 Mazda Tribute Wheel Bearing
 Mazda Tribute Axle Bearing Lock Rings
 Mazda Tribute Axle Support Bushings
 Mazda Tribute Camber and Alignment Kit
 Mazda Tribute Coil Spring Insulator
 Mazda Tribute Coil Springs
 Mazda Tribute Lateral Link
 Mazda Tribute Lug Nuts
 Mazda Tribute Radius Arm
 Mazda Tribute Steering Knuckle
 Mazda Tribute Strut Housing
 Mazda Tribute Sway Bar Link
Browse by Year
2011 Axle Shaft
2010 Axle Shaft
2009 Axle Shaft
2008 Axle Shaft
2006 Axle Shaft
2005 Axle Shaft
2004 Axle Shaft
2003 Axle Shaft
2002 Axle Shaft
2001 Axle Shaft