×
- Hello
- Login or Register
- Quick Links
- Live Chat
- Track Order
- Parts Availability
- RMA
- Help Center
- Contact Us
- Shop for
- Mazda Parts
My Garage
My Account
Cart
Genuine Mazda Tribute Oil Pan
Oil Drain Pan- Select Vehicle by Model
- Select Vehicle by VIN
Select Vehicle by Model
orMake
Model
Year
Select Vehicle by VIN
For the most accurate results, select vehicle by your VIN (Vehicle Identification Number).
8 Oil Pans found


Mazda Tribute Oil Pan Part Number: YF09-10-400
$95.54 MSRP: $127.41You Save: $31.87 (26%)Ships in 1-2 Business Days

Mazda Tribute Oil Pan Part Number: L506-10-402
$9.46 MSRP: $12.62You Save: $3.16 (26%)Ships in 1-2 Business Days
Mazda Tribute Transmission Pan Part Number: FW54-21-520
$67.01 MSRP: $89.37You Save: $22.36 (26%)Ships in 1-2 Business Days
Mazda Tribute Oil Pan Part Number: ZZC6-10-400
$137.58 MSRP: $183.47You Save: $45.89 (26%)
Mazda Tribute Oil Pan Part Number: ZZDA-10-400A
$141.95 MSRP: $189.30You Save: $47.35 (26%)
Mazda Tribute Oil Pan Part Number: ZZC2-10-400
$266.31 MSRP: $355.15You Save: $88.84 (26%)


Mazda Tribute Oil Pan Part Number: L309-10-400C

Mazda Tribute Oil Pan Part Number: YF09-10-381
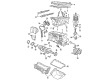
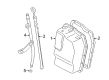
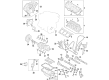
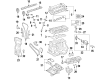
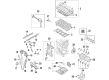
Mazda Tribute Oil Pan
The Mazda Tribute Oil Pan is located at the lower location of the engine, where it also acts as the main reservoir for storing the lubricating oil such that the engine will get a constant supply of oil to the engine with each start-up and drive. Similar to general passenger vehicles, these SUVs operate on a wet sump system where the pan becomes the reservoir and no additional tank or sump pump is required. During its production cycle, Mazda fitted the compact SUV with either stamped steel or cast aluminum basins, each with a contoured edge protruding clear of the subframe and closed snugly against the block to eliminate leakage. Previously Mazda pans were made using heavy-gauge steel that could bounce off debris on the road, whereas the more recent Mazda parts switched to lighter aluminum which heats up and sheds some weight. However, irrespective of material, the design has internal baffles to diminish the slosh of oil during rapid lane changes, which is a critical aspect since uncontrolled movement may expose the pickup tube and temporarily cut off supply to the engine. The second generation of the Tribute did not change the overall design, and thus from year to year, there is no real need to use additional brackets and lines. The Oil Pan simply screws onto the bottom of the crankcase with a gasket which separates the fluid and the built-in drain plug to make changes on a scheduled basis very easy. Since the Oil Pan is subjected to splashes, a healthy coating of paint or factory anodizing prevents corrosion and keeps the system sealed.
Looking for Oil Pan with proven quality? Choose OEM Oil Pan. Mazda designs and builds them to strict factory specs. Every piece goes through rigorous quality checks. You'll get parts that fit right and work like new. Shop our huge inventory of OEM Mazda Tribute parts. Enjoy the highly competitive prices online. Our site is your one-stop shop. Each genuine Tribute part includes a manufacturer's warranty. Buy with confidence. Our return policy is simple and hassle-free. In a rush? Choose expedited delivery at checkout. You'll love the streamlined experience from search to checkout to receiving your order.
Mazda Tribute Oil Pan Parts and Q&A
- Q: How to perform an oil pan removal and installation for 4 cylinder engine on Mazda Tribute?A:To replace the drain plug and 2008 and previous 2.0L and 2.3L vehicles, start by jacking up the vehicle and position it on jackstands then drain the engine oil and clean the drain plug and then fit it again. Take out the oil filter, which is then discarded and take out the catalytic converter in the exhaust system. Slip the oil pan holding the retaining bolts successively, and loosen the seal with a rubber mallet, then take care to drop the oil pan, taking care not to scratch the mating surfaces. Wipe off and clean the oil pan mating surfaces, load the bead of sealant onto the oil pan flange that is 1/8-inch wide, and then install the oil pan bolts in a cross-pattern and then tighten them to the required torque. Once the vehicle is lowered, the sealant will take at least an hour to dry and then once it dries, it is possible to refill the engine with oil and put in a new oil filter. In 2009 and later 2.0L and 2.5L models, loosen the lug nuts (on the left front wheel), raise the vehicle and take off the left front wheel. Empty the engine oil and take away the throttle body air intake duct. Relax the transaxle-to-engine mounting bolts, and, as necessary, loosen the charge air cooler pipes. Disassembly Take off of the splash shield and the bolts that hold the oil pan, and push the transaxle away out of the engine. Wipe mating surfaces, put a bead of RTV sealant, 1/8-inch, on, and install oil pan and tighten the bolts in the appropriate order. Lastly, the air intake duct should be put in place and new oil poured into the engine when the sealant has dried. In case of 1.5L and 1.6L engines, lift the vehicle, take off the engine splash shield, drain the engine oil and take off the oil filter. Turn off the charge air cooler pipes and in case of need, place charge air cooler pump aside. Unscrew the oil pan holding bolts and with the help of a rubber mallet or pry bar loosen the seal and drop the oil pan. Wipe the mating surfaces, place a 0.137 inch bead of RTV sealant and install the 12-bolt of the oil pan in that order. Installation Finish off the installation by changing the oil filter and topping the crankcase with oil, verifying that there are no oil warning lights and then start the vehicle.

Related Mazda Tribute Parts
 Mazda Tribute Oil Pan Gasket
 Mazda Tribute Timing Chain
 Mazda Tribute Crankshaft Seal
 Mazda Tribute Cylinder Head
 Mazda Tribute Cylinder Head Gasket
 Mazda Tribute Dipstick
 Mazda Tribute Oil Filler Cap
 Mazda Tribute Oil Filter Gasket
 Mazda Tribute Piston
 Mazda Tribute Spool Valve
 Mazda Tribute Timing Belt Idler Pulley
 Mazda Tribute Timing Chain Tensioner
Browse by Year
2011 Oil Pan 2010 Oil Pan 2009 Oil Pan 2008 Oil Pan 2006 Oil Pan 2005 Oil Pan 2004 Oil Pan 2003 Oil Pan 2002 Oil Pan 2001 Oil Pan