×
- Hello
- Login or Register
- Quick Links
- Live Chat
- Track Order
- Parts Availability
- RMA
- Help Center
- Contact Us
- Shop for
- Mazda Parts
My Garage
My Account
Cart
Genuine Mazda Tribute Crankshaft Seal
- Select Vehicle by Model
- Select Vehicle by VIN
Select Vehicle by Model
orMake
Model
Year
Select Vehicle by VIN
For the most accurate results, select vehicle by your VIN (Vehicle Identification Number).
4 Crankshaft Seals found

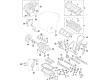
Mazda Tribute Oil Seal Part Number: GY01-10-602
$17.74 MSRP: $23.66You Save: $5.92 (26%)Ships in 1-2 Business Days

Mazda Tribute Crankshaft Seal Part Number: L3G6-10-602
$9.48 MSRP: $12.64You Save: $3.16 (25%)Ships in 1-2 Business Days
Mazda Tribute Rear Main Seal Part Number: ZZM3-11-399
$31.31 MSRP: $41.77You Save: $10.46 (26%)
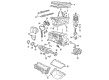
Mazda Tribute Rear Main Seal Part Number: ZZTT-11-399
Mazda Tribute Crankshaft Seal
Looking for Crankshaft Seal with proven quality? Choose OEM Crankshaft Seal. Mazda designs and builds them to strict factory specs. Every piece goes through rigorous quality checks. You'll get parts that fit right and work like new. Shop our huge inventory of OEM Mazda Tribute parts. Enjoy the highly competitive prices online. Our site is your one-stop shop. Each genuine Tribute part includes a manufacturer's warranty. Buy with confidence. Our return policy is simple and hassle-free. In a rush? Choose expedited delivery at checkout. You'll love the streamlined experience from search to checkout to receiving your order.
Mazda Tribute Crankshaft Seal Parts and Q&A
- Q: How to replace the crankshaft seal in Four-cylinder engines on Mazda Tribute?A:To replace crankshaft front oil seal on 2004 and older 2.0L, 1.5L and 1.6L engine, it is important to first ensure that the camshaft(s) or crankshaft is not rotated when Timing Belt is removed to avoid damaging the engine. Start by removing timing belt, then take off crankshaft sprocket of the crankshaft and take out the Woodruff key of 2.0L engines. On the 2.0L models of 2004 and prior, remove timing belt guide washer. Carefully loosen the seal between the bottom of the right inner fender with a small screwdriver with the tape and do not impinge on the Oil Pump assembly and crankshaft. Another way is to drill small holes on both sides of the seal and then make use of self-tapping screws to extract it. Wipe the seal bore and crankshaft sealing surface clean and clean and inspect other minor imperfections. Apply engine oil onto the new seal and fit the seal with a hammer and a suitably sized socket. Install crankshaft sprocket with FRONT printed upside down, timing belt and covers followed by turning engine on to check oil leakage. In 2.3L, 2.5L, and 2013, and later 2.0L engines, loosen the crankshaft pulley and then carefully pull off the seal so as not to bend the timing chain cover bore or the crankshaft. Wipe the sealing surfaces, apply a coating of engine oil to those surfaces, and estimate the new seal firmly into the timing chain cover, a seal driver or an appropriate socket to force it to plug firmly in place. The seal must be level with the engine cover. Apply clean engine oil on the lip of the seal and then put the crankshaft pulley back. In case of camshaft oil seals, place the engine at TDC when the Number 1 piston is operating and in the case of 2004 and earlier models, loosen the camshaft sprocket bolts and sprockets marking their locations. Be sure not to scratch the bore or destroy the camshaft when prying out the seal, preferably with the self-tapping screw technique. Wash out the bore, grease the new seal and hammer it into fit with a socket just a little less than the outside diameter of the seal. Make sure the camshafts are at TDC and fit the camshaft sprockets, fitting the bolts to the required torque. Lastly, replace the timing belt and start the engine to ensure that there are no oil leaks around the camshaft seals.
- Q: How is the rear Crankshaft Seal installed in Four-cylinder engines on Mazda Tribute?A:The rear main oil seal is a one piece that is pressed into the rear main oil seal carrier in all engines except the 2004 and earlier 2.0L engine. Start by taking out the automatic or manual transaxle and clutch, and the Flywheel/driveplate. In the case of 2004 and previous 2.0L engines, use a flat-blade screwdriver to carefully pry out the old seal, taking care not to harm the crankshaft sealing surface, as well as the engine block bore, to avoid oil leaks. Whitish clean the crankshaft and seal bore, wipe with a rag damp with lacquer thinner or acetone, and grease the edge of the new seal and the outside of the crankshaft with engine oil. Make sure that the edges of the new oil seal are not rolled over and then place it on the crankshaft and install it using a special installation tool or a socket of the precise dimension to press the seal into place making it plumb along the entire circumference. When labeled, the seal inscriptions should be facing outwards, towards the non-engine side. The rest of the installation is the reverse of de-installation. To install the rear seal on 2.3L, 2.5L and 2013 and later 2.0L models, use a special tool (Part #303-328) to install the rear seal. Take off the Oil Pan, unbolt the oil seal and carrier assembly and clean the matching surfaces on the crankshaft and cylinder block taking care not to remove any burrs or raised edges with metal brushes. On 1.5L and 1.6L models in case no liner is supplied, install a plastic strip of thin, durable plastic, just around the inside, circumference of the seal. One should attach the new oil seal and carrier in the engine block with the plastic seal cover open. On 2.3L, 2.5L and 2013 and subsequent 2.0L, apply a thin layer of silicone gasket sealant along the bottom mating surface, mount the special tool onto the seal housing, and install the oil seal carrier bolts finger-tight with the carrier in place, however, avoid smearing the sealant. Install the oil seal, pressing it firmly into place with the special tool and a mallet, tightening the carrier holding the oil seal to the required torque, and removing the alignment liner where 1.5L and 1.6L models are used, or the special tool when 2.3L, 2.5L and 2013 and later 2.0L. Lastly, look at the evidence of oil spillage when the engine is running.


Related Mazda Tribute Parts
 Mazda Tribute EGR Valve
 Mazda Tribute Exhaust Manifold
 Mazda Tribute A/C Compressor Cut-Out Switches
 Mazda Tribute A/C Hose
 Mazda Tribute Axle Beam Mount
 Mazda Tribute Axle Bearing Lock Rings
 Mazda Tribute Axle Shaft Seal
 Mazda Tribute Brake Pad Set
 Mazda Tribute Shock Absorber
 Mazda Tribute Thermostat Gasket