×
- Hello
- Login or Register
- Quick Links
- Live Chat
- Track Order
- Parts Availability
- RMA
- Help Center
- Contact Us
- Shop for
- Mazda Parts
My Garage
My Account
Cart
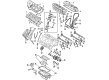
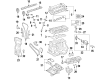
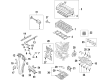
Genuine Mazda Tribute Cylinder Head
Head- Select Vehicle by Model
- Select Vehicle by VIN
Select Vehicle by Model
orMake
Model
Year
Select Vehicle by VIN
For the most accurate results, select vehicle by your VIN (Vehicle Identification Number).
8 Cylinder Heads found

Mazda Tribute Cylinder Head Part Number: ZZC4-10-1A0R-0A
$632.96 MSRP: $860.58You Save: $227.62 (27%)Mazda Tribute Cylinder Head Part Number: ZZD2-10-1A0
$898.74 MSRP: $1220.86You Save: $322.12 (27%)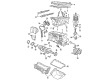
Mazda Tribute Cylinder Head Part Number: YF71-10-100R-00
$1097.62 MSRP: $1495.49You Save: $397.87 (27%)Ships in 1-2 Business DaysMazda Tribute Cylinder Head Part Number: ZZD2-10-100
Mazda Tribute Cylinder Head Part Number: ZZCB-10-10XA
Mazda Tribute Cylinder Head Part Number: ZZCA-10-10XR-00
Mazda Tribute Cylinder Head Part Number: ZZC4-10-100R-0A

Mazda Tribute Cylinder Head Part Number: ZZC2-10-100R-00
Mazda Tribute Cylinder Head
Looking for Cylinder Head with proven quality? Choose OEM Cylinder Head. Mazda designs and builds them to strict factory specs. Every piece goes through rigorous quality checks. You'll get parts that fit right and work like new. Shop our huge inventory of OEM Mazda Tribute parts. Enjoy the highly competitive prices online. Our site is your one-stop shop. Each genuine Tribute part includes a manufacturer's warranty. Buy with confidence. Our return policy is simple and hassle-free. In a rush? Choose expedited delivery at checkout. You'll love the streamlined experience from search to checkout to receiving your order.
Mazda Tribute Cylinder Head Parts and Q&A
- Q: What are the instructions for removing both cylinder heads in V6 engine on Mazda Tribute?A:The procedures of removing the two cylinder heads are described as follows, having in mind that in case of a single cylinder head to be replaced, the other one can be left out. In the case of the rear cylinder head, nothing except the Timing Chain, Camshafts and the rocker arms must be removed and the front can be left in place. On the other hand, when one would want to remove the front head, he/she must first remove the rear timing chain. The steps to follow include fuel system discharge of pressure and removal of negative battery terminal, then empty the cooling system and the engine oil. Take off the upper and lower intake manifolds, oil pan, engine front cover, timing chains, camshafts, rocker arms, and lash adjusters, Exhaust Manifold(s) and water pump and its housing. When using certain models, take out the upper radiator support brackets, the oil dipstick and tube. Unbolt the EGR valve pipe and strip the hoses and electrical connectors off the coolant bypass tube and loosen the cylinder head bolts in reverse order of installation and then loosen them off in reverse order of installation and dispose of them. Removal of the cylinder head in the engine block should be done with care; it should be pried only on a casting protrusion, should the head become stuck. Installation Before installing, rub the mating surfaces of the cylinder head and block, and look for any damage which might need filing or machining. Install new cylinder head gaskets, and make sure that the locating dowels are installed. The cylinder heads should be carefully positioned over the dowels and the torque angle procedure is then observed to tighten the new cylinder head bolts abandoning the old ones. Install the rest of the parts in reverse order, assembling using specified torque values, installing the oil filter, recovering the amount of oil and the cooling system, reconnecting the battery, and lastly starting the engine to ensure that there are no leaks, which requires the Powertrain Control Module to relearn its idle and fuel trim strategy to achieve the best results.
- Q: What precautions should be taken when removing and reinstalling the cylinder head in Four-cylinder engines on Mazda Tribute?A:To all engines described, the head bolts are not reusable, a new set of head bolts must be purchased. Label all the electrical and hose connections that will be disconnected. To take off the cylinder head of 2008 and the older 2.0L and 2.3L models, release the fuel pressure, disconnect the battery cable on the negative post, take off the intake duct of the air filter housing, disconnect the accelerator and cruise control wires when fitted, empty the cooling system, take off the Timing Belt or chain, and Camshafts. Installation of the valve cover to cover the top of the engine temporarily, unplug the camshaft position sensor and unplug the fuel rail and injectors in one piece. In models 2004 and older, take out the alternator and a mounting bracket, the thermostat housing, the Intake Manifold, the dipstick tube, the exhaust manifold, and the support bracket of the power steering hose (where installed). When a hoist or an engine support fixture has been used, before removing the hoist, it is a good idea to reattach the Engine Mount bracket and engine mount. Disassemble the power steering pump mounting bracket, valve shims, making sure to label them to be reassembled. In 1.5L, 1.6L, 2013 and subsequent 2.0L and 2009 and subsequent 2.5L models, release the pressure in the fuel system, unplug the negative battery terminal, elevate the vehicle safely on jackstands and drain the cooling system. Install a jack under the engine Oil Pan but pad it with a block of wood so as not to damage it, then take out the front mount, variable camshaft timing solenoid(s), timing belt or chain, and camshaft alignment plate, labeling each of the camshafts and the bearing caps to be replaced later. Take out the valve shims, fuel rail, intake manifold, alternator, and the exhaust manifold or the turbocharger, disconnecting the various coolant hoses on the cylinder head and outlet. The installation will require the replacement of the head bolts with new ones. Progressively loosen the ten cylinder head bolts, raise the cylinder head out of the engine compartment and be careful not to break the aluminum alloy. Clean the mating faces of the cylinder block and head making sure that no carbon gets in the oil and water passages. Inspect mating surfaces to confirm that there are no nicks or scratches on it and in case of nonconformity, refer to an automotive machine shop. Wipe mating surfaces and be sure the locating dowels are positioned and the bolt holes are oily or not. Place a fresh gasket on top of the dowels, with the TOP mark at the top and temporarily screw in the crankshaft pulley to prevent the valves/piston-contact during reassembly. Install guide studs to help in the installation of the cylinder head, install NEW head bolts and then lubricate the threads using light oil and then tighten them gradually to the desired torque levels. In 2004 and earlier 2.0L engines the tightening sequence is as specified with the 1.5L, 1.6L, 2013 and later 2.0L, 2.3L and 2.5L performance adhering to the five tightening stages with the last two using the angle torque procedure. Install the parts sequentially in reverse order of removal, with new gaskets, and verify that the engine has leaks, now that it is running. Once the battery is reconnected, the Powertrain Control Unit needs to re-learn its idle and fuel trim strategy to maximize its performance again.
Related Mazda Tribute Parts
 Mazda Tribute Oil Pan Gasket
 Mazda Tribute Camshaft
 Mazda Tribute Camshaft Seal
 Mazda Tribute Crankshaft Pulley
 Mazda Tribute Crankshaft Timing Gear
 Mazda Tribute Oil Pan Baffle
 Mazda Tribute Oil Pump Rotor Set
 Mazda Tribute Timing Belt Idler Pulley
 Mazda Tribute Timing Chain Guide
 Mazda Tribute Valve Guide
 Mazda Tribute Valve Spring Retainer
 Mazda Tribute Valve Spring Retainer Keeper