×
- Hello
- Login or Register
- Quick Links
- Live Chat
- Track Order
- Parts Availability
- RMA
- Help Center
- Contact Us
- Shop for
- Mazda Parts
My Garage
My Account
Cart
Genuine Mazda Tribute Timing Chain Tensioner
Engine Timing Chain Tensioner- Select Vehicle by Model
- Select Vehicle by VIN
Select Vehicle by Model
orMake
Model
Year
Select Vehicle by VIN
For the most accurate results, select vehicle by your VIN (Vehicle Identification Number).
3 Timing Chain Tensioners found

Mazda Tribute Tensioner Part Number: LF02-12-500
$98.99 MSRP: $132.00You Save: $33.01 (26%)Ships in 1-2 Business Days
Mazda Tribute Tensioner Part Number: GY01-12-500D
$69.91 MSRP: $93.23You Save: $23.32 (26%)Ships in 1-2 Business Days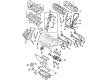
Mazda Tribute Tensioner Part Number: ZZD2-12-500
Mazda Tribute Timing Chain Tensioner
Looking for Timing Chain Tensioner with proven quality? Choose OEM Timing Chain Tensioner. Mazda designs and builds them to strict factory specs. Every piece goes through rigorous quality checks. You'll get parts that fit right and work like new. Shop our huge inventory of OEM Mazda Tribute parts. Enjoy the highly competitive prices online. Our site is your one-stop shop. Each genuine Tribute part includes a manufacturer's warranty. Buy with confidence. Our return policy is simple and hassle-free. In a rush? Choose expedited delivery at checkout. You'll love the streamlined experience from search to checkout to receiving your order.
Mazda Tribute Timing Chain Tensioner Parts and Q&A
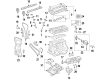
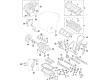
- Q: How to remove and install the Timing Chain, Timing Chain Tensioner and Timing Cover in Four-cylinder engines on Mazda Tribute?A:The timing chain cover of 2008 and earlier models incorporates a negative battery cable that must be disconnected first, and then the drivebelt and tensioner are removed. Unplug the electrical connector of the crankshaft position (CKP) sensor and dislodge the wiring harness off the engine cover. Install the sensor of the CKP, which has a special alignment tool, always installing a new sensor each time you take off the old one. Also, it is necessary to remove the crankshaft pulley, water pump pulley, disconnect the electrical connector to the power steering pressure switch, and then remove the bolt on the lower left side of the power steering pump to shift it aside. Lastly, take off bolts attaching the engine cover. On 2009 and later models, lift up the vehicle and secure it, disconnect the negative battery terminal, take out the Engine Mount and lift out the drivebelt, idler pulley and tensioner. Take out crankshaft pulley, front engine oil seal, and water pump pulley then CKP sensor. Removing the cover Detach any brackets or harnesses (where applicable) of the cover, and then evenly loosen the front cover bolts and tap the cover sideways to loosen before removing it. To install, clean mating surfaces, fit engine cover up to four minutes after applying bead of RTV sealant, and tighten all bolts to set points of desired torque in a three step process. Re-time and changed crankshaft position sensor using a suitable alignment tool. To remove the timing chains and tensioner, place the parking brake, jack up the front of the car and place it on jackstands. 1999 to 2013 and subsequent 2.0L models On 2013 and subsequent 2.0L models, relieve the fuel pressure and dislocate the high-pressure fuel pump and drive unit. Take out the timing chain cover, insert a special tool into the slots of the camshaft, and use the optimization of the timing chain tensioner and put in a pin to keep it in the pressurized form. Take away the tensioner mounting bolts and the tensioner itself then the loose timing chain guide and timing chain. Left-hand chain guide and camshaft sprockets may be taken out, when required. To install, the camshaft alignment tool is not to be used to hold the camshaft in place when loosening the sprocket bolts but rather the hexagonal area on the camshaft. Install camshaft sprocket bolts by loosening the sprocket bolts rather than removing them and then place on the left chain guide, timing chain, and right chain guide. Install fasteners, and install timing chain tensioner and tighten the fasteners, the plunger is pinned in the compressed position and then released to insert into the chain guide. Lastly, attach all the camshaft sprocket bolts with the camshafts in position with a wrench and fit the timing chain cover and ensure that all special alignment tools are removed before turning the engine by hand.


