×
- Hello
- Login or Register
- Quick Links
- Live Chat
- Track Order
- Parts Availability
- RMA
- Help Center
- Contact Us
- Shop for
- Mazda Parts
My Garage
My Account
Cart
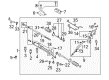
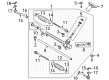
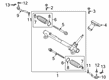
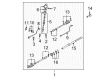
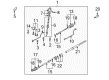
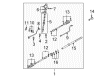
Genuine Mazda 6 Rack and Pinions
Steering Rack- Select Vehicle by Model
- Select Vehicle by VIN
Select Vehicle by Model
orMake
Model
Year
Select Vehicle by VIN
For the most accurate results, select vehicle by your VIN (Vehicle Identification Number).
11 Rack and Pinions found

Mazda 6 Rack Part Number: GS3L-32-119
$48.01 MSRP: $64.04You Save: $16.03 (26%)Ships in 1-2 Business Days
Mazda 6 Pinion Gear Part Number: GJR9-32-12Y
$106.14 MSRP: $141.55You Save: $35.41 (26%)Ships in 1-2 Business Days
Mazda 6 Steering Gear Part Number: GJR9-32-110E
$239.41 MSRP: $319.29You Save: $79.88 (26%)Ships in 1-2 Business Days
Mazda 6 Steering Gear Part Number: GBEF-32-110
$252.06 MSRP: $336.16You Save: $84.10 (26%)Ships in 1-2 Business Days
Mazda 6 Steering Gear Part Number: GS3L-32-960C
$604.64 MSRP: $812.84You Save: $208.20 (26%)Ships in 1-2 Business Days
Mazda 6 Rack Part Number: GJ6E-32-119
$99.86 MSRP: $131.08You Save: $31.22 (24%)Ships in 1-2 Business Days
Mazda 6 Rack Part Number: GJ6A32119

Mazda 6 Steering Gear Part Number: GK2A-32-110R-0E
Mazda 6 Steering Gear Part Number: GP7B-32-110R-0E

Mazda 6 Steering Gear Part Number: GP7C-32-110R-0E

Mazda 6 Steering Gear Part Number: GP9A-32-110E
Mazda 6 Rack and Pinions
Looking for Rack and Pinions with proven quality? Choose OEM Rack and Pinions. Mazda designs and builds them to strict factory specs. Every piece goes through rigorous quality checks. You'll get parts that fit right and work like new. Shop our huge inventory of OEM Mazda 6 parts. Enjoy the highly competitive prices online. Our site is your one-stop shop. Each genuine 6 part includes a manufacturer's warranty. Buy with confidence. Our return policy is simple and hassle-free. In a rush? Choose expedited delivery at checkout. You'll love the streamlined experience from search to checkout to receiving your order.
Mazda 6 Rack and Pinions Parts and Q&A
- Q: How to remove the steering gear with Rack and Pinions on Mazda 6?A:In removing the rack and pinions, disconnect the cable attached to the negative post of the battery and then unscrew the rack and pinions. Accessing the interior of the car: The intermediate shaft pinch bolt can be taken out and thrown away under the instrument panel. Unscrew the lug nuts of the front wheel, elevate the vehicle and ensure that it is firmly mounted on jack stands and then take both front wheels off. Loose the tie-rod ends of the Steering Knuckles and the front part of the exhaust system. Put a drain pan underneath the rack and pinions and bypass the power steering pressure and the power steering return line unscrewing the ends to avoid high fluid leakage and contamination. There models can contain a sheet metal shield that requires that shield to be removed in order to access the fittings. Position a floor jack at the back of the subframe, loosen the crossmember support bracket mounting nut and bolts on either side of the subframe, and then the bracket. Loose the front subframe mounting fasteners and take out the rear subframe fasteners and bring down the rear of the subframe with the jack. In case this is not found to allow enough room to lift out the rack and pinions the engine will have to be supported and the crossmember taken away. The second step is to take off the three mounting bolts of the rack and pinions followed by the rack and pinions. To install, do the steps in the reverse order with the matchmarks taken into consideration when aligning the rack and pinions input shaft to the intermediate shaft U-joint and a fresh pinch bolt fitted. Install new subframe mounting bolts, a new banjo bolt and sealing washers on the power steering pressure line tightening all the fasteners. Install the lug nuts and add the power steering fluid of the correct type, and bleed the power steering system. Lastly, get the front end alignment inspection and adjustment made where required.

Related Mazda 6 Parts
 Mazda 6 Alternator
 Mazda 6 Clutch Master Cylinder
 Mazda 6 Instrument Cluster
 Mazda 6 Power Steering Hose
 Mazda 6 A/C Clutch
 Mazda 6 Harmonic Balancer
 Mazda 6 Air Bag
 Mazda 6 Crankshaft Timing Gear
 Mazda 6 Driveshaft
 Mazda 6 Spark Plug Wire
 Mazda 6 Throttle Body Mounting Gasket
Browse by Year
2021 Rack and Pinions 2020 Rack and Pinions 2019 Rack and Pinions 2018 Rack and Pinions 2017 Rack and Pinions 2016 Rack and Pinions 2015 Rack and Pinions 2014 Rack and Pinions 2013 Rack and Pinions 2012 Rack and Pinions 2011 Rack and Pinions 2010 Rack and Pinions 2009 Rack and Pinions 2008 Rack and Pinions 2007 Rack and Pinions 2006 Rack and Pinions 2005 Rack and Pinions 2004 Rack and Pinions 2003 Rack and Pinions