×
- Hello
- Login or Register
- Quick Links
- Live Chat
- Track Order
- Parts Availability
- RMA
- Help Center
- Contact Us
- Shop for
- Mazda Parts
My Garage
My Account
Cart
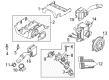
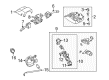
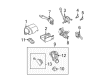
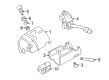
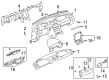
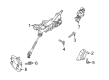
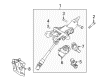
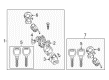
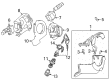
Genuine Mazda Ignition Lock Cylinder
Ignition Key Lock Cylinder- Select Vehicle by Model
- Select Vehicle by VIN
Select Vehicle by Model
orMake
Model
Year
Select Vehicle by VIN
For the most accurate results, select vehicle by your VIN (Vehicle Identification Number).
131 Ignition Lock Cylinders found

Mazda Ignition Lock Cylinder Part Number: EPY6-76-29XB
$842.17 MSRP: $1150.74You Save: $308.57 (27%)Ships in 1-2 Business DaysProduct Specifications- Other Name: Key Sub Set, Steering Lock; Steering Lock
- Replaces: EPY6-76-29XA

Mazda Cylinder Part Number: GE4T-64-09YB-34
$1.87 MSRP: $14.76You Save: $12.89 (88%)Ships in 1-2 Business DaysProduct Specifications- Other Name: Cylinder, Glove Lid; Lock Cylinder

Mazda Ignition Cylinder Part Number: DRY3-76-29XA
$63.25 MSRP: $515.65You Save: $452.40 (88%)Ships in 1-2 Business DaysProduct Specifications- Other Name: Key Sub Set, Steering Lock
- Replaces: DRY3-76-29X

Mazda Ignition Lock Cylinder Part Number: EHY8-76-29XA
$709.28 MSRP: $969.16You Save: $259.88 (27%)Product Specifications- Other Name: Key Sub Set, Steering Lock; Steering Lock

Mazda Ignition Lock Cylinder Part Number: NFY1-76-29XC
$735.71 MSRP: $1005.27You Save: $269.56 (27%)Ships in 1-2 Business DaysProduct Specifications- Other Name: Key Sub Set, Steering Lock; Ignition Assembly, Lock Set
- Replaces: NFY1-76-29XA, NFY1-76-29XB, NFY1-76-29X

Mazda Cylinder Part Number: GE4T-64-09YB-80
$4.53 MSRP: $6.04You Save: $1.51 (25%)Ships in 1-2 Business DaysProduct Specifications- Other Name: Cylinder, Glove Lid; Lock Cylinder

Mazda Cylinder Part Number: GE4T-64-09YB-00
$8.31 MSRP: $11.09You Save: $2.78 (26%)Ships in 1-2 Business DaysProduct Specifications- Other Name: Cylinder, Glove Lid; Lock Cylinder
- Replaces: GE4T-64-09YB

Mazda Cylinder Part Number: GE4T-64-09YB-89
$11.36 MSRP: $15.15You Save: $3.79 (26%)Ships in 1-2 Business DaysProduct Specifications- Other Name: Cylinder, Glove Lid; Lock Cylinder

Mazda Cylinder Part Number: ECY1-76-149A
$16.08 MSRP: $21.44You Save: $5.36 (25%)Ships in 1-2 Business DaysProduct Specifications- Other Name: Repair Kit, Ignition Cylinder; Ignition Lock Cylinder
- Replaces: ZZCA-66-149

Mazda Ignition Lock Cylinder Part Number: 1F20-09-012B
$77.88 MSRP: $103.85You Save: $25.97 (26%)Ships in 1-2 Business DaysProduct Specifications- Other Name: Repair Kit, Ignition Cylinder; Lock Set
- Replaces: 1F20-09-012A, ZZN0-09-012, 1F20-09-012

Mazda Lock Cylinder Part Number: BG1N-76-250B
$94.85 MSRP: $126.49You Save: $31.64 (26%)Ships in 1-2 Business DaysProduct Specifications- Other Name: Key Sub Set, Glove; Cylinder & Key

Mazda Steering Lock Part Number: BP4K-66-150B
$130.18 MSRP: $173.60You Save: $43.42 (26%)Ships in 1-2 Business DaysProduct Specifications- Other Name: Lock, Steering
- Replaced by: B38N-66-150

Mazda Steering Lock Part Number: CG39-66-150A
$131.95 MSRP: $175.96You Save: $44.01 (26%)Ships in 1-2 Business DaysProduct Specifications- Other Name: Lock, Steering
Mazda Steering Lock Part Number: CG36-66-150A
$139.95 MSRP: $186.65You Save: $46.70 (26%)Ships in 1-2 Business DaysProduct Specifications- Other Name: Lock, Steering
- Replaces: CG36-66-150

Mazda Ignition Lock Cylinder Part Number: NHY9-76-14X
$140.90 MSRP: $187.90You Save: $47.00 (26%)Ships in 1-2 Business DaysProduct Specifications- Other Name: Key Sub Set, Ignition Switch; Repair Kit

Mazda Ignition Lock Cylinder Part Number: EC04-66-15XA
$159.41 MSRP: $212.59You Save: $53.18 (26%)Ships in 1-2 Business DaysProduct Specifications- Other Name: Lock, Steering; Lock & Switch
Mazda Steering Lock Part Number: B39M-66-150
$174.08 MSRP: $232.14You Save: $58.06 (26%)Ships in 1-2 Business DaysProduct Specifications- Other Name: Lock, Steering
Mazda Ignition Lock Cylinder Part Number: EC03-66-15XA
$191.30 MSRP: $255.11You Save: $63.81 (26%)Ships in 1-2 Business DaysProduct Specifications- Other Name: Housing (M/T); Lock & Switch

Mazda Ignition Lock Cylinder Part Number: BPYK-76-14XB
$211.40 MSRP: $281.92You Save: $70.52 (26%)Ships in 1-2 Business DaysProduct Specifications- Other Name: Key Sub Set, Ignition Switch; Ignition Cylinder
- Replaces: BPYK-76-14XA
Mazda Ignition Lock Cylinder Part Number: BRYS-76-14X
$212.76 MSRP: $283.74You Save: $70.98 (26%)Ships in 1-2 Business DaysProduct Specifications- Other Name: Key Sub Set, Ignition Switch; Ignition Cylinder
| Page 1 of 7 |Next >
1-20 of 131 Results
Mazda Ignition Lock Cylinder
The Mazda Ignition Lock Cylinder provides the quick, tamper-resistant engine start thanks to the ability to accept a uniquely coded key; this will unlock the steering column and power up the starter, giving every driver the confidence to start the journey before it begins. Mazda earned global respect through its bold rotary engine days and then shocked new generations with Skyactiv technology that sips fuel but has a lively throttle feel. Distinctive Kodo styling allows every Mazda to appear ready to pounce even when it's in park, while i-Activsense technology such as radar cruise and lane keeping demonstrates the brand's commitment to safety. Adventurous motorists love the available i-Activ AWD that puts itself to the test on wet or rough roads, while emerging electric and mild hybrid options prove Mazda has an eye on tomorrow. Fun is still at the center, so the tuning of the chassis makes daily errands into mini road trips. Across the lineup, the Ignition Lock Cylinder remains consistent to allow owners to move between models without having to relearn controls. In that spirit of spirited but secure motoring, the Ignition Lock Cylinder combines these mechanical wafers with the updated in transponder coding in that it prevents the steering shaft from turning and cuts fuel unless the right key is present, quelling the attempt to hot wire them and steal a steering wheel. Its simple twist moves through OFF, ACC, ON, and START for audio, electronics, and engine systems to wake up in a smooth sequence, and an automatic shift interlock keeps an automatic transmission parked until the key rests in ON, rounding out a small but vital guardian for every Mazda.
You'll get great performance and real durability when you pick genuine OEM Ignition Lock Cylinder. Mazda builds these using high-quality materials and official factory methods to ensure they hold up mile after mile. You deserve that Mazda reliability without the headache of cheap knockoffs. It is easy to find exactly what you need in our huge inventory of genuine parts. Plus, every OEM part carries a real manufacturer's warranty for your peace of mind. You will love our low prices too. Order today and we will ship your brand-new parts fast. They often reach your door in just a few days.
Mazda Ignition Lock Cylinder Parts and Q&A
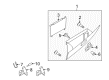
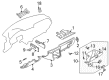
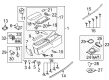
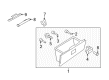
- Q: How to remove and install the ignition lock cylinder on Mazda 3?A:For 2009 and earlier models, start by disconnecting the cable from the negative battery terminal, then open the liftgate and remove the trim panel. Through the large access hole, disengage the outside liftgate handle-to-latch rod and the outside liftgate lock-to-latch rod. All liftgate lock rods are attached by plastic clips, which can be removed by unsnapping the portion engaging the connecting rod and pulling the rod out of its locating hole. For models with power liftgate locks, disconnect the electrical connectors at the latch. Next, remove the screws securing the latch to the liftgate and take out the latch assembly through the liftgate opening, with installation being the reverse of removal. For 2010 and later models, remove the liftgate trim panels, disconnect the lock actuator electrical connector, and remove the mounting bolts and lock actuator assembly, again with installation being the reverse of removal. Regarding the liftgate lock cylinder and outside handle for 2009 and earlier models, open the liftgate and remove the trim panel, then disconnect the liftgate lock actuator connector and liftgate latch electrical connectors. Disconnect the lock clip and rod from the liftgate lock cylinder, remove the clips securing the cables, and detach the cable from the latch and lock actuator. Finally, remove the latch and lock assembly mounting bolts and take out the latch and lock, with installation being the reverse of removal. Note that there is no lock cylinder or exterior handle on 2010 and later models.
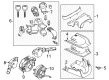
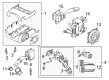
- Q: How to remove and install the ignition lock cylinder and ignition switch on Mazda B2000?A:In order to install and replace the combination switch in the models between 1982-84, it is necessary to disconnect the negative battery terminal and loosen the steering wheel and steering column shroud. The next step is to loosen the various connectors at the base of the combination switch, and the switch with the retaining snap ring, then the turn signal indicator cancelling cam off the shaft. Then loosen the switch holding bolt, and detach the entire switch out of the column, installation being the opposite of de-installation. To do so with models of 1986-89, first unconnect the battery ground cable, then take off the steering column covers. This is done by disconnecting the wiring harness connector to the switch, removing the screw connecting the switch, and lifting out the switch, and the reverse of this is also the same, i.e., installation.


Related Mazda Parts
 Mazda Antenna
 Mazda Body Control Module
 Mazda Brake Light Switch
 Mazda Relay
 Mazda Fuse
 Mazda Horn Relay
 Mazda Door Jamb Switch
 Mazda Fog Light Relay
 Mazda Hazard Warning Switch
 Mazda Oil Pressure Gauge
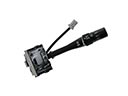 Mazda Windshield Wiper Switch
 Mazda Wiper Pulse Module
Browse by Model
2 Ignition Lock Cylinder 3 Ignition Lock Cylinder 323 Ignition Lock Cylinder 5 Ignition Lock Cylinder 6 Ignition Lock Cylinder 626 Ignition Lock Cylinder 929 Ignition Lock Cylinder B2000 Ignition Lock Cylinder B2200 Ignition Lock Cylinder B2300 Ignition Lock Cylinder B2500 Ignition Lock Cylinder B2600 Ignition Lock Cylinder B3000 Ignition Lock Cylinder B4000 Ignition Lock Cylinder CX-7 Ignition Lock Cylinder CX-9 Ignition Lock Cylinder Miata Ignition Lock Cylinder Millenia Ignition Lock Cylinder MPV Ignition Lock Cylinder MX-3 Ignition Lock Cylinder MX-5 Miata Ignition Lock Cylinder MX-6 Ignition Lock Cylinder Protege Ignition Lock Cylinder Protege5 Ignition Lock Cylinder RX-7 Ignition Lock Cylinder RX-8 Ignition Lock Cylinder Tribute Ignition Lock Cylinder