×
- Hello
- Login or Register
- Quick Links
- Live Chat
- Track Order
- Parts Availability
- RMA
- Help Center
- Contact Us
- Shop for
- Mazda Parts
My Garage
My Account
Cart
Genuine Mazda Tribute Camshaft Position Sensor
Cam Position Sensor- Select Vehicle by Model
- Select Vehicle by VIN
Select Vehicle by Model
orMake
Model
Year
Select Vehicle by VIN
For the most accurate results, select vehicle by your VIN (Vehicle Identification Number).
5 Camshaft Position Sensors found


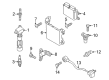
Mazda Tribute Camshaft Position Sensor Part Number: ZZCA-18-230B
$71.21 MSRP: $94.97You Save: $23.76 (26%)
Mazda Tribute Camshaft Position Sensor Part Number: LF01-18-230
$28.54 MSRP: $38.05You Save: $9.51 (25%)Ships in 1-2 Business Days

Mazda Tribute Camshaft Position Sensor Part Number: YF09-18-230
$21.31 MSRP: $28.42You Save: $7.11 (26%)Ships in 1-2 Business Days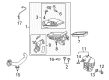
Mazda Tribute Camshaft Position Sensor Part Number: ZZC2-18-230A
$64.19 MSRP: $85.61You Save: $21.42 (26%)
Mazda Tribute Camshaft Position Sensor Part Number: GY07-18-230A
Mazda Tribute Camshaft Position Sensor
Looking for Camshaft Position Sensor with proven quality? Choose OEM Camshaft Position Sensor. Mazda designs and builds them to strict factory specs. Every piece goes through rigorous quality checks. You'll get parts that fit right and work like new. Shop our huge inventory of OEM Mazda Tribute parts. Enjoy the highly competitive prices online. Our site is your one-stop shop. Each genuine Tribute part includes a manufacturer's warranty. Buy with confidence. Our return policy is simple and hassle-free. In a rush? Choose expedited delivery at checkout. You'll love the streamlined experience from search to checkout to receiving your order.
Mazda Tribute Camshaft Position Sensor Parts and Q&A
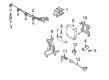
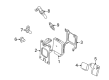
- Q: How to replace the Camshaft Position Sensor on Mazda Tribute?A:In 2012 and older four-cylinder models, begin by unhooking the cable of the negative battery terminal, then find the CMP sensor at the left rear side of the cylinder head and unhook the electrical connector. Take off the retaining-bolt of the CMP sensor and thereafter the sensor itself. Removal is the opposite of installation, whereby the CMP sensor bolt is screwed to the recommended torque. Once the battery has been reconnected, the Powertrain Control Module (PCM) should be relearned to respond to idle and fuel trim strategy to optimally perform. In V6 models, the procedure is same as in the case of V6 where the negative battery termination is disconnected and then the CMP sensor on the right end of the front cylinder head is disconnected by disconnecting the electrical connector, removing the retaining bolt after which the CMP sensor is removed. Once more, the process of installation is the opposite of the removal, and the consideration of torque requirements and PCM relearning. In 2013 models and subsequent models, the 1.5L, 1.6L and 2.0l CMP sensors are mounted on the top of the valve cover of the driver end. Uncover the engine, dislodge the electrical connector of the left CMP sensor and pulling the turbocharger piping and then dislodge the electrical connector and unbolt of the right CMP sensor to extricate the sensor. Examine the O-ring in case of reuse of the sensor, wipe it with clean engine oil during installation. When dealing with 2.5L engines, the engine cover is removed, the CMP sensor, which is positioned at the front corner of the driver side, is disconnected, the electrical connector is removed, the bolt is removed, and the CMP is pulled out, then O-ring inspection and lubrication is equally performed upon fitting it back.

Related Mazda Tribute Parts
 Mazda Tribute Coolant Temperature Sensor
 Mazda Tribute Ignition Coil
 Mazda Tribute Throttle Position Sensor
 Mazda Tribute Crankshaft Position Sensor
 Mazda Tribute Dimmer Switch
 Mazda Tribute Engine Control Module
 Mazda Tribute Knock Sensor
 Mazda Tribute Mass Air Flow Sensor
 Mazda Tribute Oxygen Sensor
 Mazda Tribute Spark Plug
 Mazda Tribute Spark Plug Wire
 Mazda Tribute Temperature Sender