×
- Hello
- Login or Register
- Quick Links
- Live Chat
- Track Order
- Parts Availability
- RMA
- Help Center
- Contact Us
- Shop for
- Mazda Parts
My Garage
My Account
Cart
Genuine Mazda 929 Cylinder Head
Head- Select Vehicle by Model
- Select Vehicle by VIN
Select Vehicle by Model
orMake
Model
Year
Select Vehicle by VIN
For the most accurate results, select vehicle by your VIN (Vehicle Identification Number).
2 Cylinder Heads found

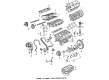
Mazda 929 Cylinder Head Part Number: JE48-10-100B
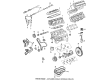
Mazda 929 Cylinder Head Part Number: JE06-10-100F
Mazda 929 Cylinder Head
Looking for Cylinder Head with proven quality? Choose OEM Cylinder Head. Mazda designs and builds them to strict factory specs. Every piece goes through rigorous quality checks. You'll get parts that fit right and work like new. Shop our huge inventory of OEM Mazda 929 parts. Enjoy the highly competitive prices online. Our site is your one-stop shop. Each genuine 929 part includes a manufacturer's warranty. Buy with confidence. Our return policy is simple and hassle-free. In a rush? Choose expedited delivery at checkout. You'll love the streamlined experience from search to checkout to receiving your order.
Mazda 929 Cylinder Head Parts and Q&A
- Q: What steps should be taken before removing the cylinder head to prevent warpage and ensure proper installation on Mazda 929?A:Prior to taking the cylinder head off, it is important to note that it should be cold so as to avoid warping. Start with taking off the negative battery cable and turning the crankshaft until the No. 1 cylinder comes to TDC. Empty out the cooling system and take out air cleaner assembly. In case with rear-wheel drive, remove the Water Pump, Distributor, disconnect the front catalytic converter to the exhaust manifold, and loosen the exhaust manifold to the cylinder head. Unplug all the electrical wires and leads, and when required, disassemble the alternator drive belt, alternator and adjusting strap. Disassemble the Thermostat connector and thermostat, lose the accelerator connection, and remove the intake manifold and carburetor assembly. Take off the Rocker Arm cover and gasket, the semi-circular oil seal(s) and clean the mating surface of the rocker arm cover. In the case of front wheel drive GLC, take off the tensioner of the timing chain cover. The cylinder head bolts should be loosened in a series of steps to prevent distortion, and the rocker arm assembly should be removed and the camshaft sprocket and chain removed off the camshaft taking care not to drop the timing chain. Disassemble the camshaft and take off the cylinder head scraping all of the old gasket material off the mating surfaces and checking all components of the engine to detect wear or damage. Installation: To install, a new head gasket must be placed on the engine block, align the cylinder head and apply clean engine oil on the camshaft bearing surfaces and then install the camshaft. Install the slide the sprocket against the cam-shaft, the rocker arm assembly, and tighten the bolts in different steps. Check and install the cylinder head-to-cylinder block bolt as needed. Install the distributor drive gear and spacer on the camshaft by aligning the key groove with the pin on 626 and GLC wagon. Install and tighten the locknut to required torque and measure end-play on camshaft. Install on the head of the cylinder after resetting the chain adjuster on the front-wheel drive GLC models, spreading RTV or rubber seal on the semi-circular oil seal(s) and attaching it, and then installing. Install a new gasket on the head of the cylinder, the rocker arm cover, and install the rest of the parts in reverse order, replacing with new gaskets and O-rings. Fill the cooling system again and re-attach the negative battery cable and then start up the engine and inspects the system regarding any leakages. In 1983-85 626 models, proceed with the same steps, being sure to remove the required parts and fasten the cylinder head bolts to the required values. Disconnect electrical wires, dismount the alternator and use the following steps to remove it and install it: 1986-87 626 models. On 1986-89 323 non-turbo models, remove the battery, empty the cooling system, and disassemble several parts by removing several components before losing and removing cylinder head bolts. In 1988-89 323 turbo models, de-pressurise the fuel system; detach the battery and procedure will be followed with removal and installation. In 1988-89 626/MX-6, the battery can be disconnected, the spark plugs removed and removal and installation proceeded as per the procedures described. In the case of 929, de-pressurize the relieve fuel system, disconnect battery, and proceed with directions of the removal and replacement of the cylinder head. Clean the surfaces of cylinder head and block surfaces thoroughly, inspect and check for distortion, and damage on components. Resurfacing is a task that should be carried out by a well-known machine shop because of the accuracy needed.
Related Mazda 929 Parts
 Mazda 929 Belt Tensioner
 Mazda 929 Camshaft Seal
 Mazda 929 Crankshaft Timing Gear
 Mazda 929 Exhaust Valve
 Mazda 929 Harmonic Balancer
 Mazda 929 Intake Valve
 Mazda 929 Oil Pan Baffle
 Mazda 929 Piston Ring Set
 Mazda 929 Rocker Arm
 Mazda 929 Timing Belt
 Mazda 929 Timing Cover Gasket
 Mazda 929 Valve Spring Retainer Keeper