×
- Hello
- Login or Register
- Quick Links
- Live Chat
- Track Order
- Parts Availability
- RMA
- Help Center
- Contact Us
- Shop for
- Mazda Parts
My Garage
My Account
Cart
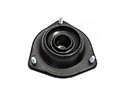
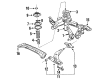
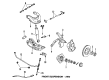
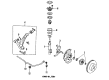
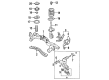
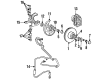
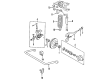
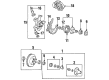
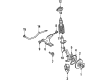
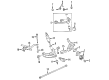
Genuine Mazda Ball Joint
Control Arm Joint- Select Vehicle by Model
- Select Vehicle by VIN
Select Vehicle by Model
orMake
Model
Year
Select Vehicle by VIN
For the most accurate results, select vehicle by your VIN (Vehicle Identification Number).
16 Ball Joints found


Mazda Lower Ball Joint Part Number: ZZP1-34-550
$57.93 MSRP: $77.25You Save: $19.32 (26%)Product Specifications- Other Name: Ball Joint, Lower
- Position: Lower


Mazda Lower Ball Joint Part Number: NA01-34-550B
$91.48 MSRP: $121.99You Save: $30.51 (26%)Ships in 1-2 Business DaysProduct Specifications- Position: Lower
- Replaces: NA01-34-550A, NA01-34-550


Mazda Lower Ball Joint Part Number: UC86-34-510A
$112.70 MSRP: $150.30You Save: $37.60 (26%)Ships in 1-2 Business DaysProduct Specifications- Other Name: Ball Joint
- Position: Lower
- Replaces: 8AU3-34-510

Mazda Ball Joint Part Number: 8AU1-34-540
$83.06 MSRP: $110.77You Save: $27.71 (26%)Ships in 1-2 Business DaysProduct Specifications- Other Name: Ball Joint Set; Upper Ball Joint

Mazda Ball Joint Part Number: T001-34-550B
$81.89 MSRP: $109.20You Save: $27.31 (26%)Ships in 1-2 Business DaysProduct Specifications- Other Name: Lower Ball Joint
- Replaces: T001-34-550A, T001-34-550

Mazda Ball Joint Part Number: LA12-34-550
$23.79 MSRP: $179.42You Save: $155.63 (87%)Ships in 1-2 Business DaysProduct Specifications- Other Name: Lower Ball Joint
Mazda Ball Joint Part Number: B455-34-550
$78.58 MSRP: $104.78You Save: $26.20 (25%)Ships in 1-2 Business DaysProduct Specifications- Other Name: Lower Ball Joint
Mazda Ball Joint Part Number: E016-34-550
$79.13 MSRP: $105.52You Save: $26.39 (26%)Ships in 1-2 Business DaysProduct Specifications- Other Name: Lower Ball Joint
Mazda Ball Joint Part Number: 8AU2-34-510
$89.36 MSRP: $119.18You Save: $29.82 (26%)Ships in 1-2 Business DaysProduct Specifications- Other Name: Ball Joint Set; Lower Ball Joint
Mazda Ball Joint Part Number: FB01-34-550
$89.99 MSRP: $120.00You Save: $30.01 (26%)Ships in 1-2 Business DaysProduct Specifications- Other Name: Lower Ball Joint
Mazda Ball Joint Part Number: BTDA-34-550
$334.68 MSRP: $446.32You Save: $111.64 (26%)Ships in 1-2 Business DaysProduct Specifications- Other Name: Lower Ball Joint
- Replaces: B01A-34-550A
Mazda Ball Joint Part Number: ZZL0-34-550
$13.75 MSRP: $18.05You Save: $4.30 (24%)Ships in 1-2 Business DaysProduct Specifications- Other Name: Lower Ball Joint
Mazda Ball Joint Part Number: ZZM1-33-051
Product Specifications- Other Name: Joint Set, Axle Front
Mazda Ball Joint Part Number: ZZL0-33-051
Product Specifications- Other Name: Pin; Upper Ball Joint
Mazda Ball Joint Part Number: B092-34-550
Product Specifications- Other Name: Lower Ball Joint

Mazda Lower Ball Joint Part Number: 1FFA-34-550
Product Specifications- Other Name: Ball Joint, Lower
- Position: Lower
Mazda Ball Joint
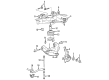
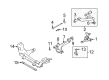
Mazda Ball Joint provides every driver with precise control and a smooth ride on any road surface when steering keeps the wheels planted on the ground. Mazda started building vehicles in 1931 and is well-known for the rotary engine in the 1960s; later, the company also introduced Skyactiv powertrains, which save fuel without ruining the fun. Mazda also adheres to the Kodo Soul of Motion style where each car appears to be on the move even when parked, while i-Activsense tech helps avoid danger with the use of tools such as lane keep and radar cruise. Testing on rough trails proves the strength of the i-Activ AWD and new electric and mild hybrid options show Mazda cares about the future. The brand combines sharp handling with comfort, making traveling every day a lively and efficient experience. A major component of that fun feel is the Ball Joint connecting the control arm to the steering knuckle. This small but strong Mazda Ball Joint is designed to function like the hip of a driver and allows suspension to move up and down, as well as the wheels turning left and right in order to get over bumps and corners simultaneously. Sealed grease and a tight rubber boot ward off dirt, helping the joint to last thousands of miles. Healthy joints prevent clunks, maintain tire wear, and keep the trademark zoom-zoom spirit alive throughout the entire Mazda lineup.
You'll get great performance and real durability when you pick genuine OEM Ball Joint. Mazda builds these using high-quality materials and official factory methods to ensure they hold up mile after mile. You deserve that Mazda reliability without the headache of cheap knockoffs. It is easy to find exactly what you need in our huge inventory of genuine parts. Plus, every OEM part carries a real manufacturer's warranty for your peace of mind. You will love our low prices too. Order today and we will ship your brand-new parts fast. They often reach your door in just a few days.
Mazda Ball Joint Parts and Q&A
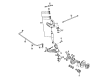
- Q: How to inspect and replace dust seals and ball joints for 2-wheel drive front suspension on Mazda B2000?A:Check the dust seals and verify if they are fractured or brittle and change them in case of necessity. Test end play of upper and lower ball joints, when either has a play over 0.10mm (0.0039 in.), it is deemed flawed. On cars 1972-1984, front lift On jackstands under the frame, then use a floor jack to raise the lower control arm until the upper control arm is clear of the bumper stop. Take out the wheel, insert a chain into the coil spring to be sure, or apply a spring compressor and take out the cotter pin and nut that held the upper ball joint. Disconnect the ball joint to the spindle with a ball joint separator, unscrew the two upper arm retaining bolts and pull the arm off of the truck, counting and recording the location of any shims. Unscrew and remove the ball joint of the arm, and in installing, put the shims in their original position, and torque the two arm retaining bolts to 65-75 ft. lbs., the ball joint-to-arm bolts to 15-20 ft. lbs and the ball joint-to-spindle nut to 40-55 ft. lbs. To work with vehicles of 1986-89, elevate and stabilize the front part of the vehicle on jackstands below the frame, take off the wheels, and stabilize the lower arm on a floor jack. Unscrew the cotter pin and the nut on the upper ball joint and then disassemble the knuckle using a ball joint separator tool. Take the bushings and dust seals off the ends of the upper arm shaft and the nuts and bolts fastening the upper arm shaft to the support bracket and record the number and position of the shims to have the proper alignment of the wheels. Inspect all components of the parts that may be worn or damaged and substitute any suspect component. Measure the ball joint preload using a pull scale and adapter and the result must be 40 lb. or less. Unscrew and unbolt the ball joint out of the arm and during the installation screw the upper arm shaft mounting bolts to 60-68 ft. lbs., the ball joint-to-arm bolts to 15-20 ft. lbs. and the ball joint nut to 30-37 ft. lbs.
- Q: How to inspect and replace the upper ball joint on Mazda B2200?A:In case of inspection of the pickup, lift and secure the car up, then release the wheel and tire set. Jack up the lower control arm, make the brake and upper control arms separated and remove the cotter pin and nut of the upper ball joint stud. Apply a given tool to remove the upper ball joint and knuckle after which a pull scale should be attached to a ball joint stud and rocked back and forth and the pull scale reading to be taken between 4.4-7.7 lbs; and this should not be below otherwise, replace upper ball joint. In the case of the 2WD Navajo, lift the vehicle, place a jackstand under the I-beam axle, inspect the front wheel bearings and have a helper move the assembly of the wheel in and out as the upper spindle arm and axle jaw move; any movement of 0.8mm or more would mean that upper ball joints need to be replaced. When making removals and installations on the pickup, follow the same procedure as the first steps of rearing the vehicle and removing the wheel and tire combination and then maintain the lower control arm, dissociate the brake hose and separate the upper ball joint. Unscrew the upper ball joint that holds bolts, place the new ball joint assembly and tighten it with the required torque. In the 2WD Navajo, one must first lift the car, disassemble the wheel and tire assembly and then connect with the brake caliper, take off the brake rotor and dust shield, pull off the steering linkage, and take out the lower ball joint stud. Fix the axle and pop the lower ball joint loose and then detach the spindle and ball joint assembly. Removal of the lower ball joint of the spindle and later upper ball joint is done with a given tool. Installation requires pressing the upper ball joint first followed by the lower ball joint without heating them. Install the snapring, fit the spindle and ball joints into the axle and tighten the lower ball joint stud nut then install the clamp bolt and the remainder of the parts.