×
- Hello
- Login or Register
- Quick Links
- Live Chat
- Track Order
- Parts Availability
- RMA
- Help Center
- Contact Us
- Shop for
- Mazda Parts
My Garage
My Account
Cart
Genuine Mazda Coolant Temperature Sensors
Coolant Temperature Sensor- Select Vehicle by Model
- Select Vehicle by VIN
Select Vehicle by Model
orMake
Model
Year
Select Vehicle by VIN
For the most accurate results, select vehicle by your VIN (Vehicle Identification Number).
5 Coolant Temperature Sensors found

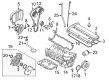
Mazda Sensor Part Number: AJ57-18-840A
$60.43 MSRP: $80.59You Save: $20.16 (26%)Ships in 1-2 Business DaysProduct Specifications- Other Name: Switch, Water Thermostat 3.0L
- Replaces: AJ57-18-840

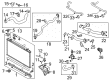
Mazda Coolant Temperature Sensor Part Number: B593-18-840A
$48.34 MSRP: $64.46You Save: $16.12 (26%)Ships in 1-2 Business DaysProduct Specifications- Other Name: Sensor, Temperature-Engine Coolant
- Replaces: B593-18-840

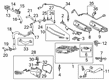
Mazda Coolant Temperature Sensor Part Number: SH01-18-840
$56.90 MSRP: $75.88You Save: $18.98 (26%)Ships in 1-2 Business DaysProduct Specifications- Other Name: Sensor, Water Temperature; Temperature Sensor

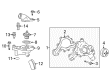
Mazda Sensor Part Number: 1F72-18-510
Product Specifications- Other Name: Heat Gauge Unit; Temperature Sending Unit

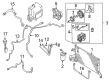
Mazda Temperature Sensor Part Number: D112-61-762
Product Specifications- Other Name: Sensor, Water Temperature; Water Temperature Sensor
Mazda Coolant Temperature Sensors
Mazda Coolant Temperature Sensors are always monitoring engine coolant temperature to ensure that the control unit keeps all drives smooth, fuel efficient, and safe from overheating. Mazda has spent decades perfecting the thrill of motion, from the legendary rotary fame to more contemporary Skyactiv engines that sip fuel without taking the excitement away. Its Kodo design lines flow as if they were a living creature while i-Activsense features add that confidence smart lane keeping and adaptive cruise. All-wheel drive testing on rough tracks proves Mazda values balance and grip, and its push into electric and mild hybrid systems shows commitment towards future mobility. Every steering input is direct, making a daily commute feel like a winding back road because Mazda tunes the chassis and powertrain as one harmonious package. Inside this performance-focused environment, Coolant Temperature Sensors are the silent protectors. The sensors provide real-time temperature data to the engine management system to allow fuel and ignition maps to adjust in real-time to changes in load, changes in weather, or long highway climbs. A stable range of coolant temperature equates to quicker cold starts, more consistent power during summer heat, and longer component life. Mazda designed a single reliable sensor layout that is applied throughout the brand lineup, meaning that owners will have the same reliability regardless of whether they are driving a compact hatch or a roomy SUV. In short, the Coolant Temperature Sensors help Mazda engines to stay in that sweet spot where efficiency, durability, and fun collide.
You'll get great performance and real durability when you pick genuine OEM Coolant Temperature Sensors. Mazda builds these using high-quality materials and official factory methods to ensure they hold up mile after mile. You deserve that Mazda reliability without the headache of cheap knockoffs. It is easy to find exactly what you need in our huge inventory of genuine parts. Plus, every OEM part carries a real manufacturer's warranty for your peace of mind. You will love our low prices too. Order today and we will ship your brand-new parts fast. They often reach your door in just a few days.
Mazda Coolant Temperature Sensors Parts and Q&A
- Q: What are the functions of coolant temperature sensors and how can they be tested,remove and install on Mazda Millenia?A:The coolant temperature sensor is a variable resistor which alters its resistance to changes in temperature and the computer is able to read changes in resistance and know the operating temperature of the engine. This data is essential in fine-tuning of the air/fuel ratio and ignition timing. To test the sensor, it can be removed and put in water heated gradually and measure its resistance in certain temperatures: at -4°C ( -20°C ), it should have a resistance of 14.6-17.8 kohms, at 68°C (20°C ), resistance must have been 2.2-2.7 kohms, at 104°C (40°C ), resistance must have been 10-13 kohms, at 140°C (60°C ), resistance must have been 0.50 To remove it, the engine coolant has to be emptied, and the thermosensor relocated at the back of the engine or the intake manifold. The sealing washer is to be installed when the new sensor is being installed and the sensor is to be torqued one-eight to one-point five Nm or 25-29 ft. lbs.
- Q: How to replace Coolant Temperature Sensors on Mazda Tribute?A:With 2012 models and older models featuring V6 engine specifically 2008 and below, start by removing the cable on the negative battery terminal and empty the cooling system. The second step is to take out air intake duct and find the ECT sensor on the thermostat housing. Unplug the electrical connector of the ECT sensor and unscrew the holding clip by drawing it straight up and then remove the sensor. Undo the old O-ring and always install a new one when changing even in the case of reuse of the old sensor. The removal is undone in the opposite sequence as the installation and once the cooling system has been filled, the battery should be reconnected to give the Powertrain Control Module time to re-learn its idle and fuel trim strategy to achieve maximum performance. On 2013 and subsequent models, also applicable to 1.5 L, 2.0 L and 1.6 L engines (with 2.5 L models again requiring just a CHT sensor), begin by dismantling the engine cover and emptying the cooling system. On models with 2.0L engines, disassemble the battery and the battery tray, remove the turbocharger piping between the air filter and the turbocharger inlet. In the case of 2.0L, loosen the two nuts attached to the engine keeping the purge valve and tube bracket of the EVAP. Find the ECT sensor on the coolant piping located at the back of the cylinder head, unplug the electrical connector and get rid of the retaining clip. Ready the new ECT sensor to curtail the coolant loss and when the same sensor needs to be re-fitted, examine the O-ring whether it is damaged. Installation should be done in reverse order, including the replacement of the old sensor of ECT with the new one, putting in the retaining clip, and filling the coolant, in that order.


Related Mazda Parts
 Mazda Valve Cover Gasket
 Mazda Ball Joint
 Mazda Intake Manifold Gasket
 Mazda Brake Light Switches
 Mazda Bulb Socket
 Mazda Cooling Fan Module
 Mazda Driveshaft Center Support Bearing
 Mazda EGR Tube
 Mazda Hazard Warning Switches
 Mazda Secondary Air Injection Check Valve
 Mazda Tail Pipe
 Mazda Valve Spring
Browse by Model
2 Coolant Temperature Sensors 3 Coolant Temperature Sensors 6 Coolant Temperature Sensors 626 Coolant Temperature Sensors 929 Coolant Temperature Sensors B3000 Coolant Temperature Sensors B4000 Coolant Temperature Sensors CX-3 Coolant Temperature Sensors CX-30 Coolant Temperature Sensors CX-5 Coolant Temperature Sensors CX-9 Coolant Temperature Sensors Miata Coolant Temperature Sensors Millenia Coolant Temperature Sensors MPV Coolant Temperature Sensors MX-3 Coolant Temperature Sensors MX-30 EV Coolant Temperature Sensors MX-5 Miata Coolant Temperature Sensors MX-6 Coolant Temperature Sensors Protege Coolant Temperature Sensors Protege5 Coolant Temperature Sensors RX-8 Coolant Temperature Sensors Tribute Coolant Temperature Sensors